Blog
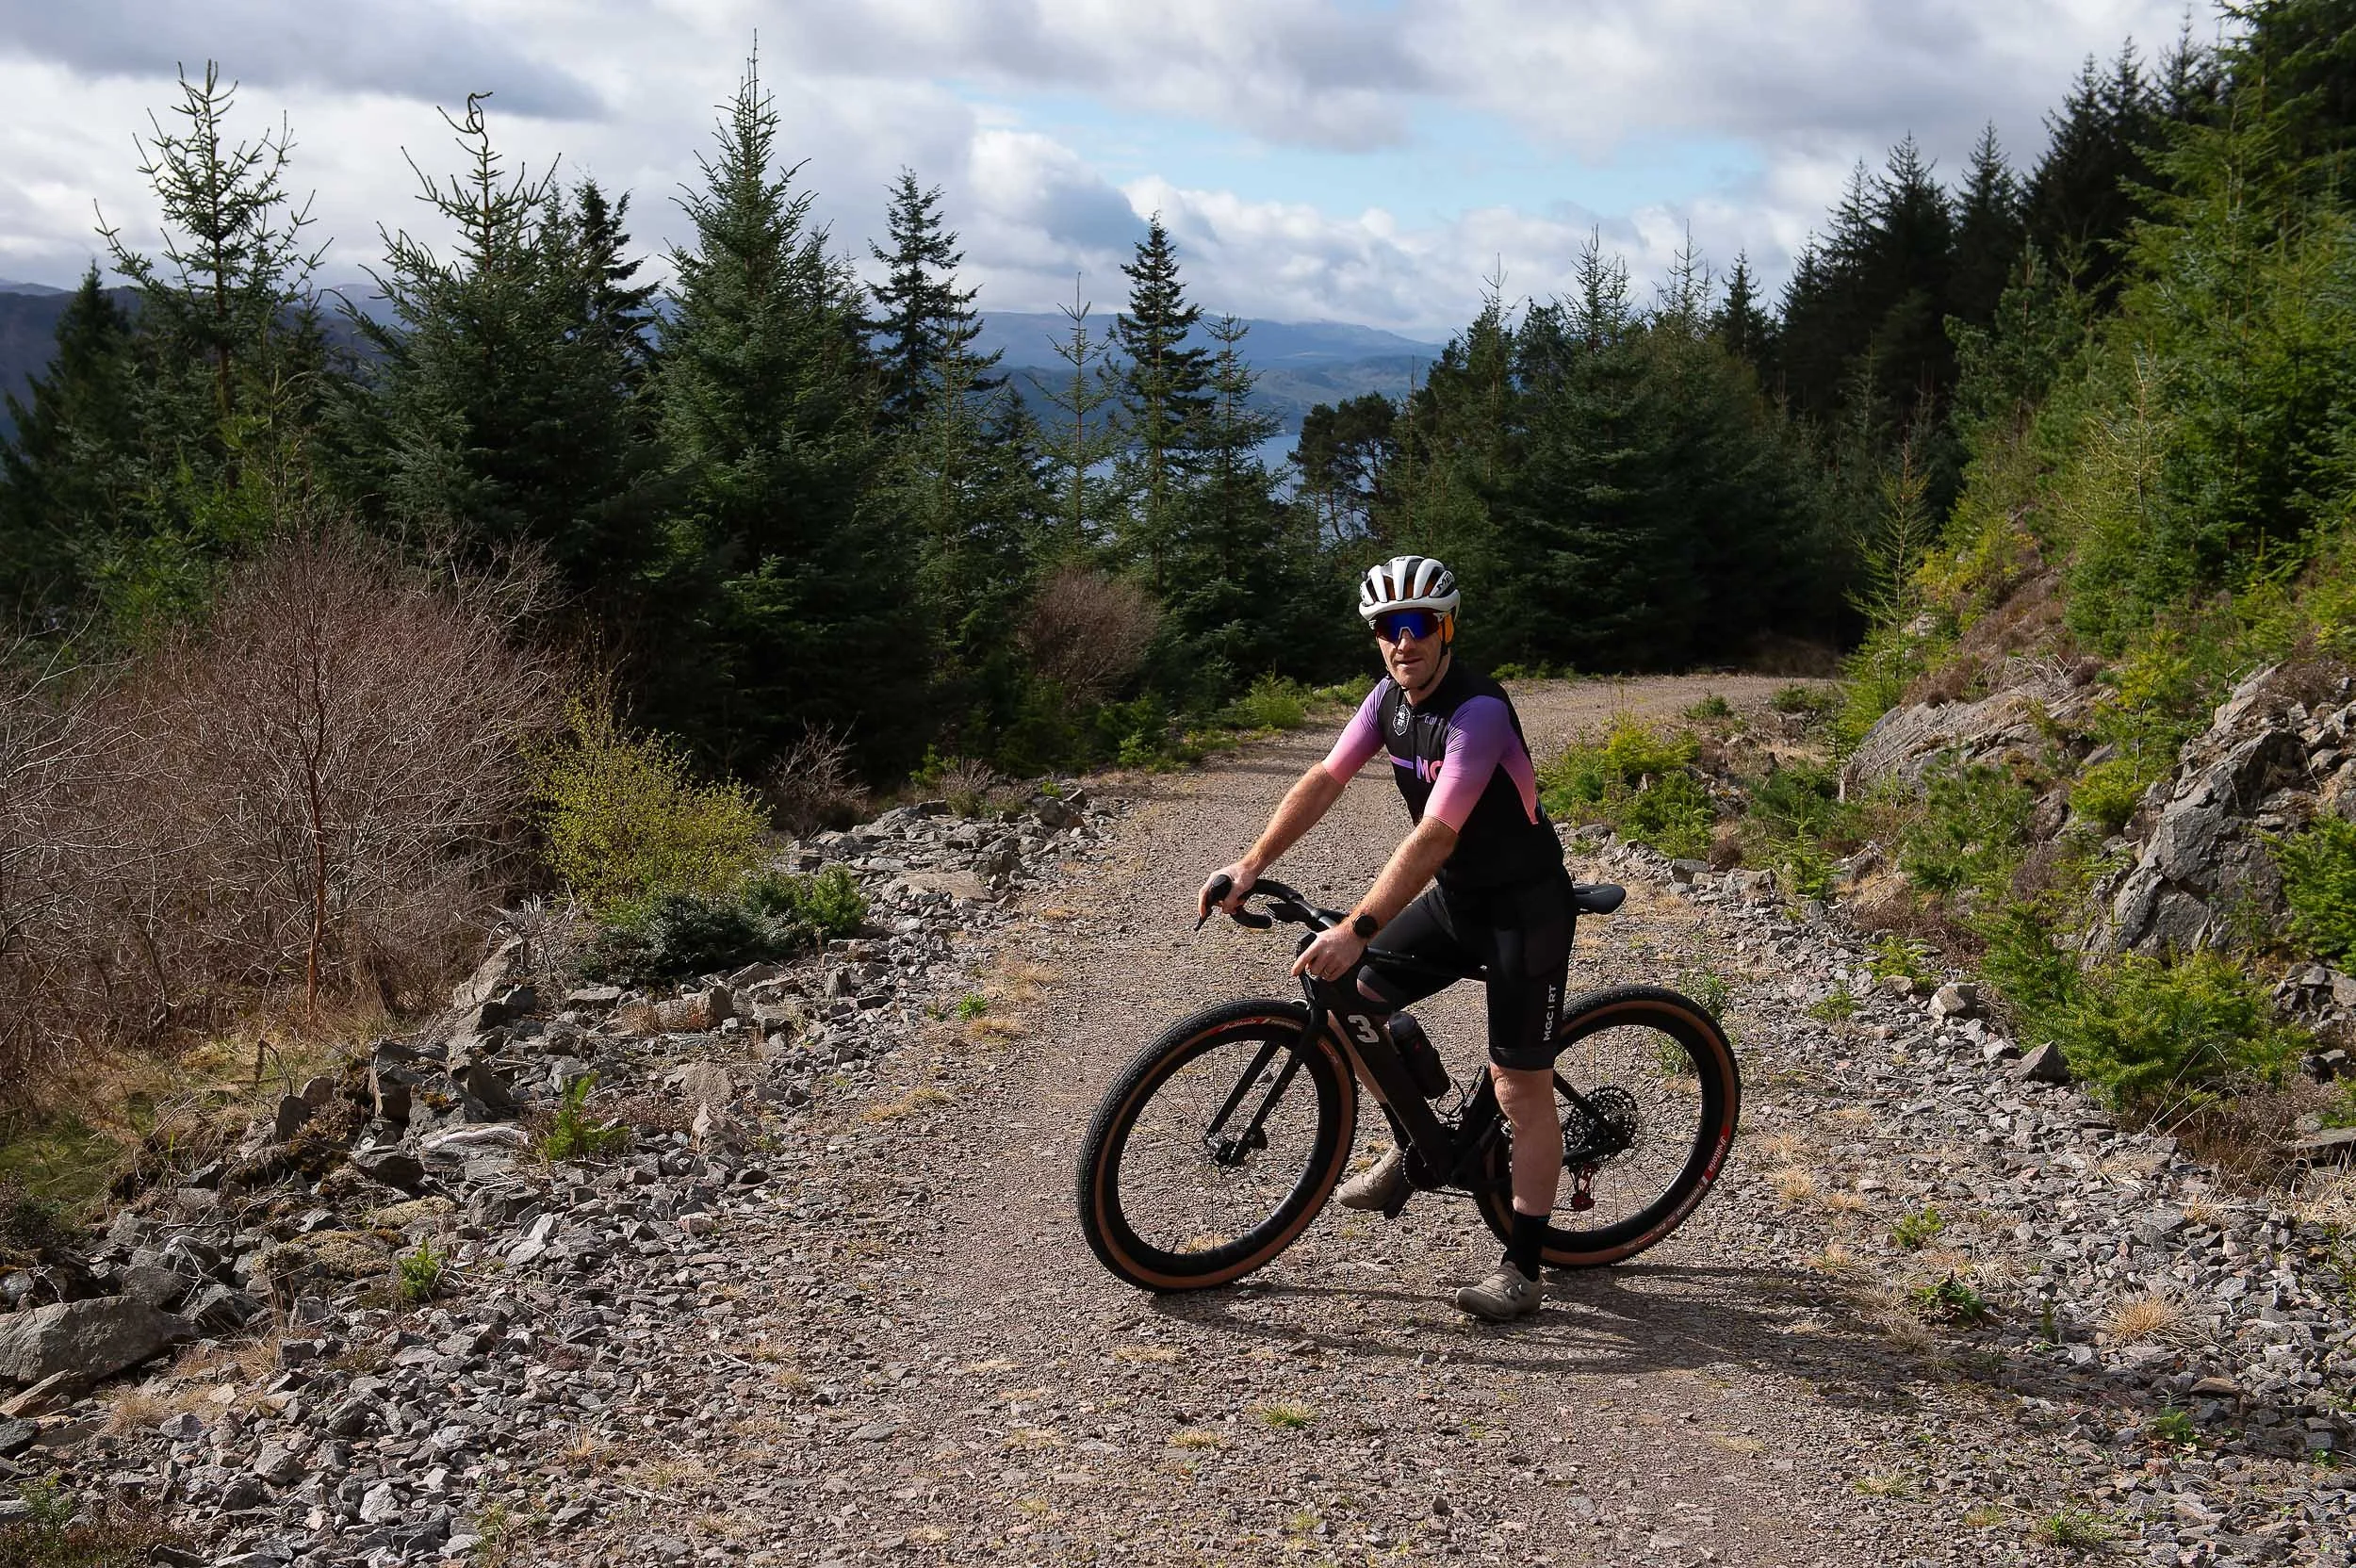
Donnie Campbell - 3T Extrema Italia
A gravel biking photo shoot with 3T brand ambassador Donnie Campbell
A gravel bike photo shoot with Donnie Campbell, a Scottish endurance athlete and off-road bikepacking racer in receipt of a top-of-the range carbon Extrema Italia gravel bike from Italian bike manufacturer 3T, which the brand say they’ve “designed for the harshest adventures and toughest races”. As a newly-appointed brand ambassador for 3T in 2026 and beyond, Donnie’s perfectly positioned to prove this statement for them, as he builds on the fitness and skills he’s applied to win the c.2000km GBDuro bikepacking stage race from Land’s End to John O’Groats in 2023, set fastest known times / FKTs between 2021 and 2025 on some of Scotland's premier long-distance cycling adventures (including An Turas Mor and Badger Divide) and in 2026 come second in the 600km Dales Divide, behind double Olympian Alistair Brownlee.
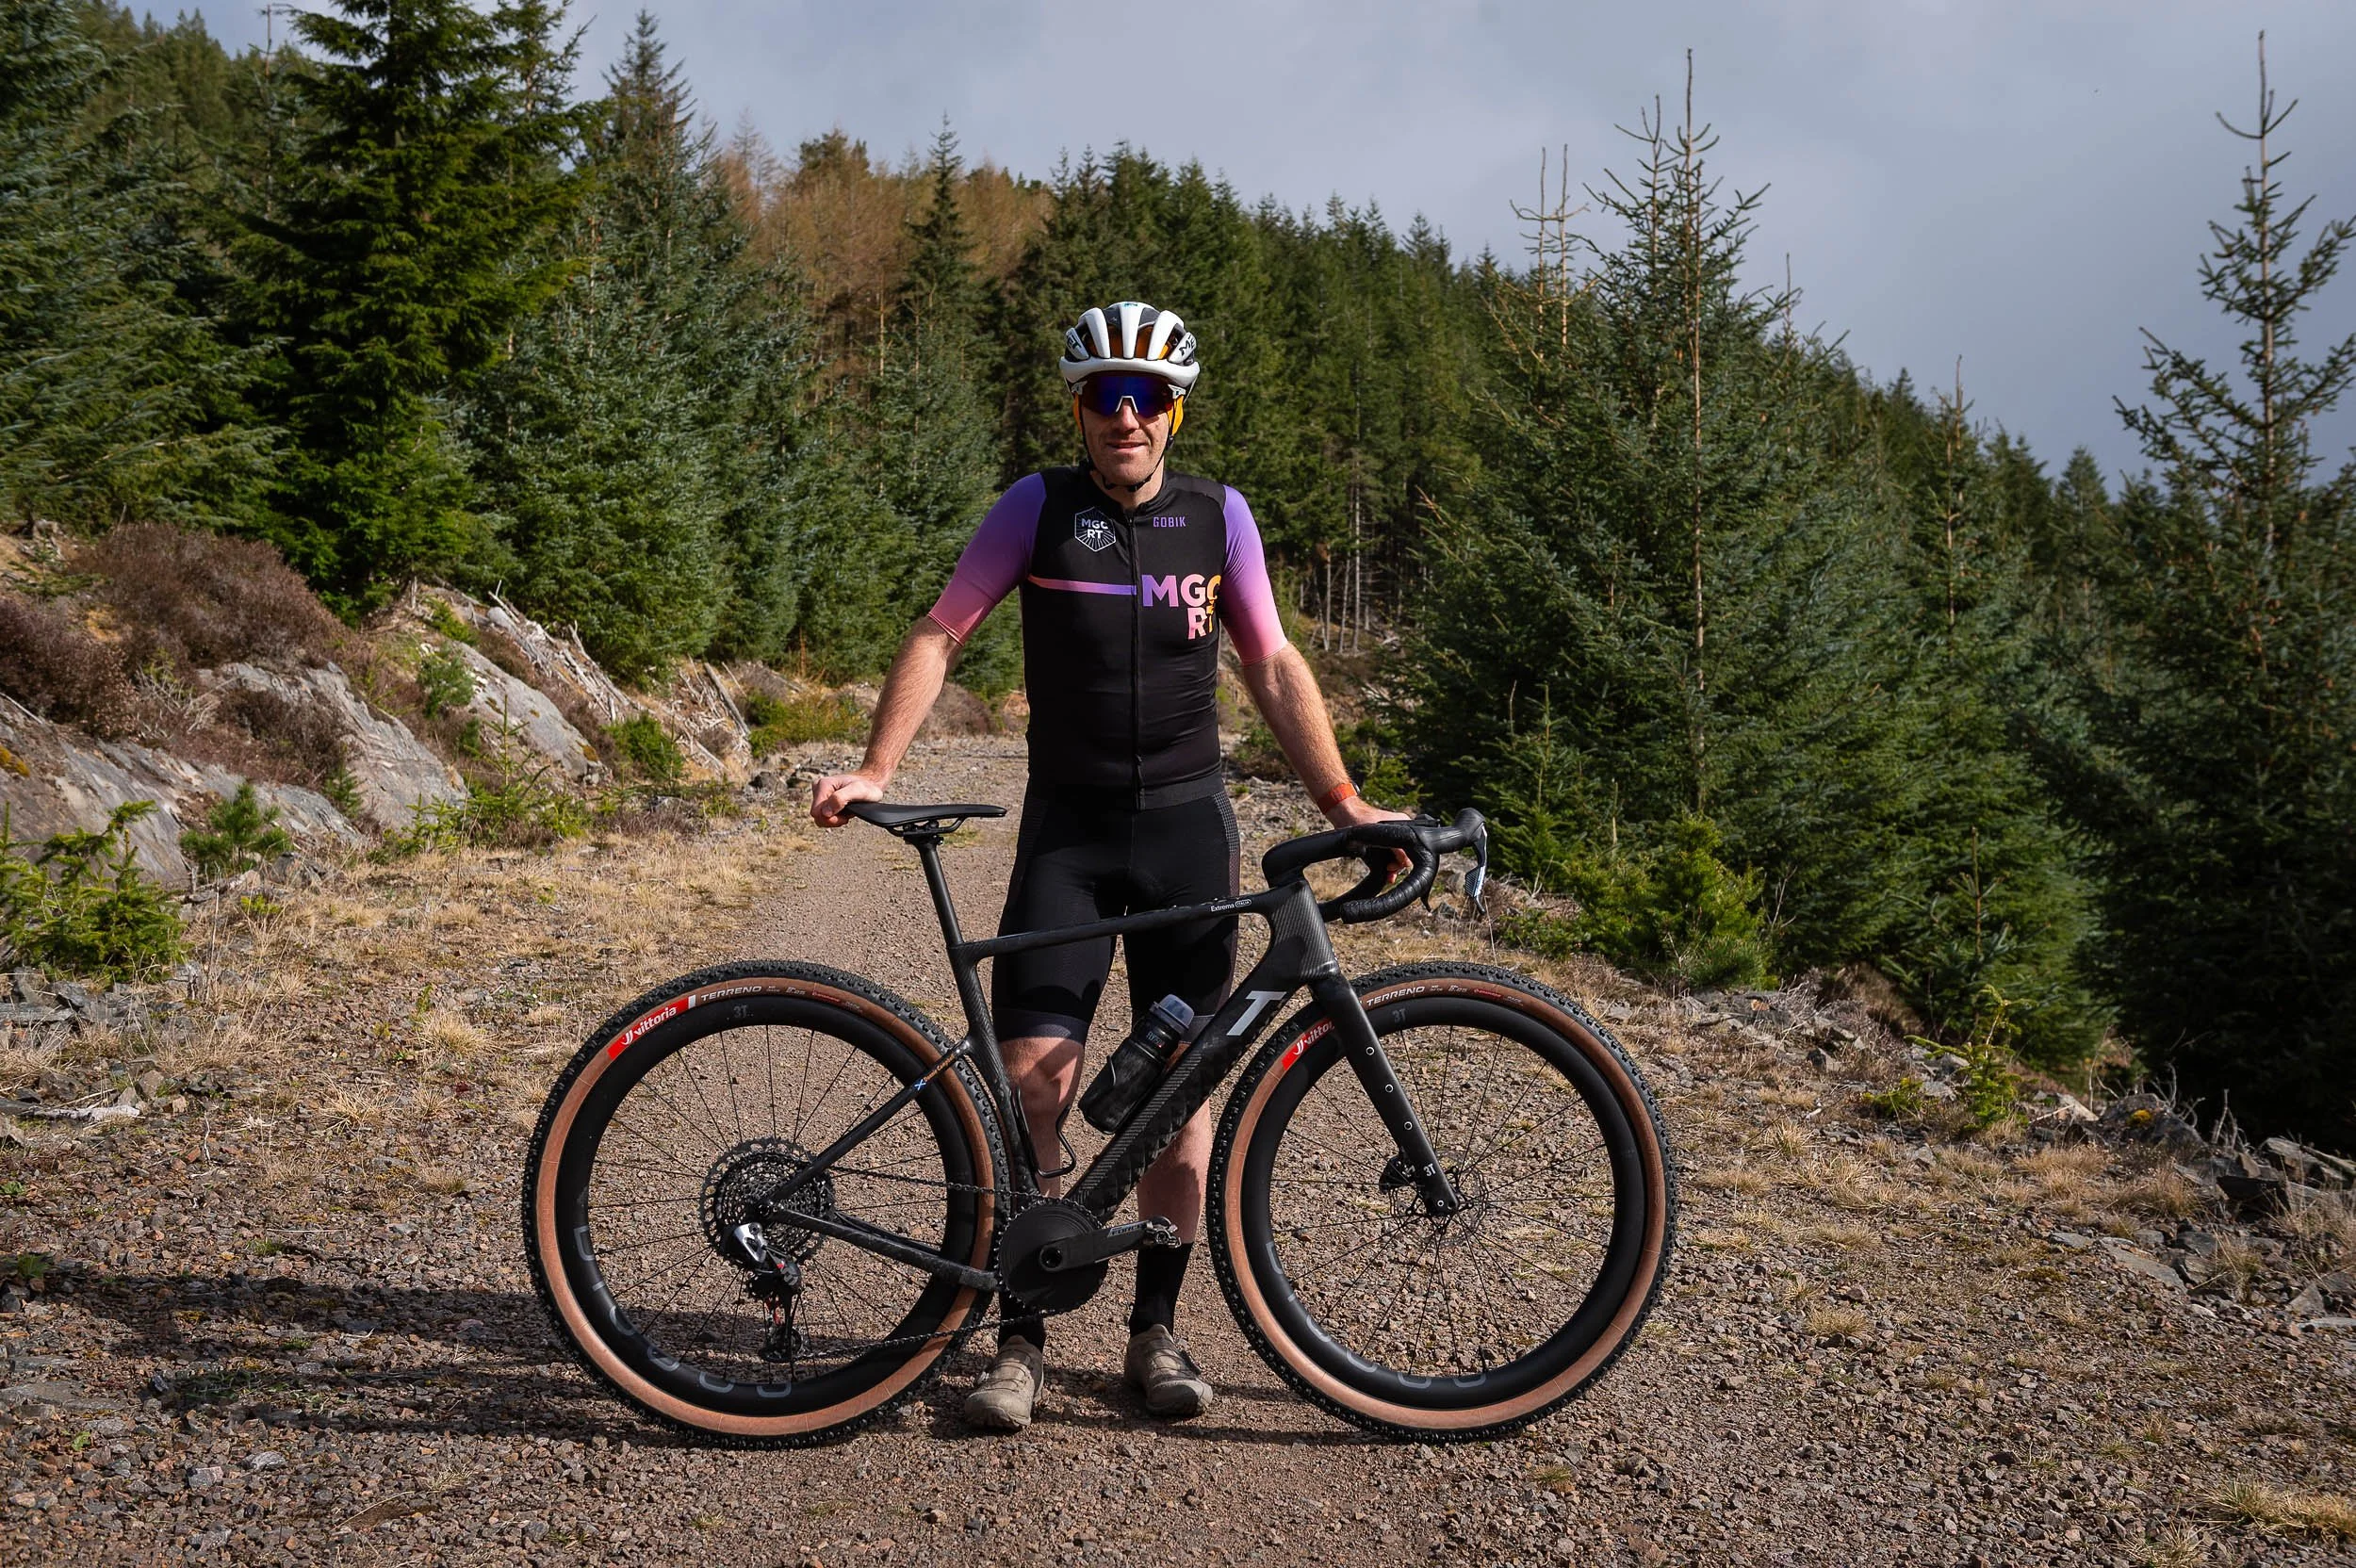
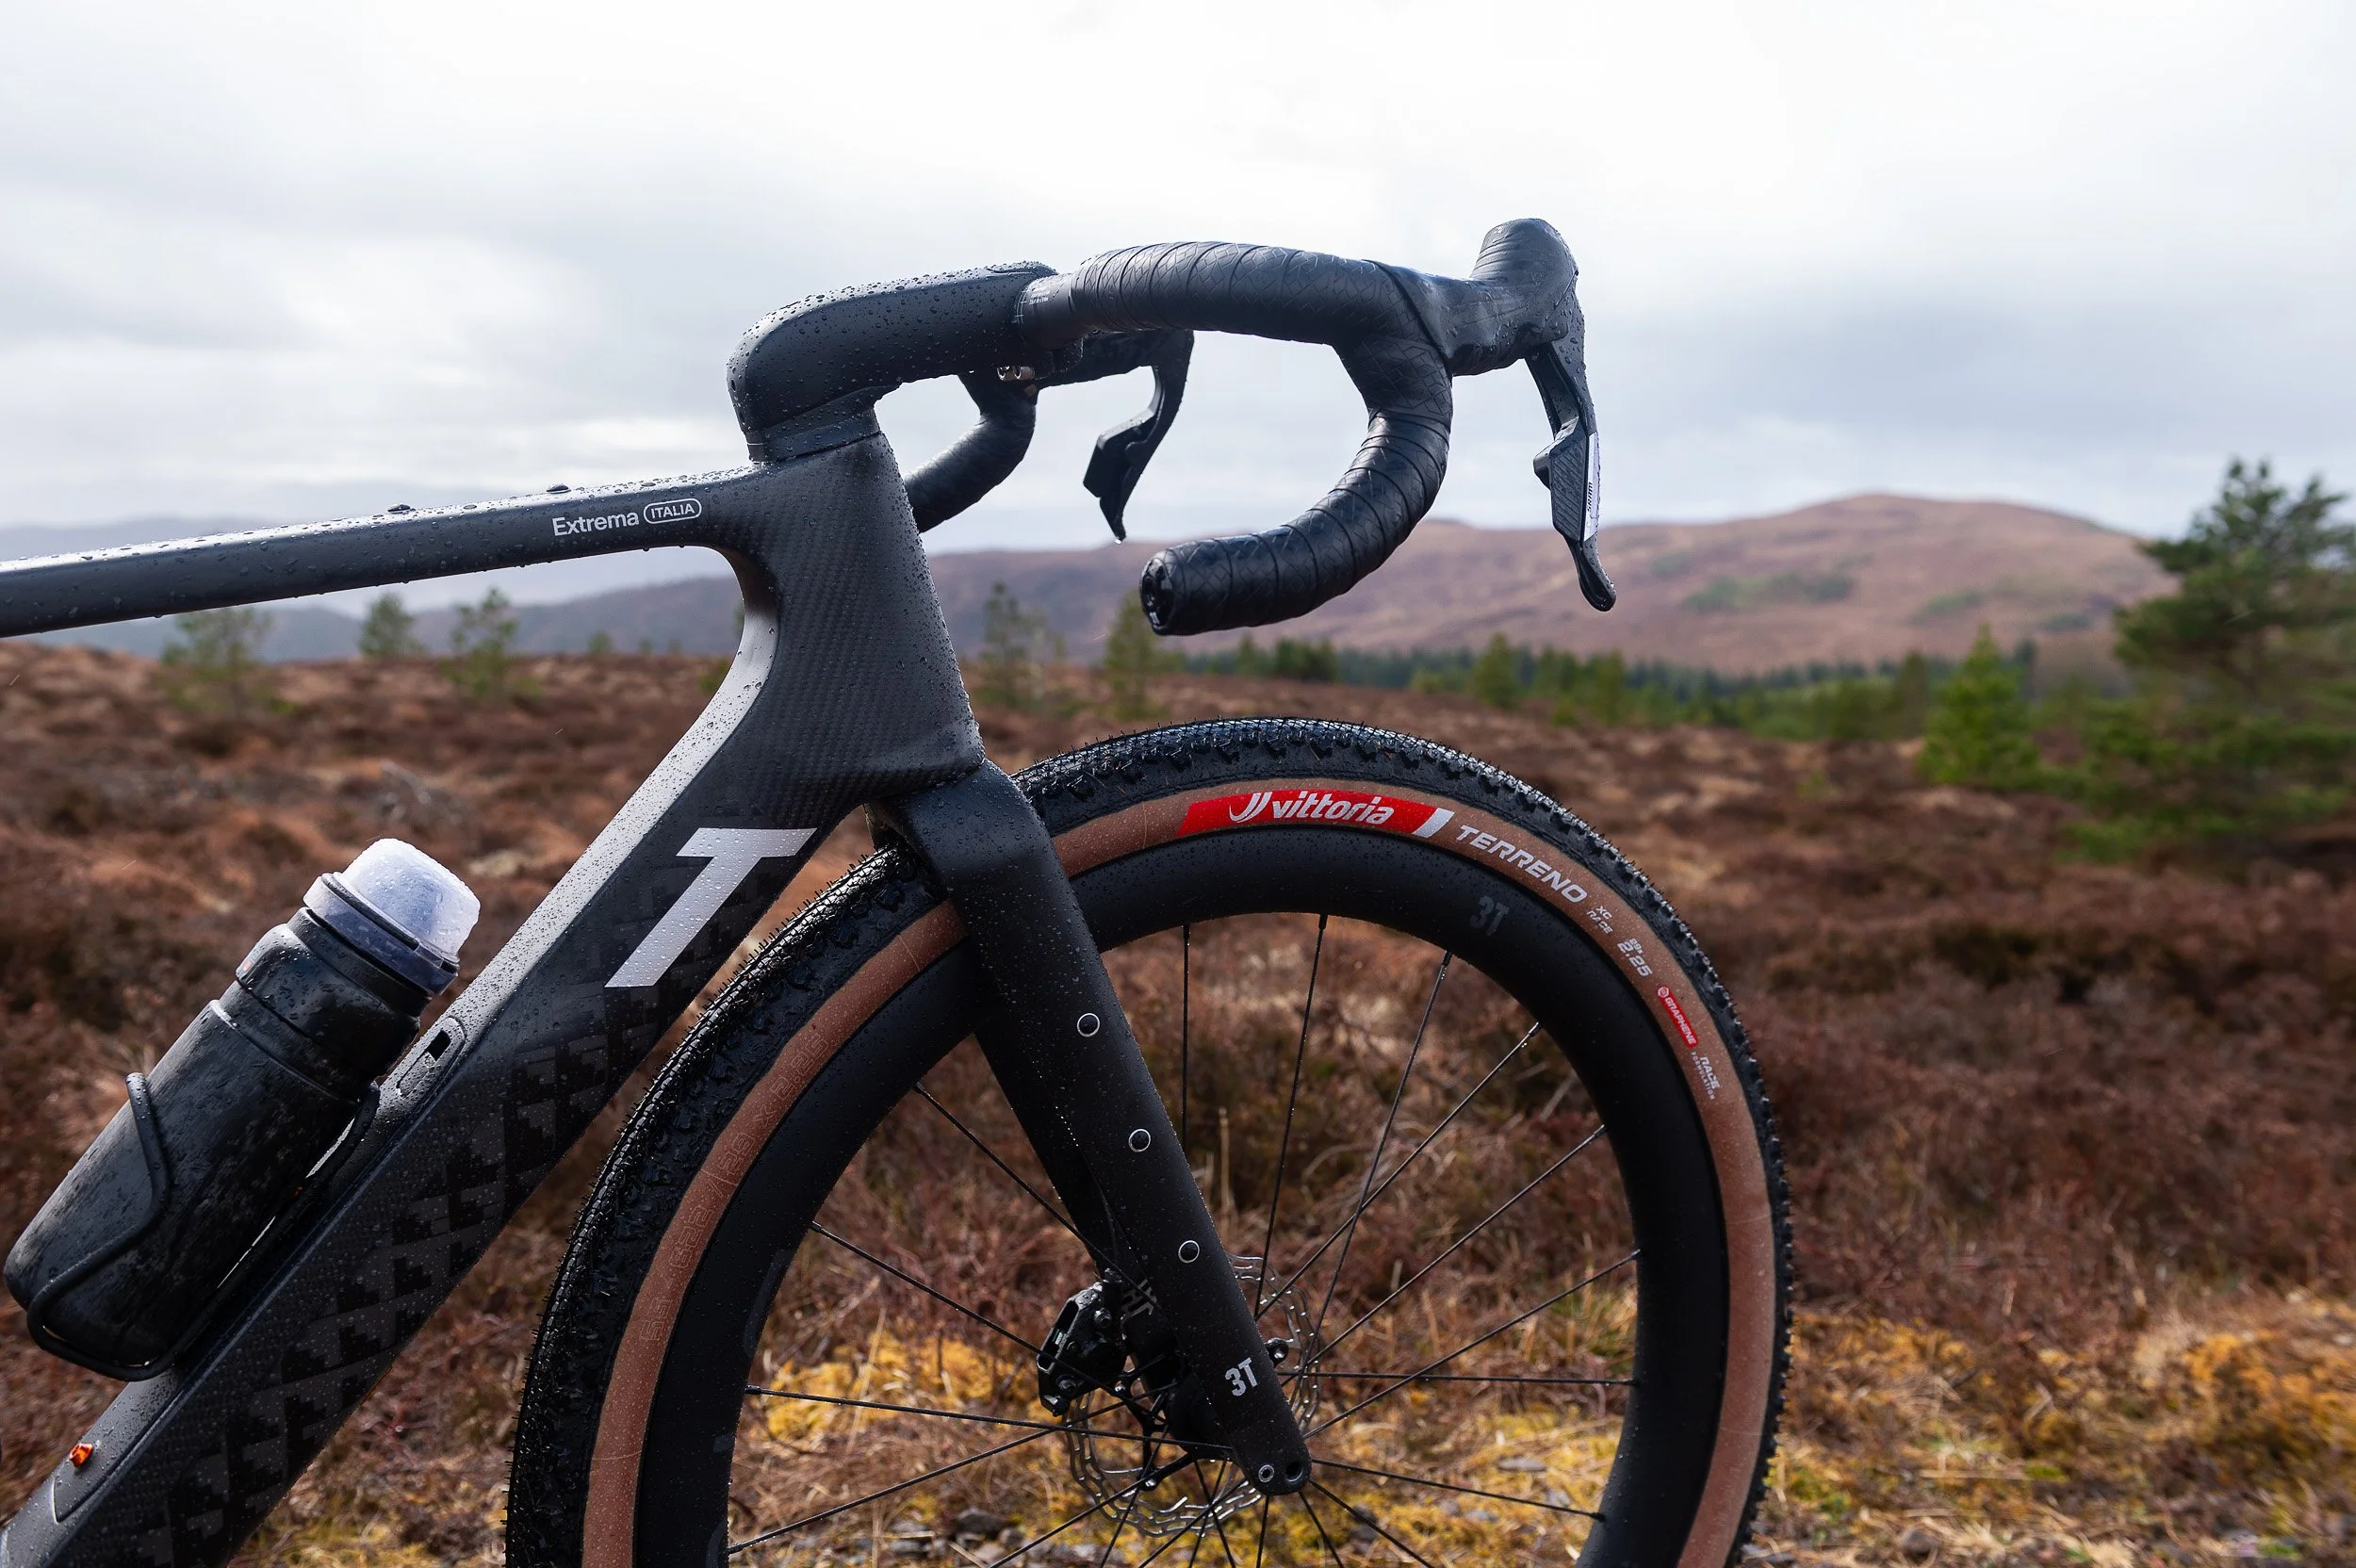
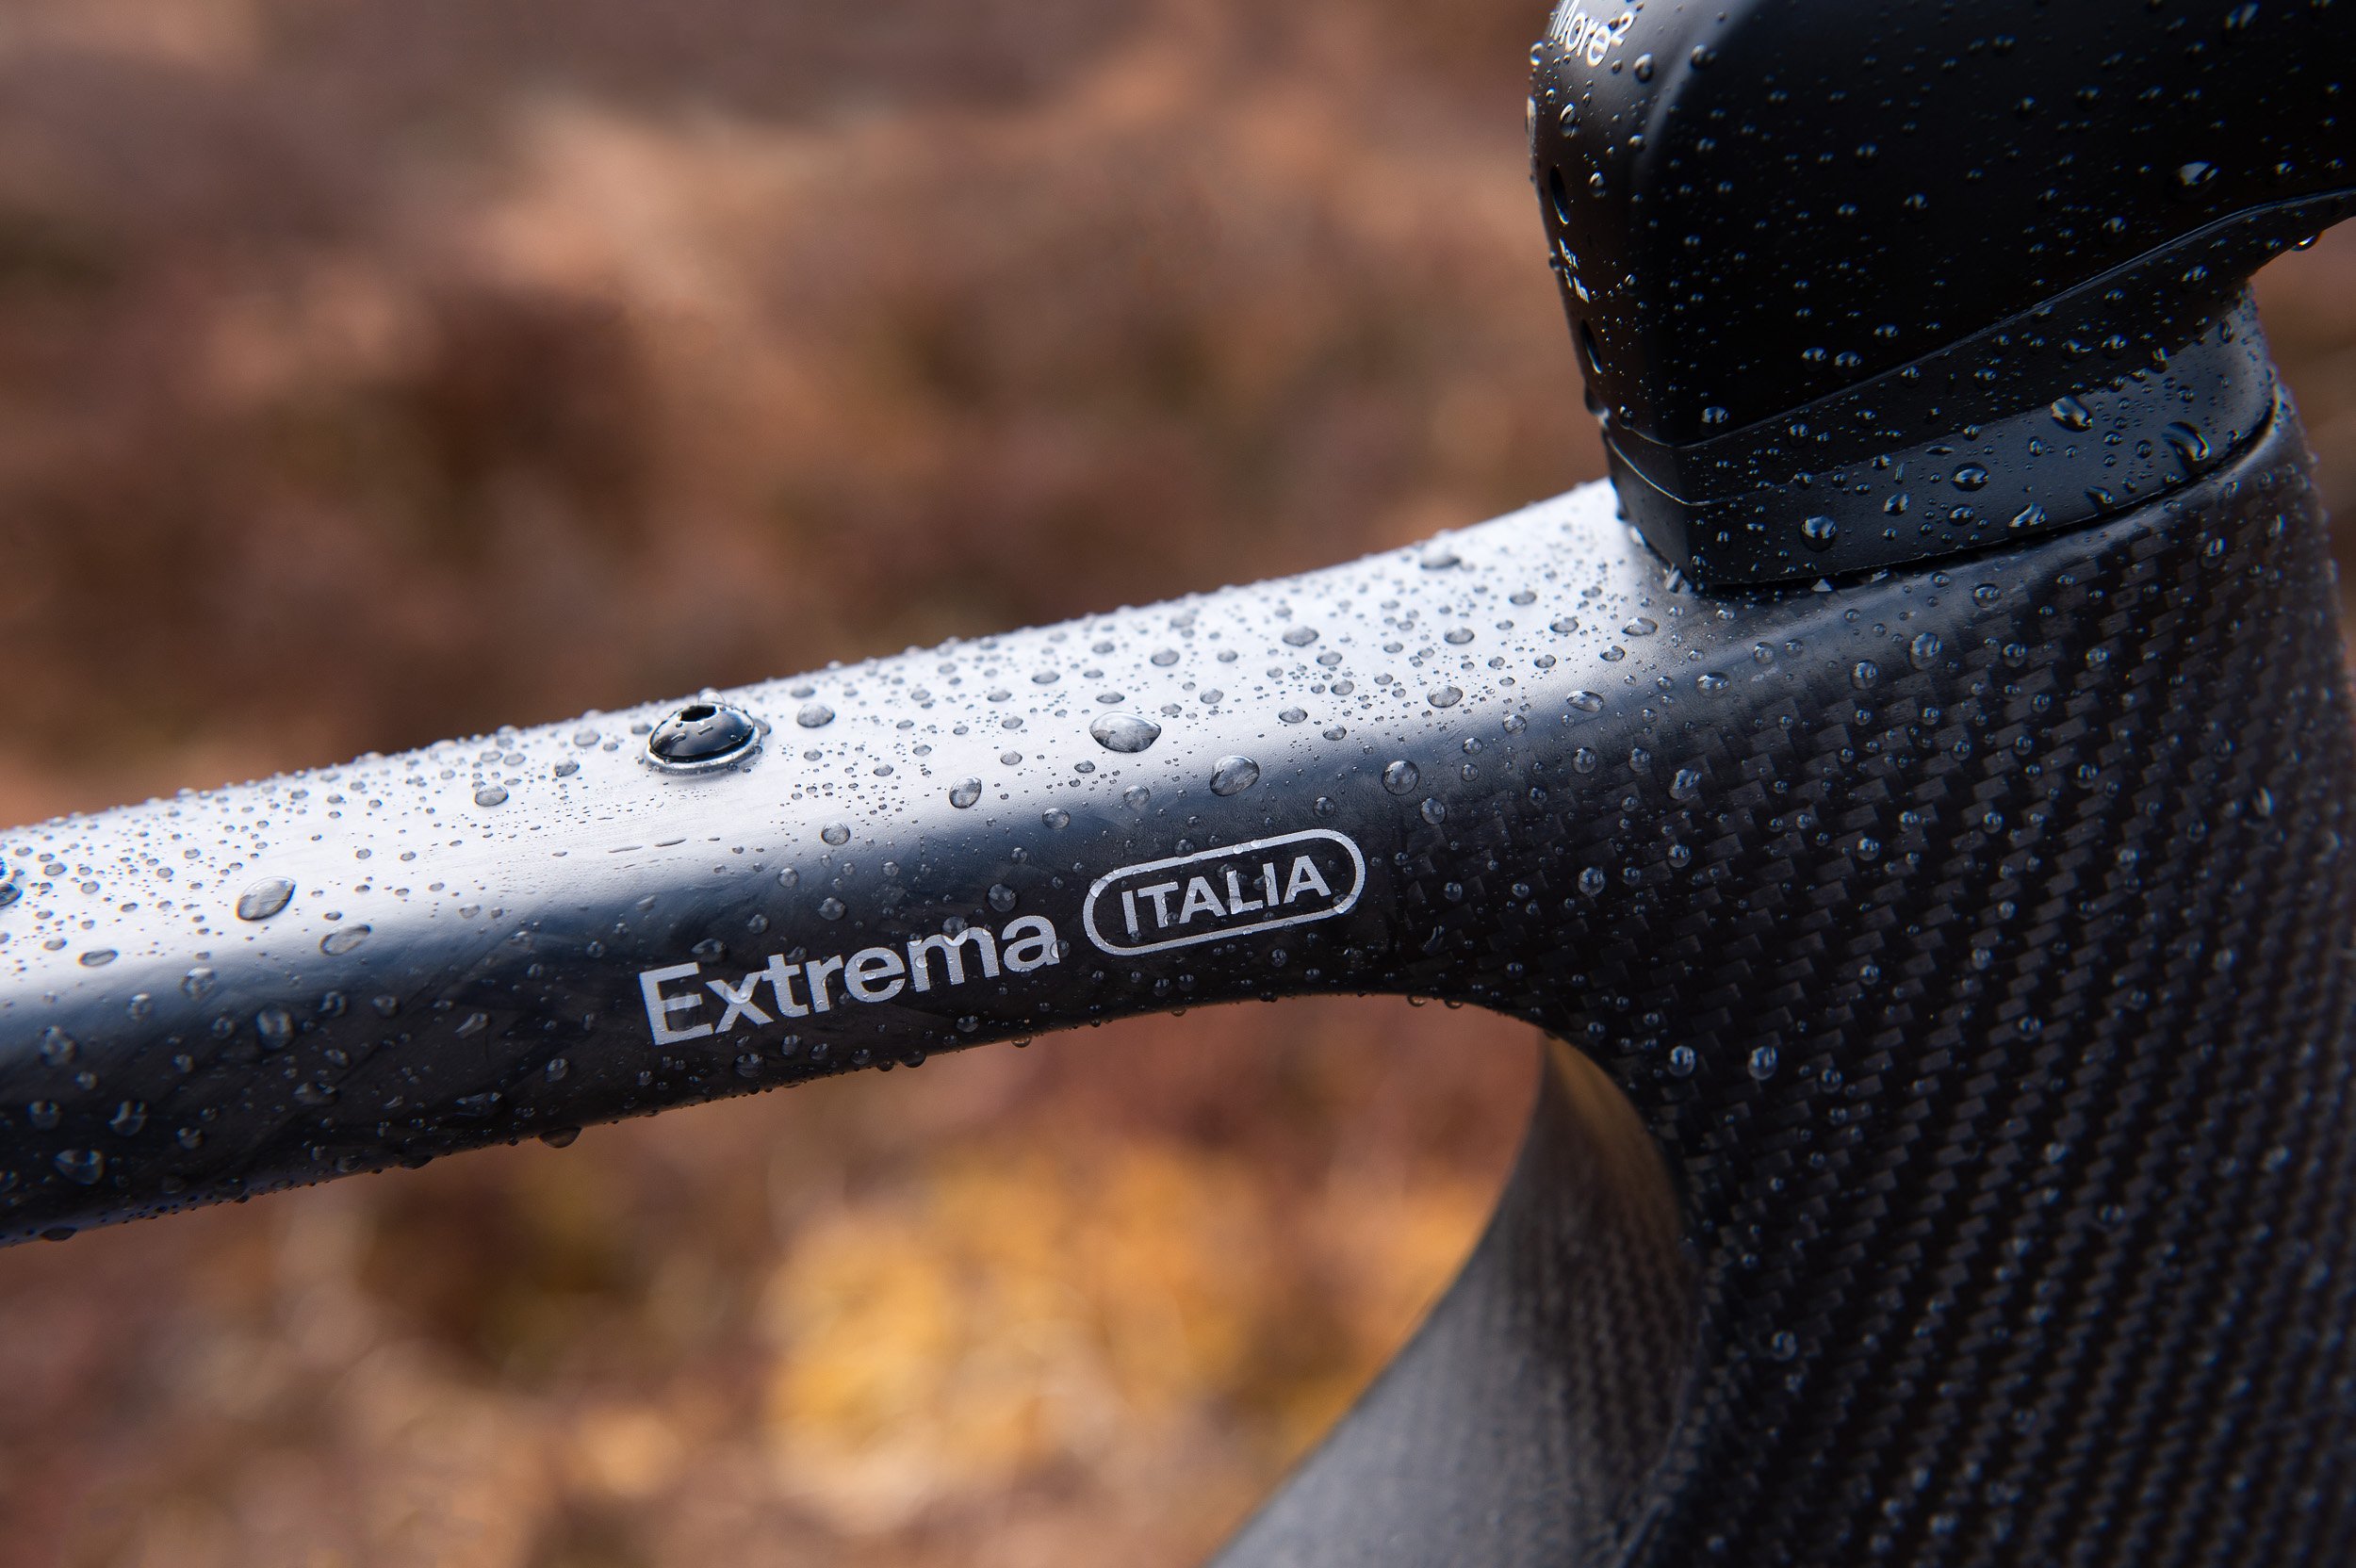
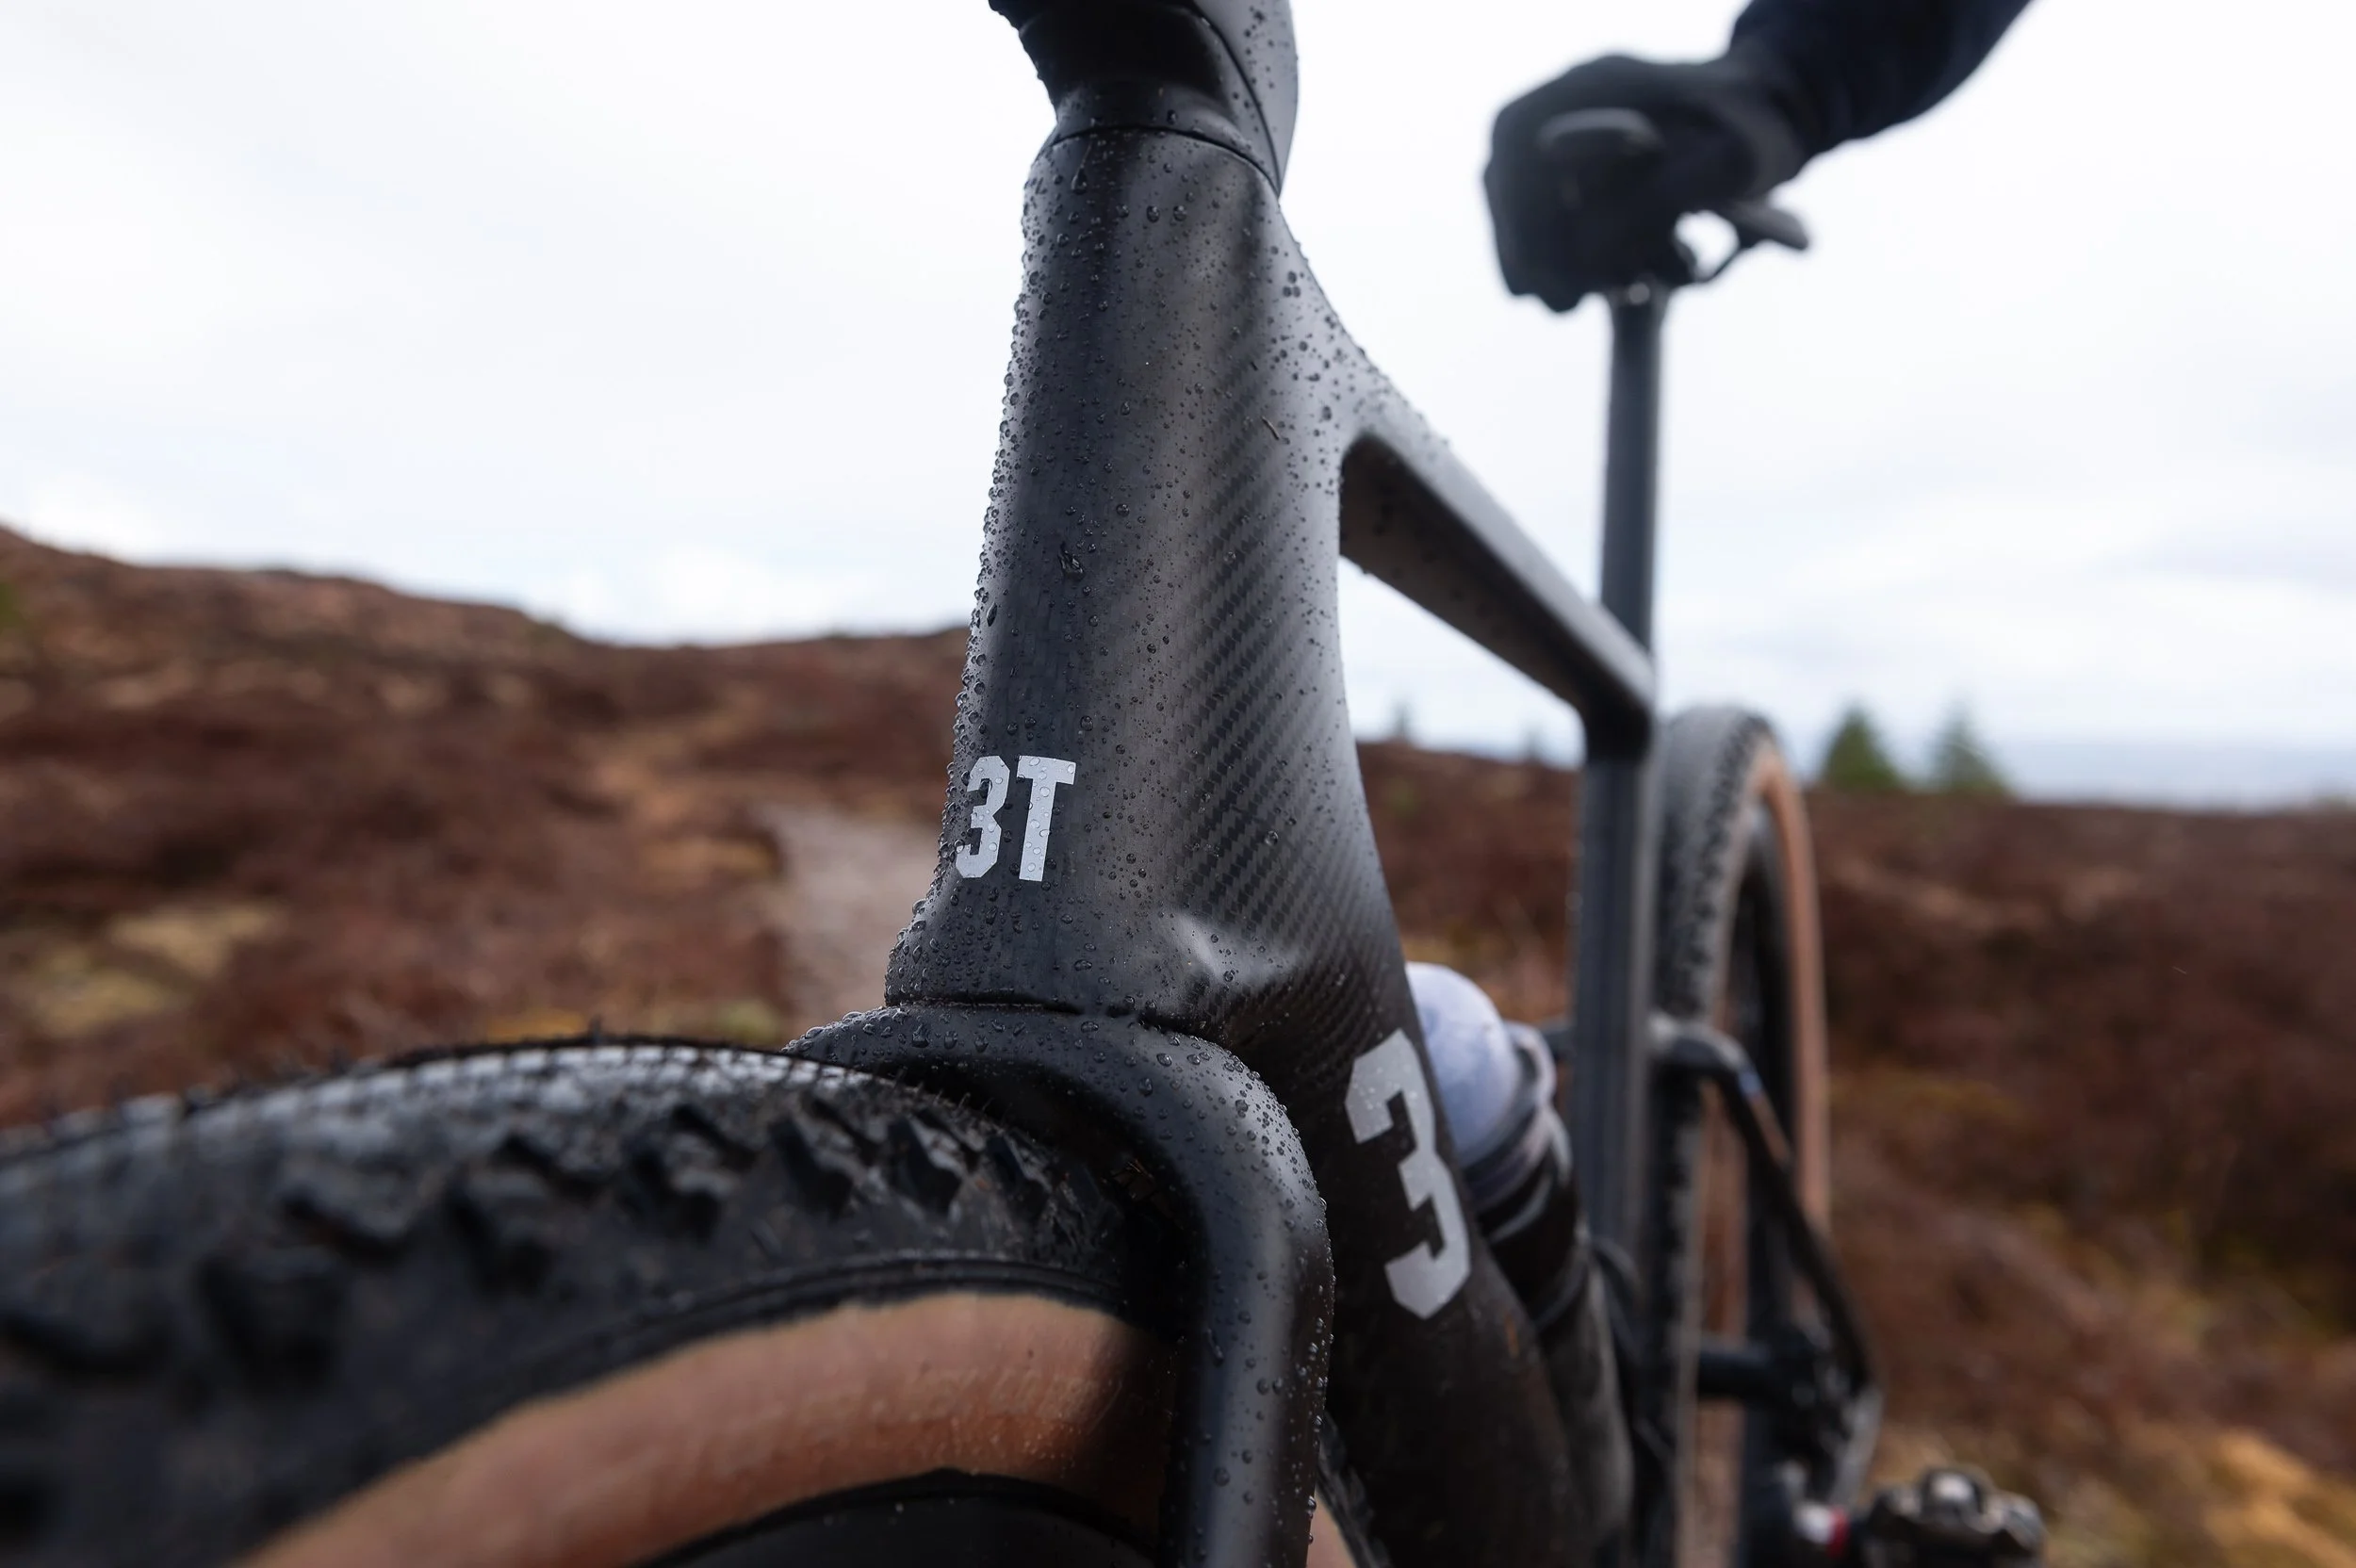
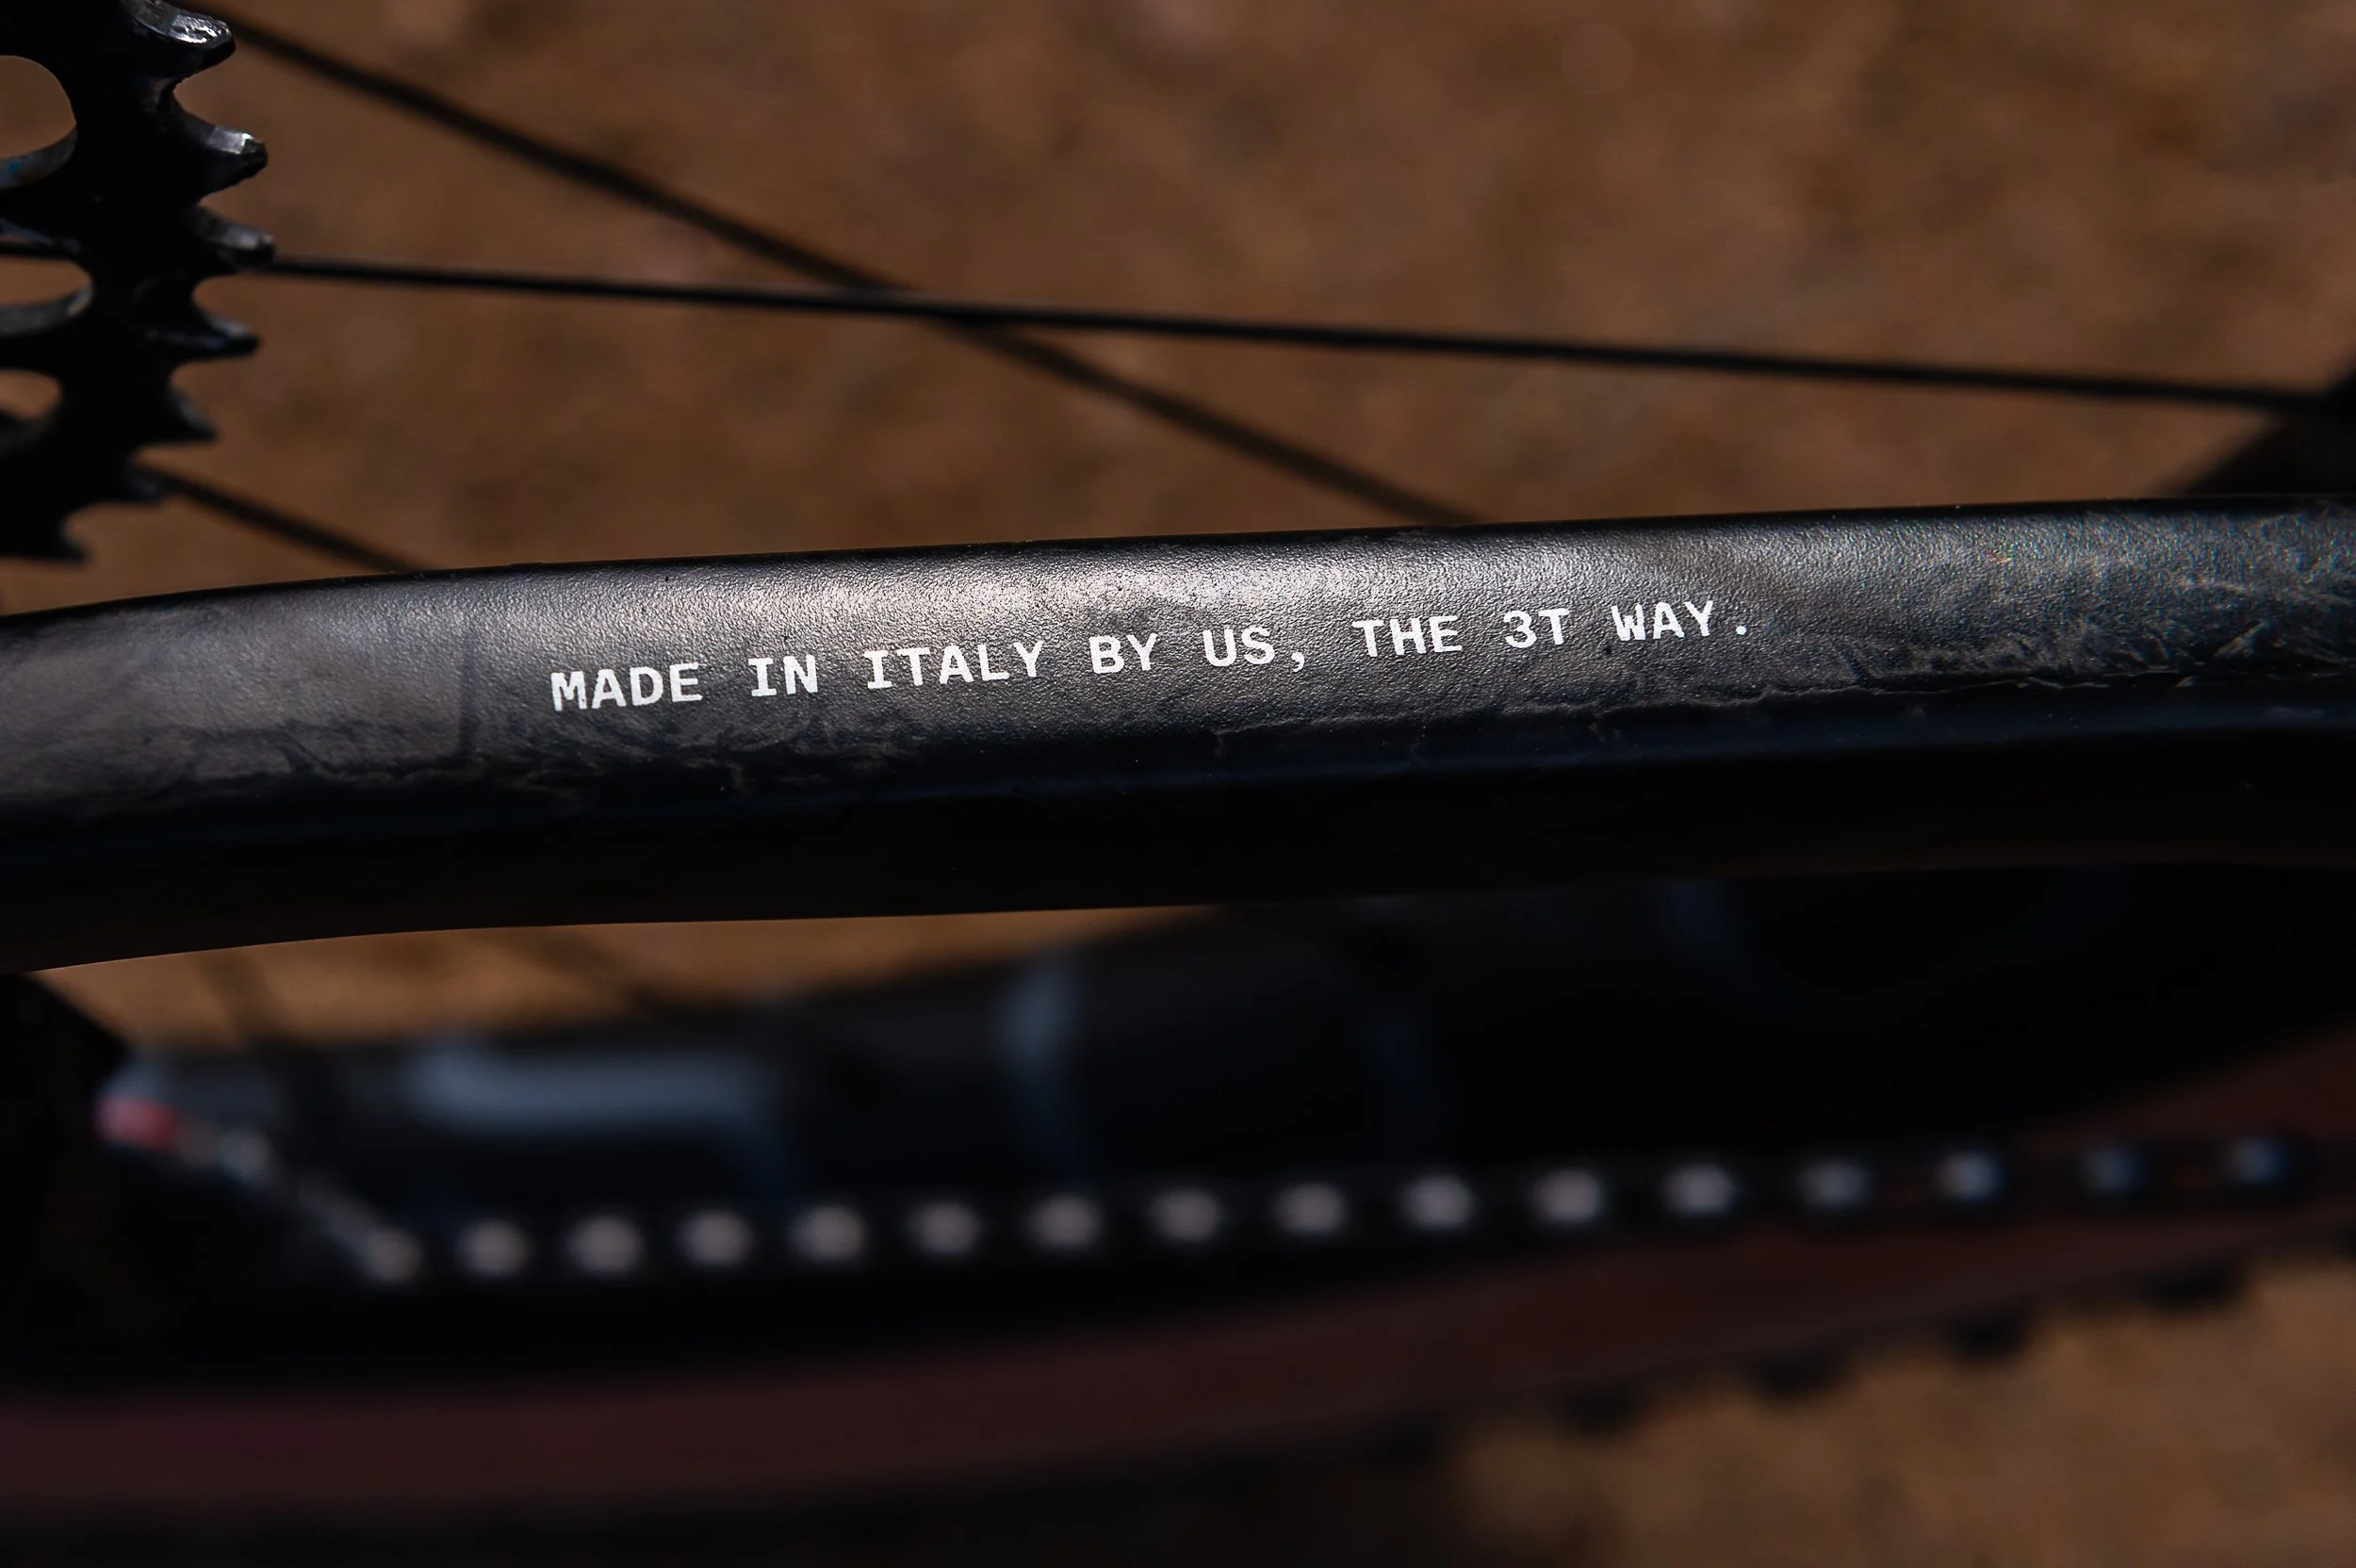
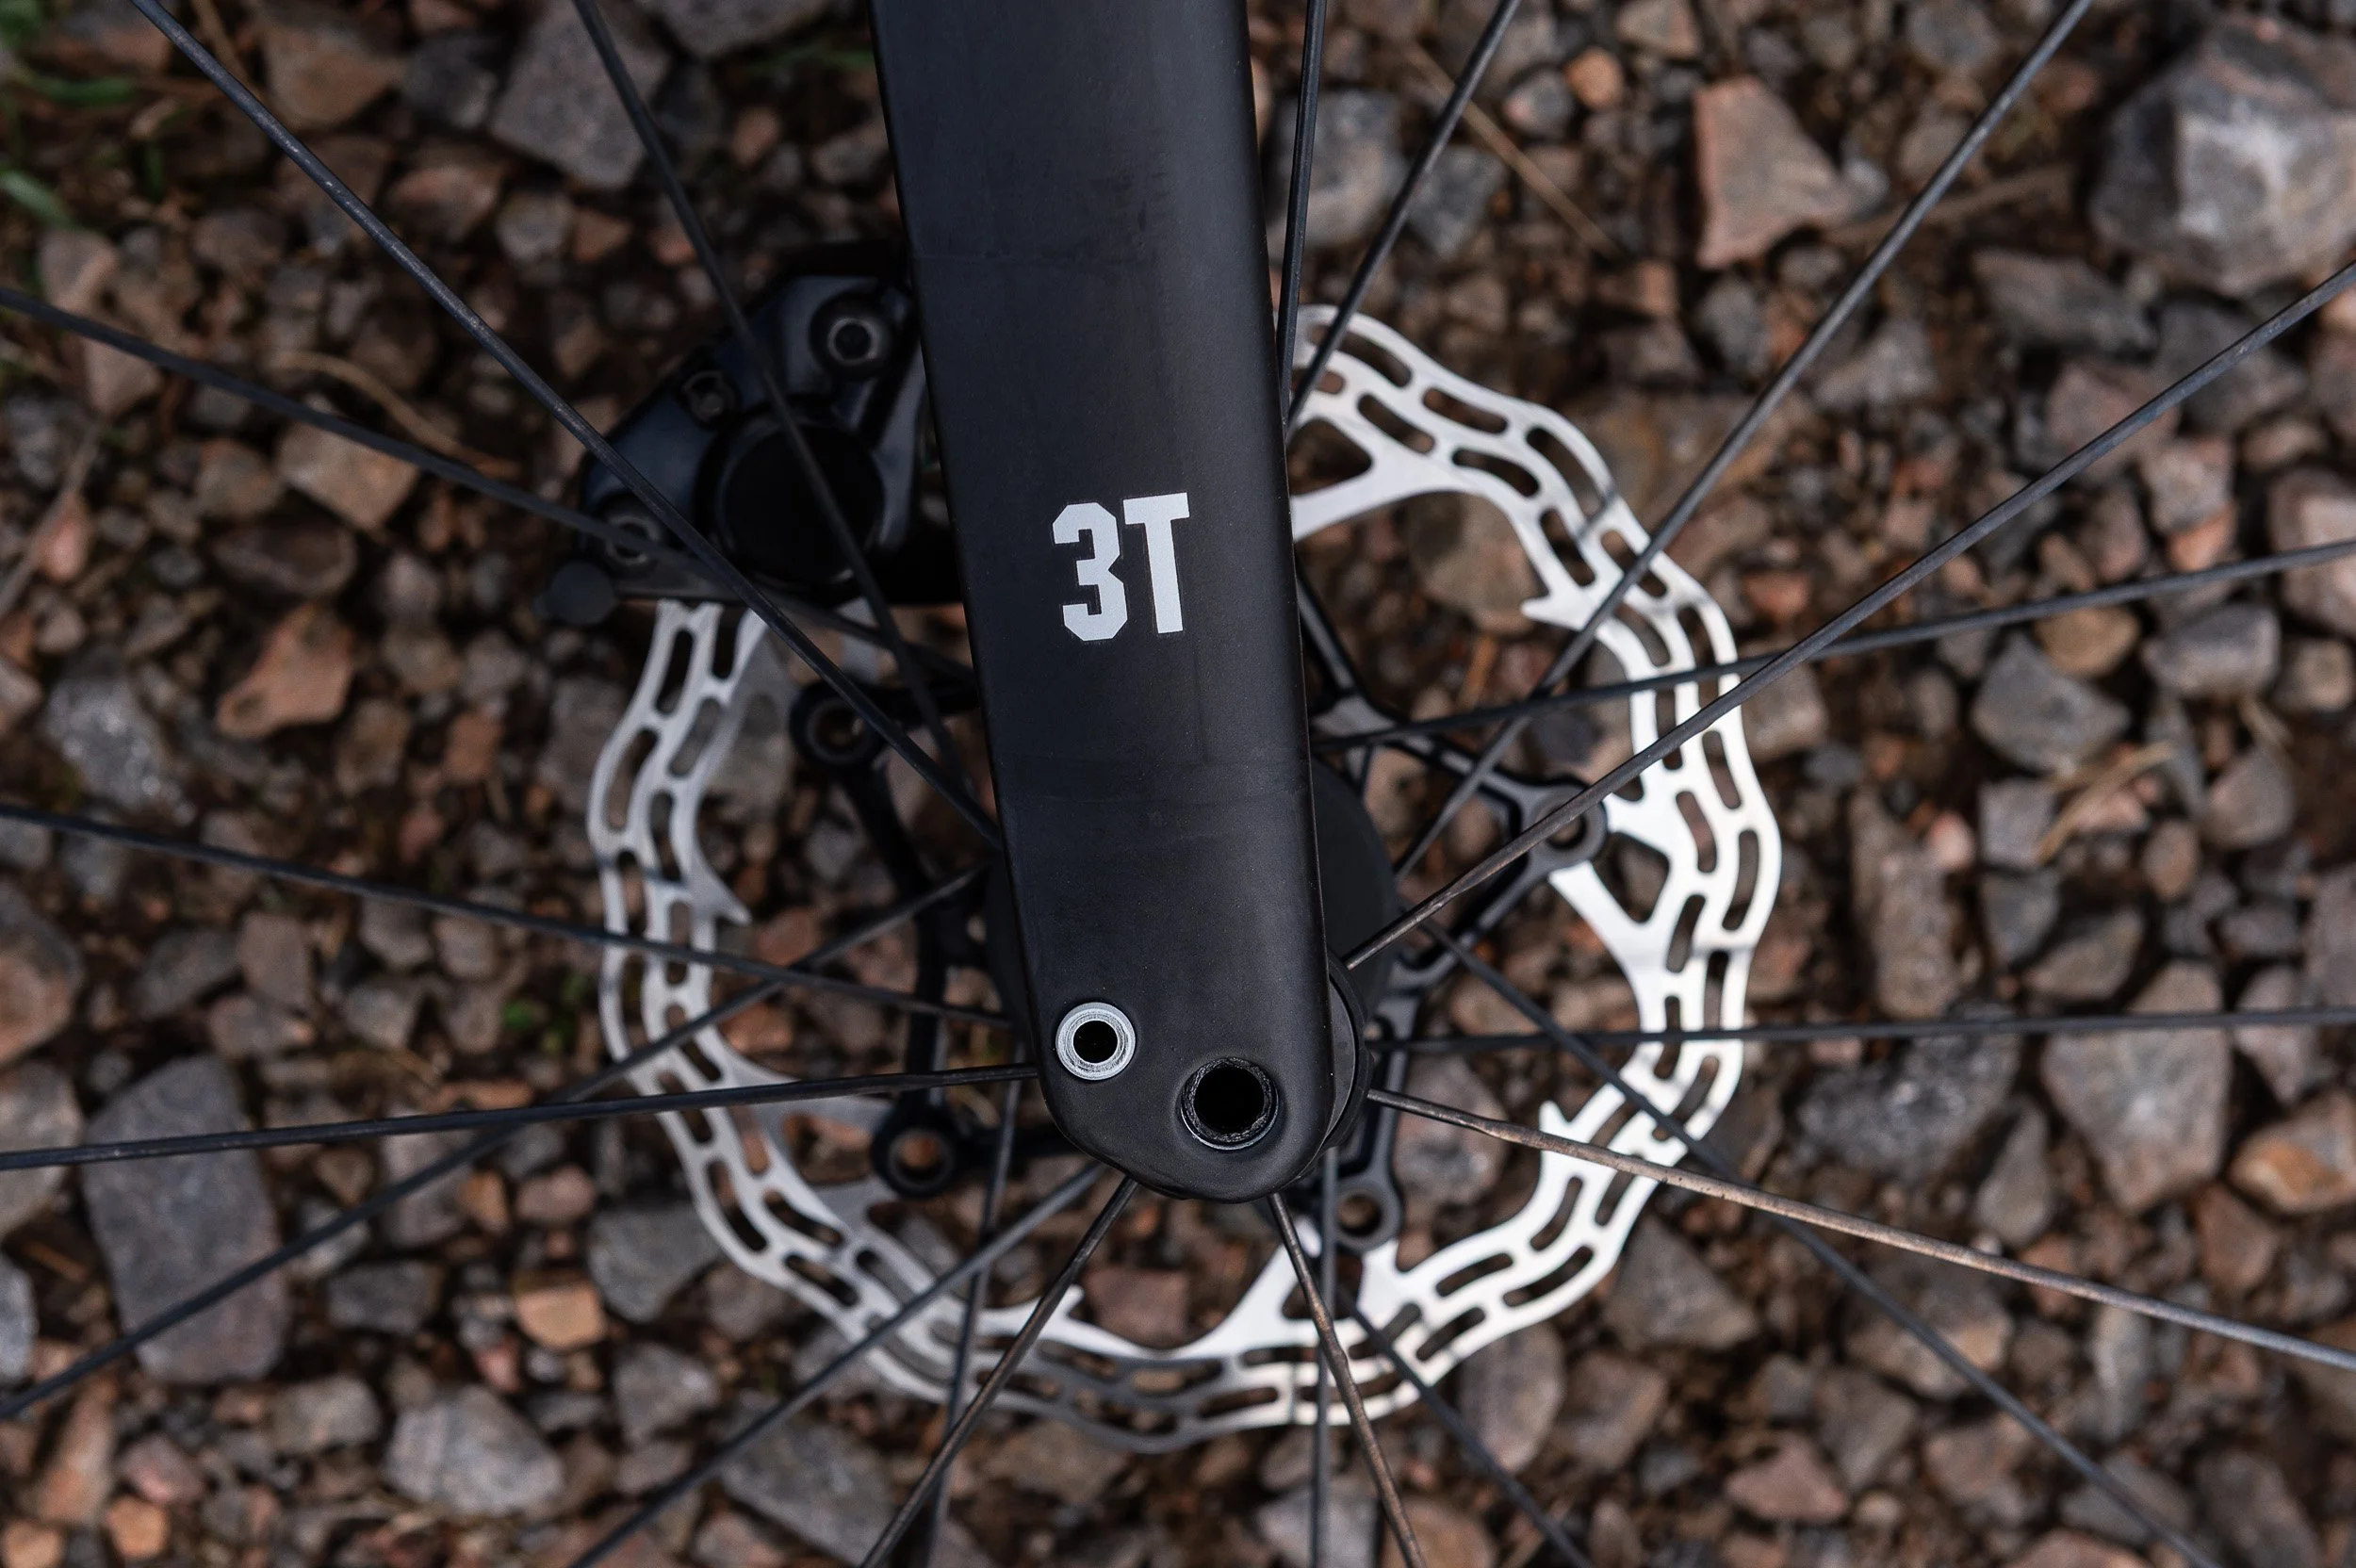
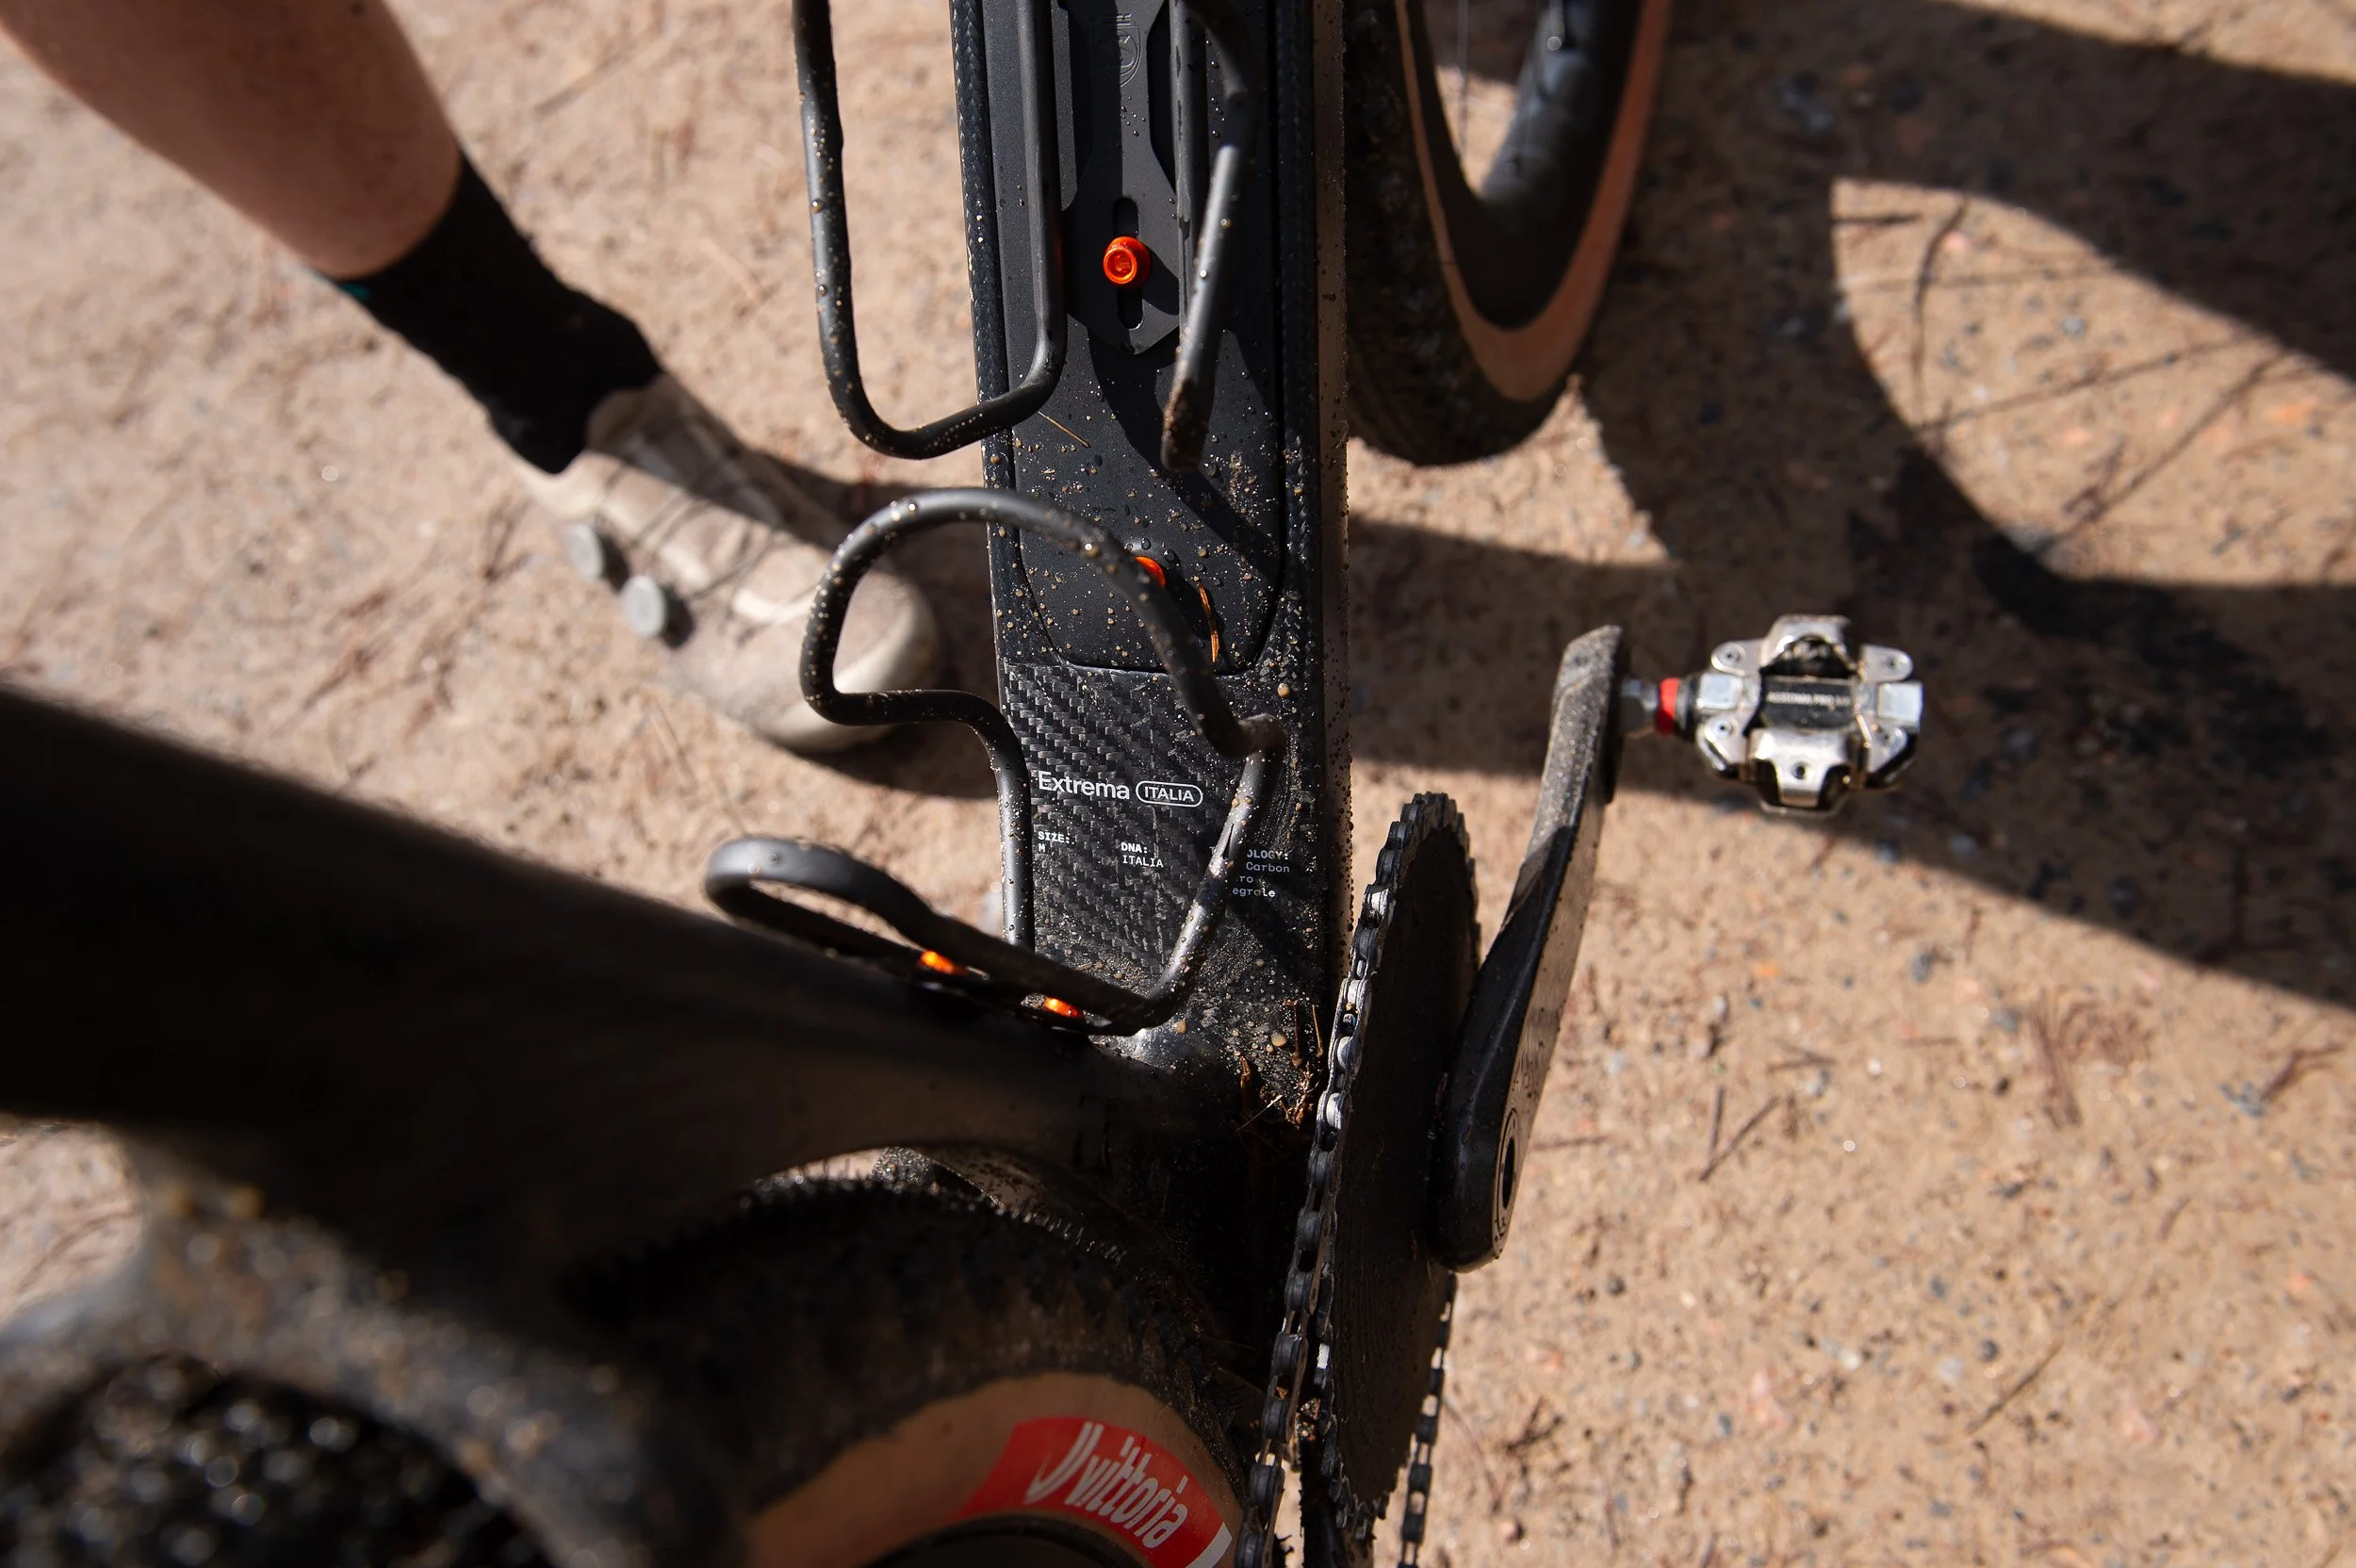

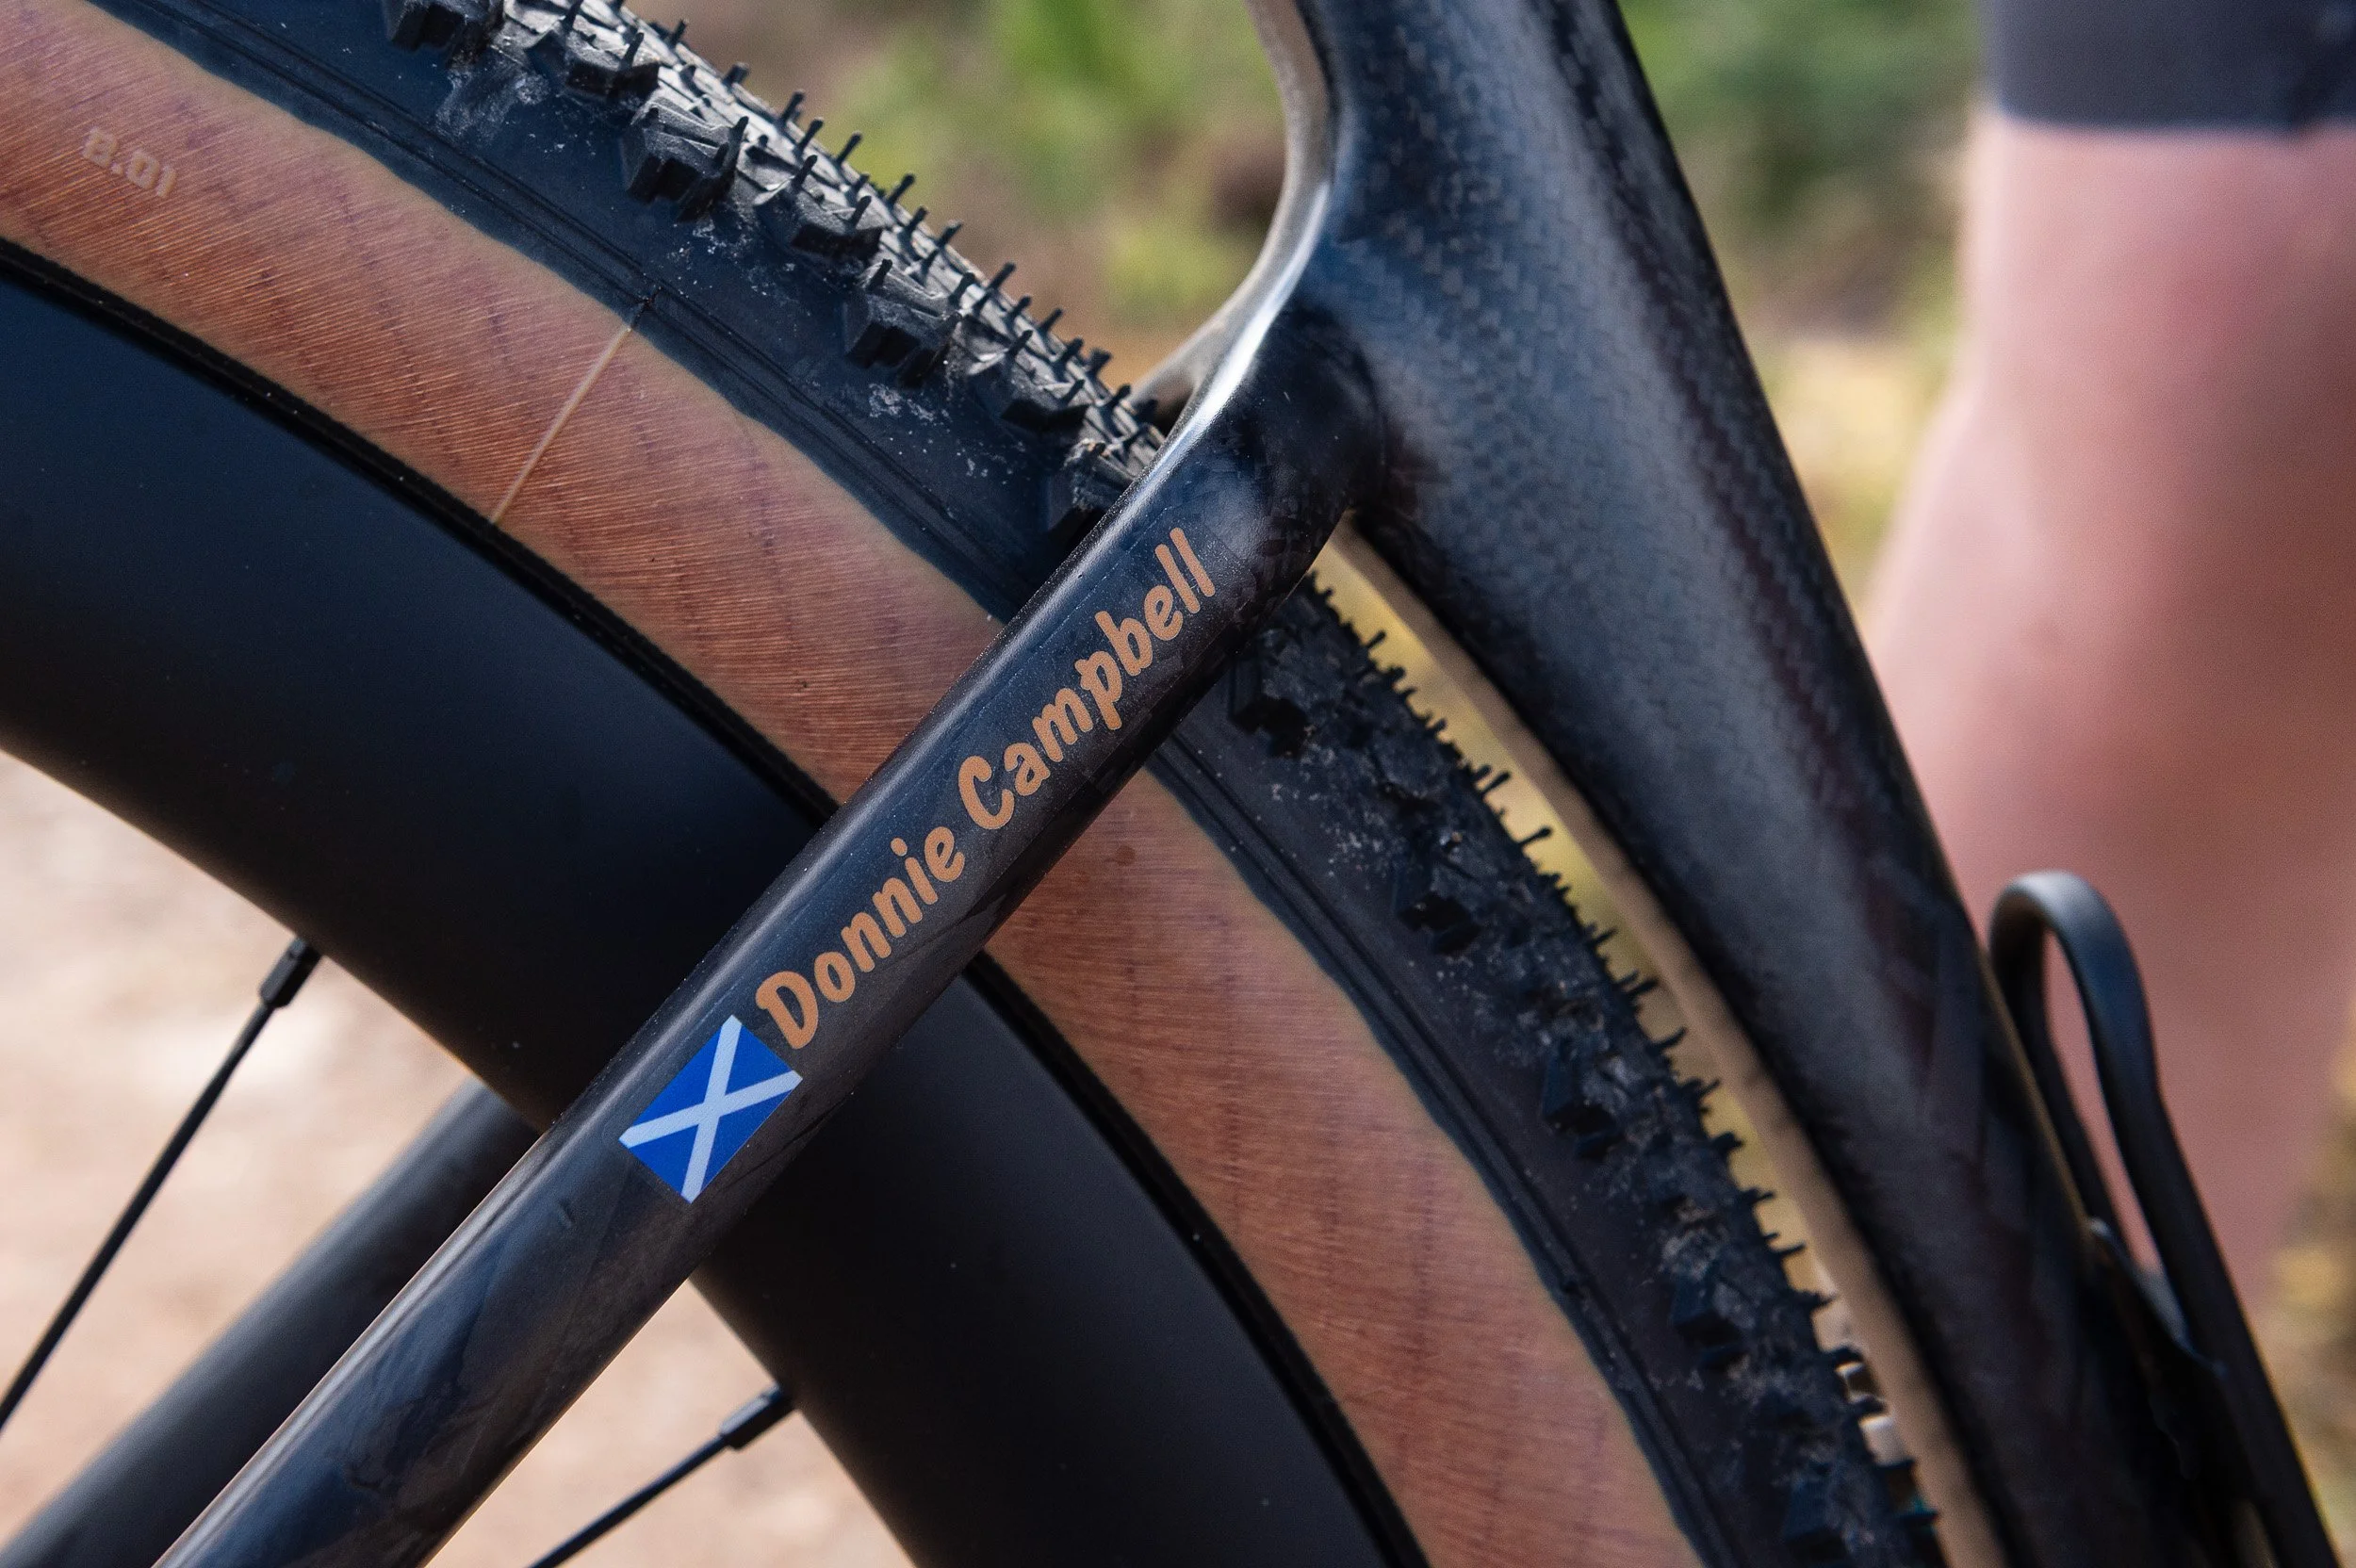

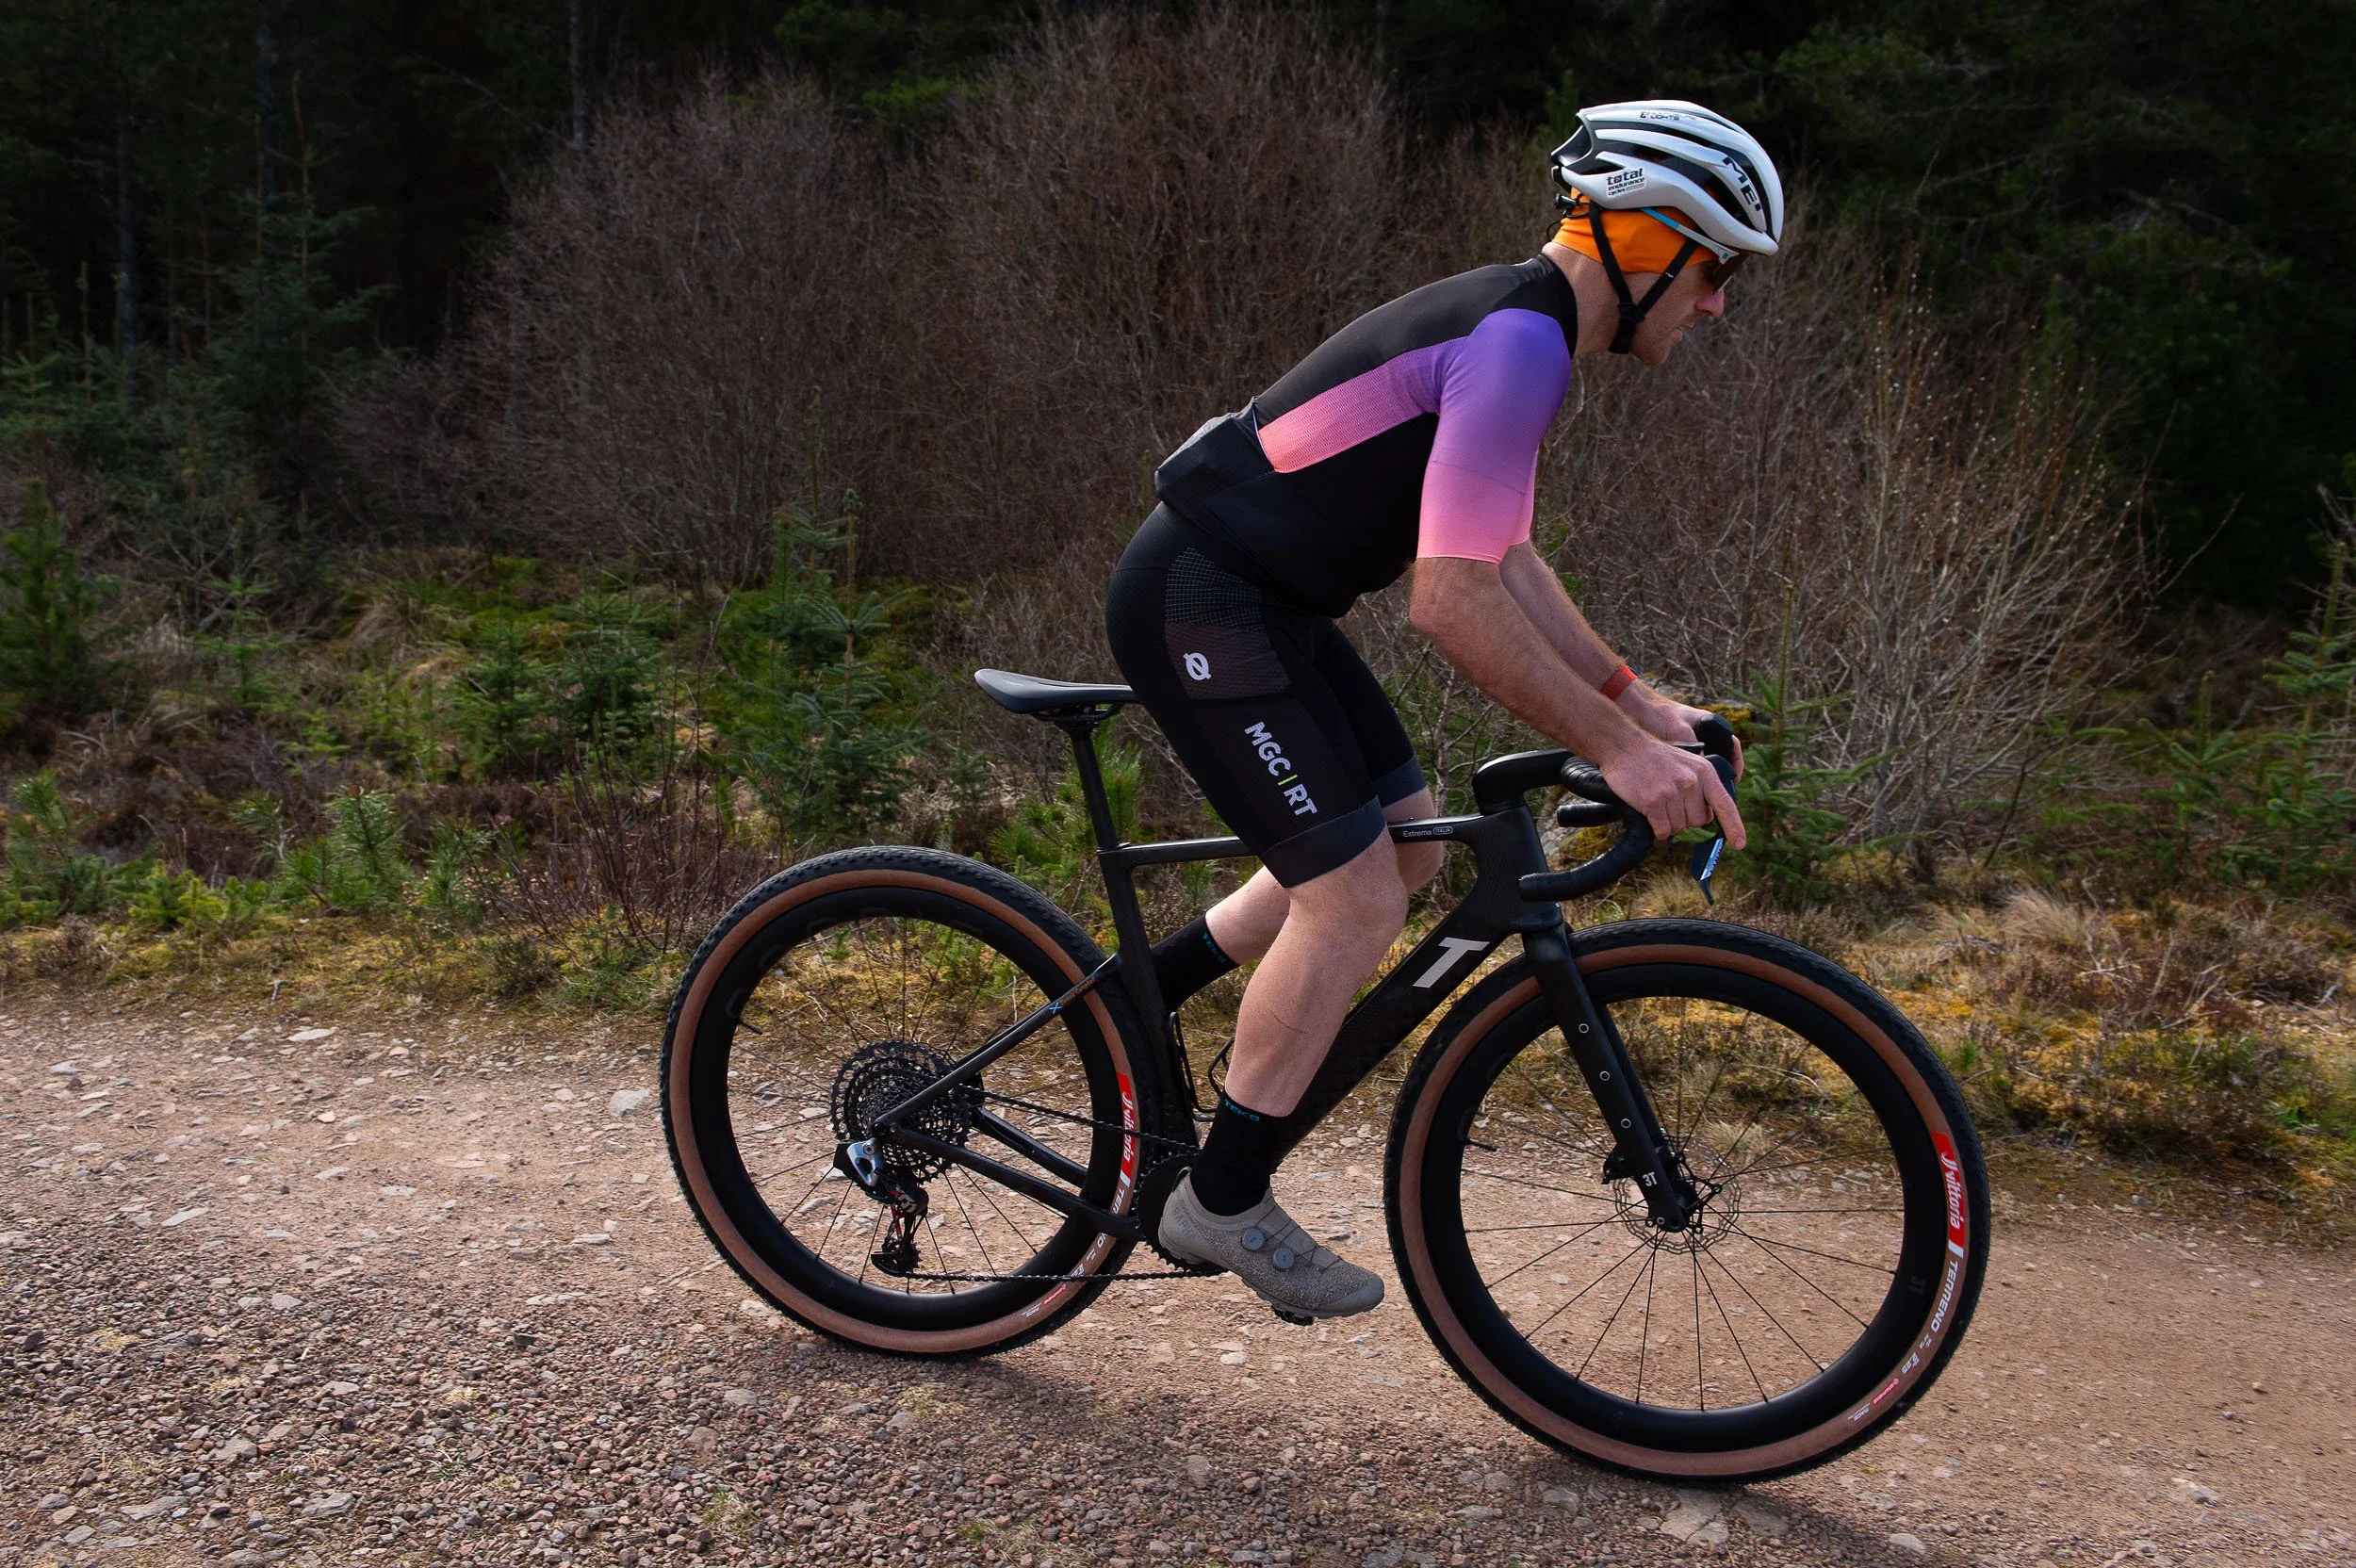
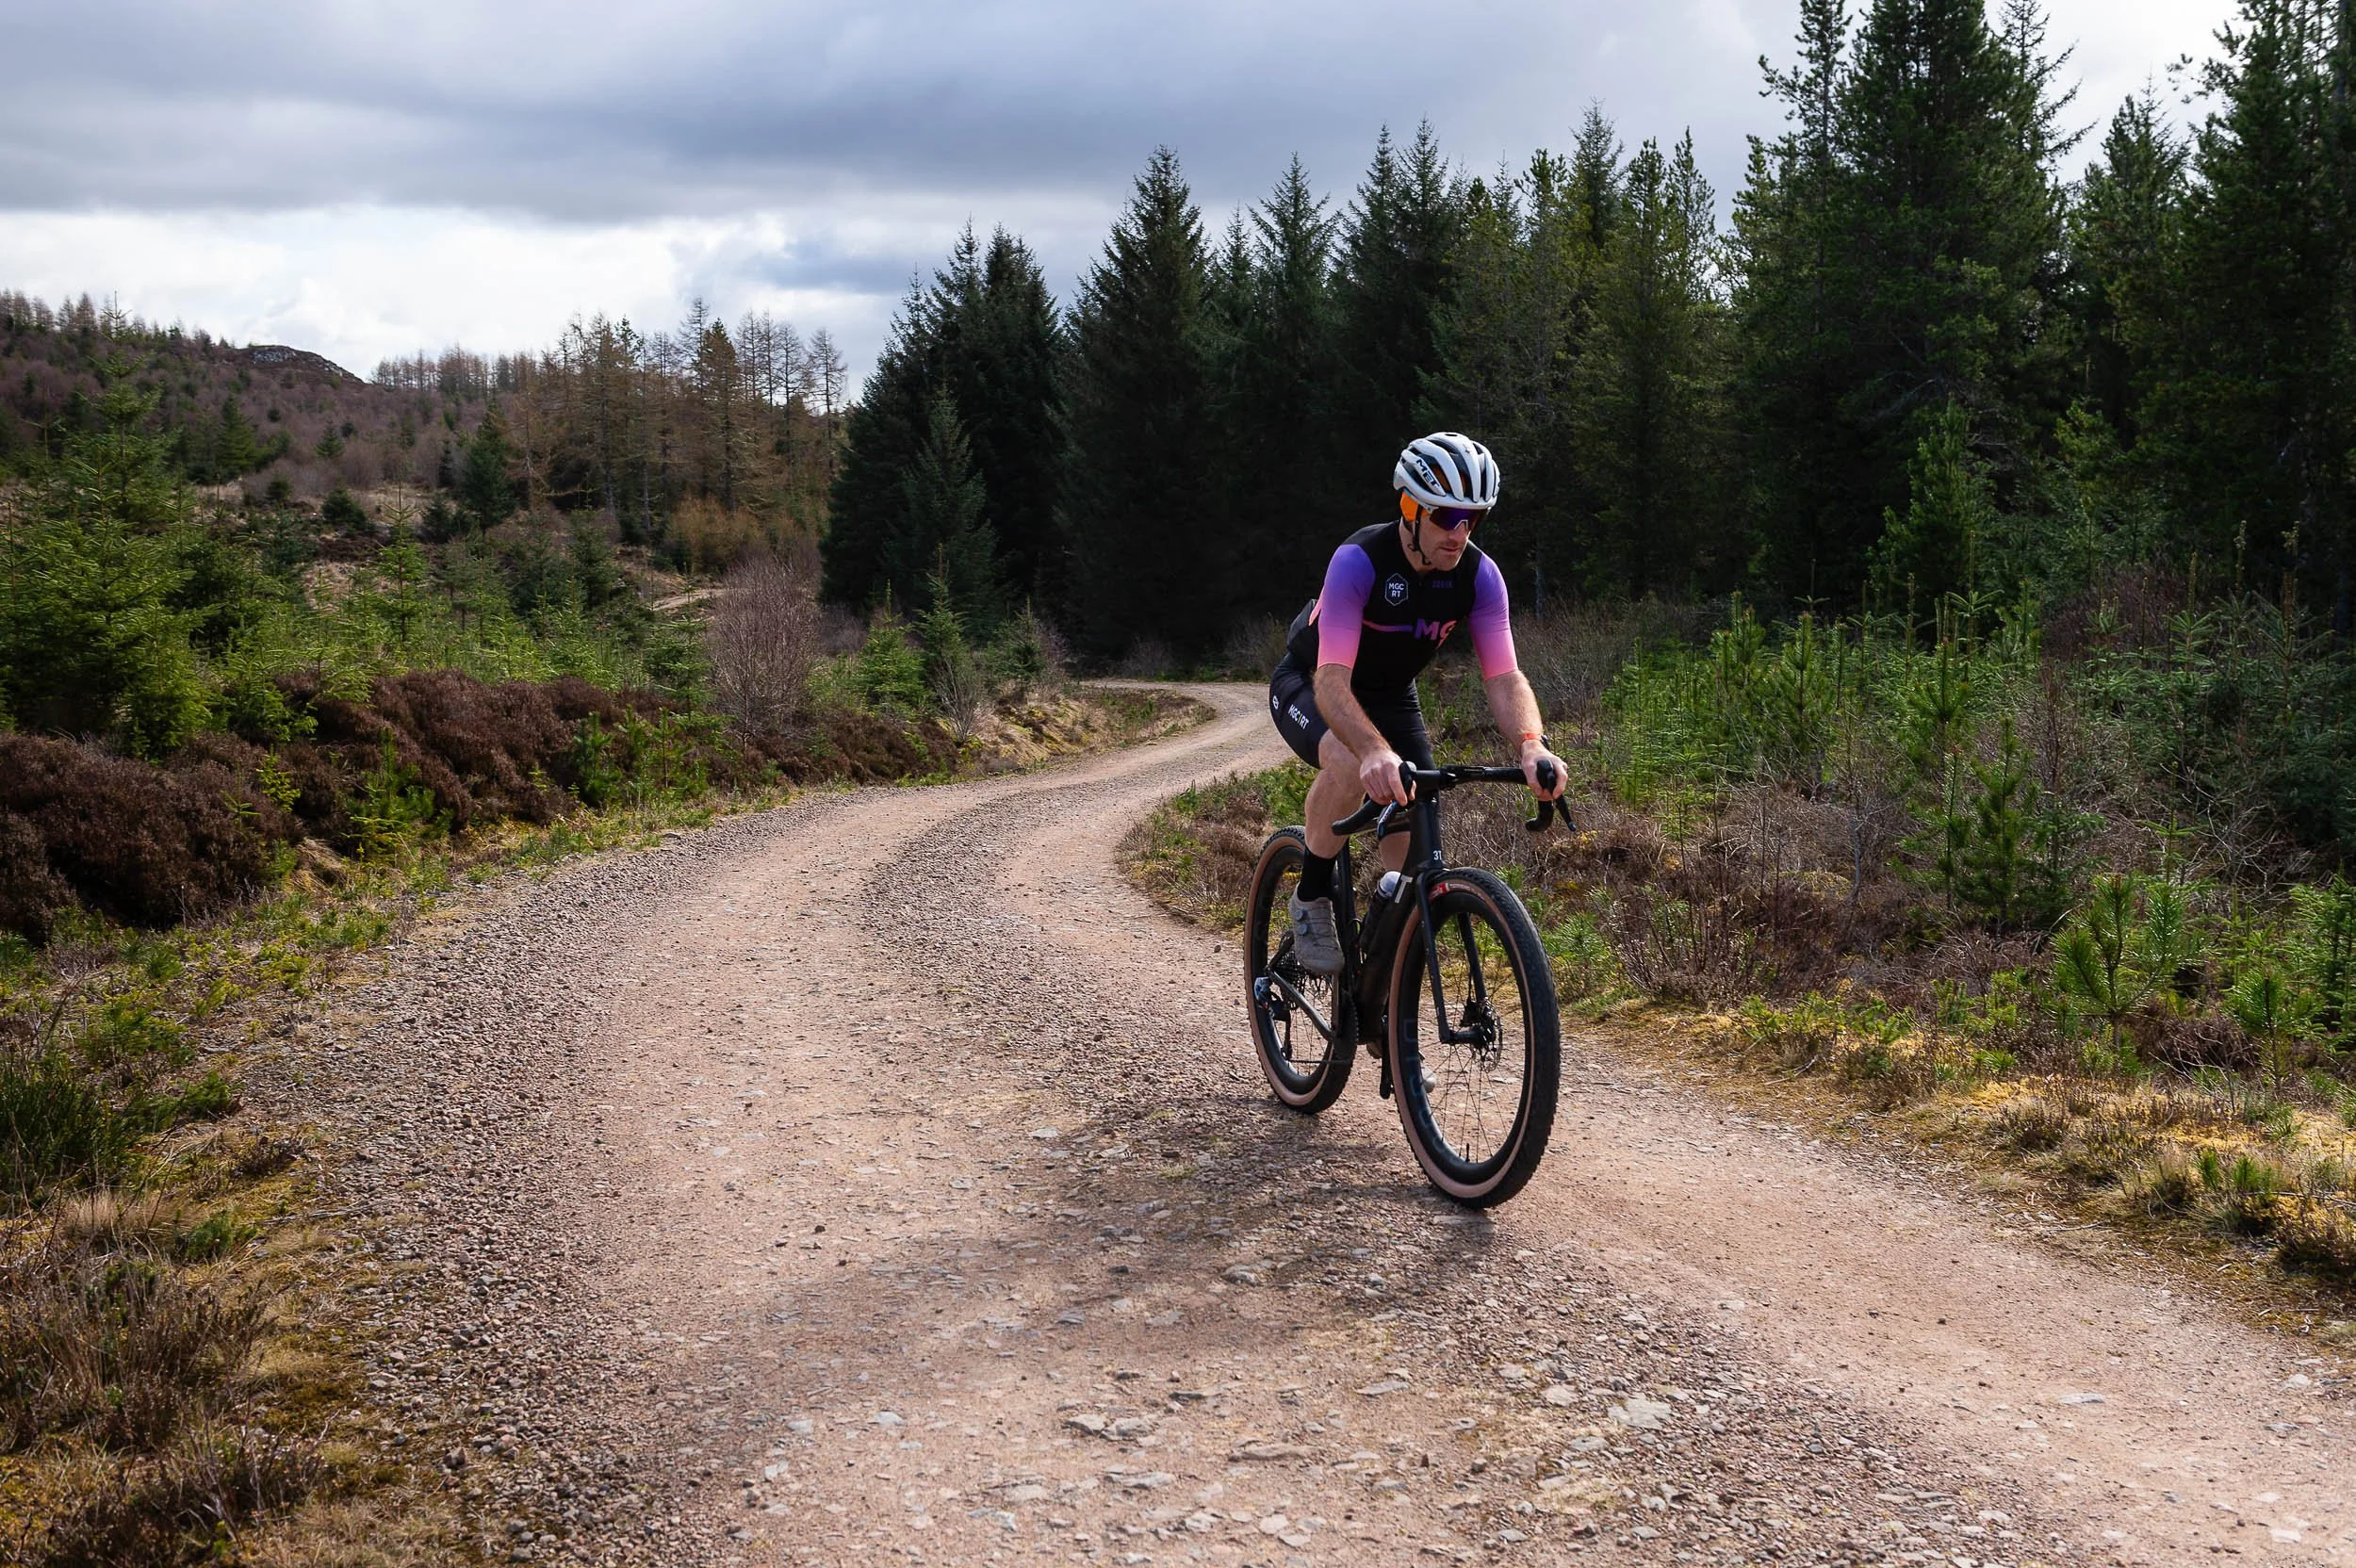
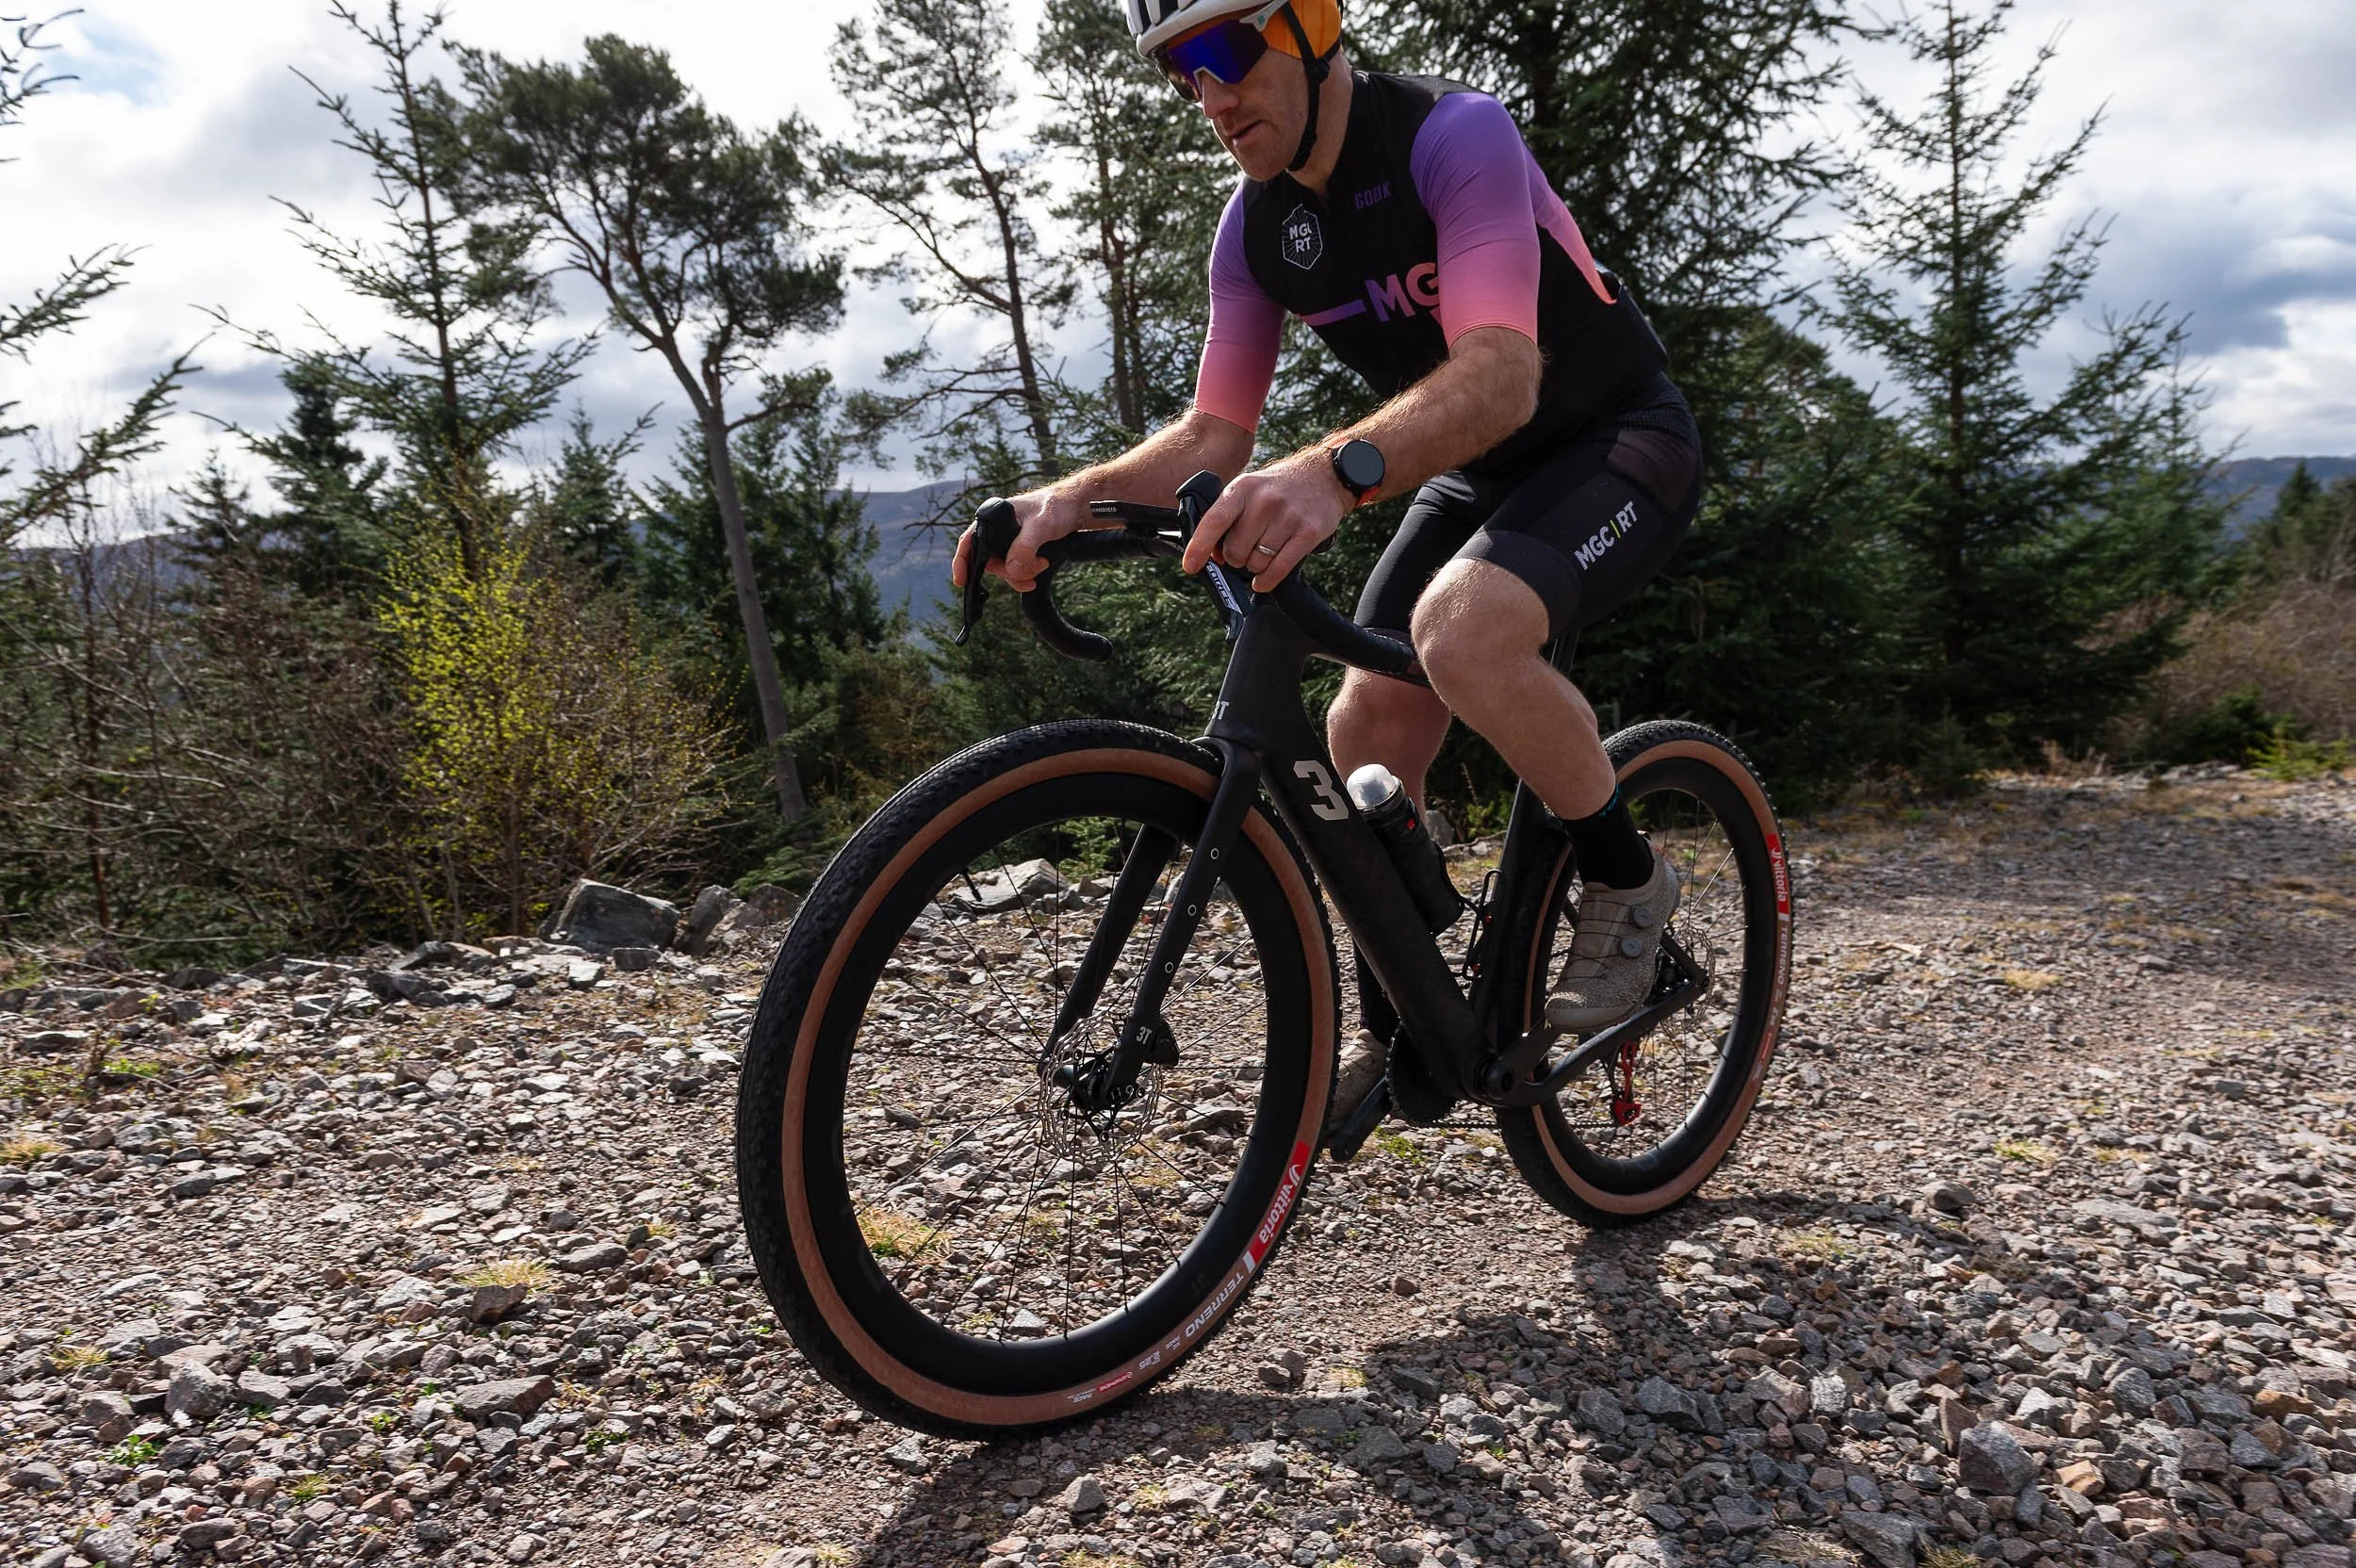
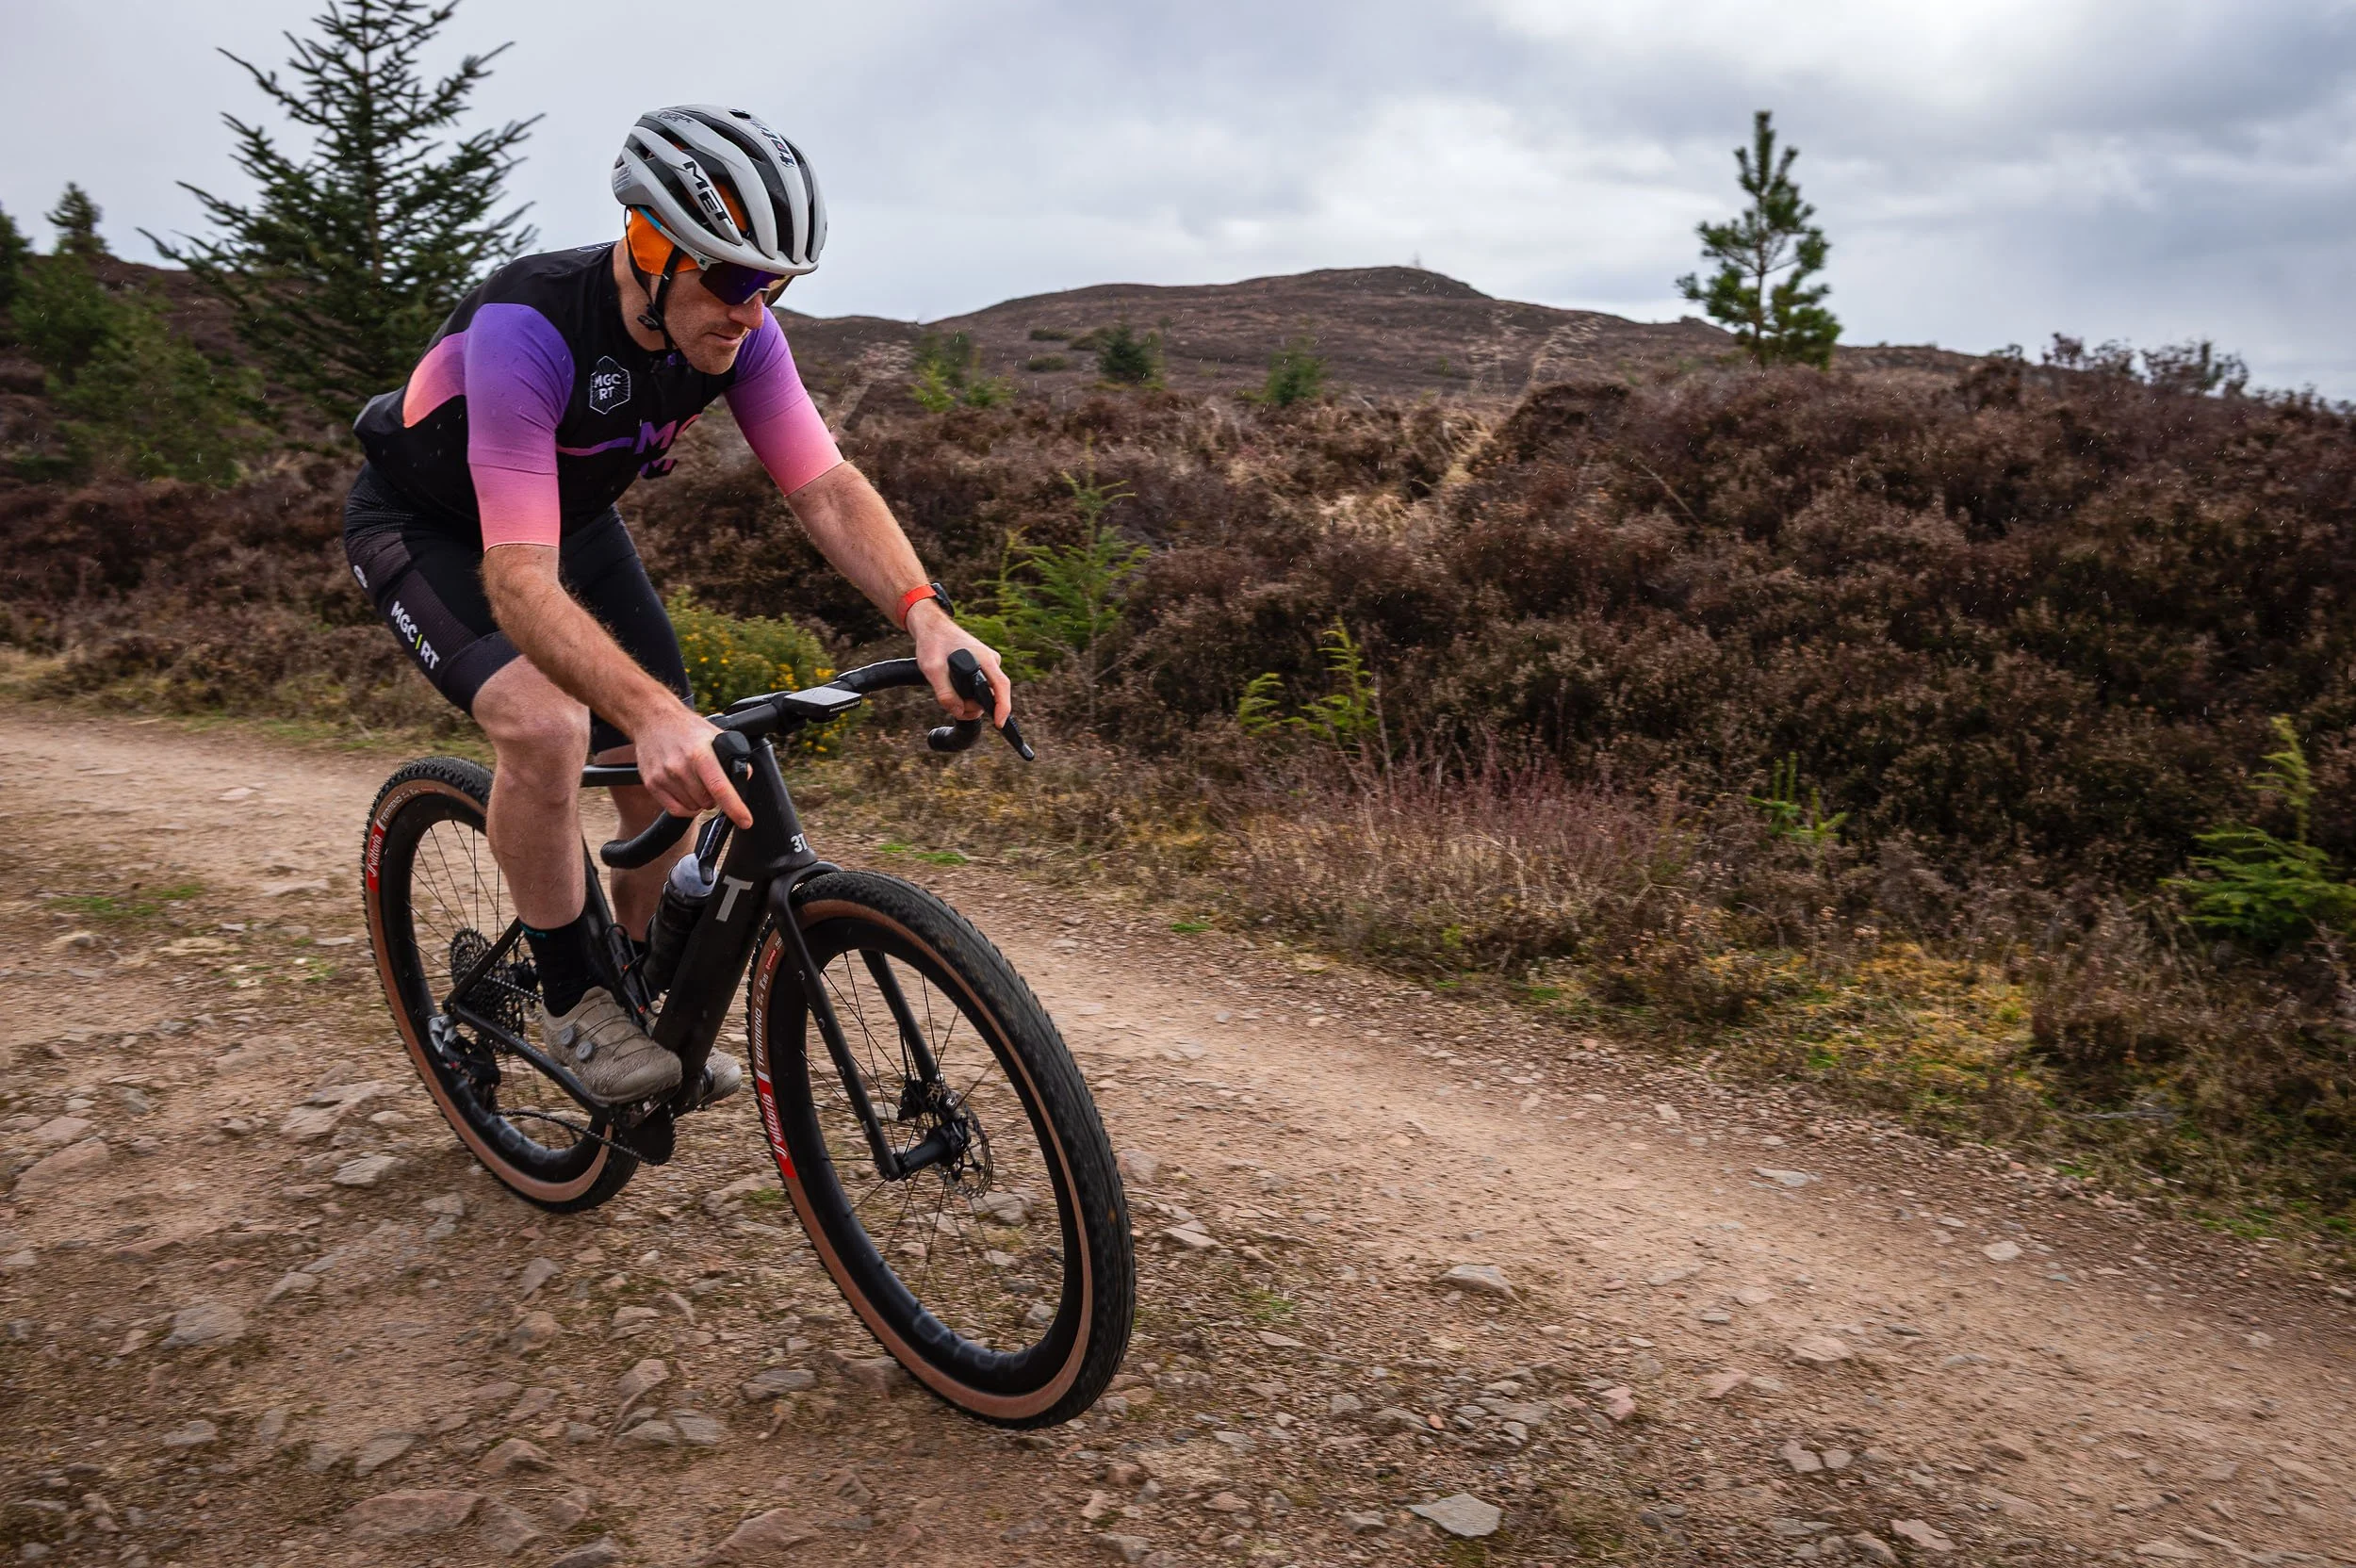
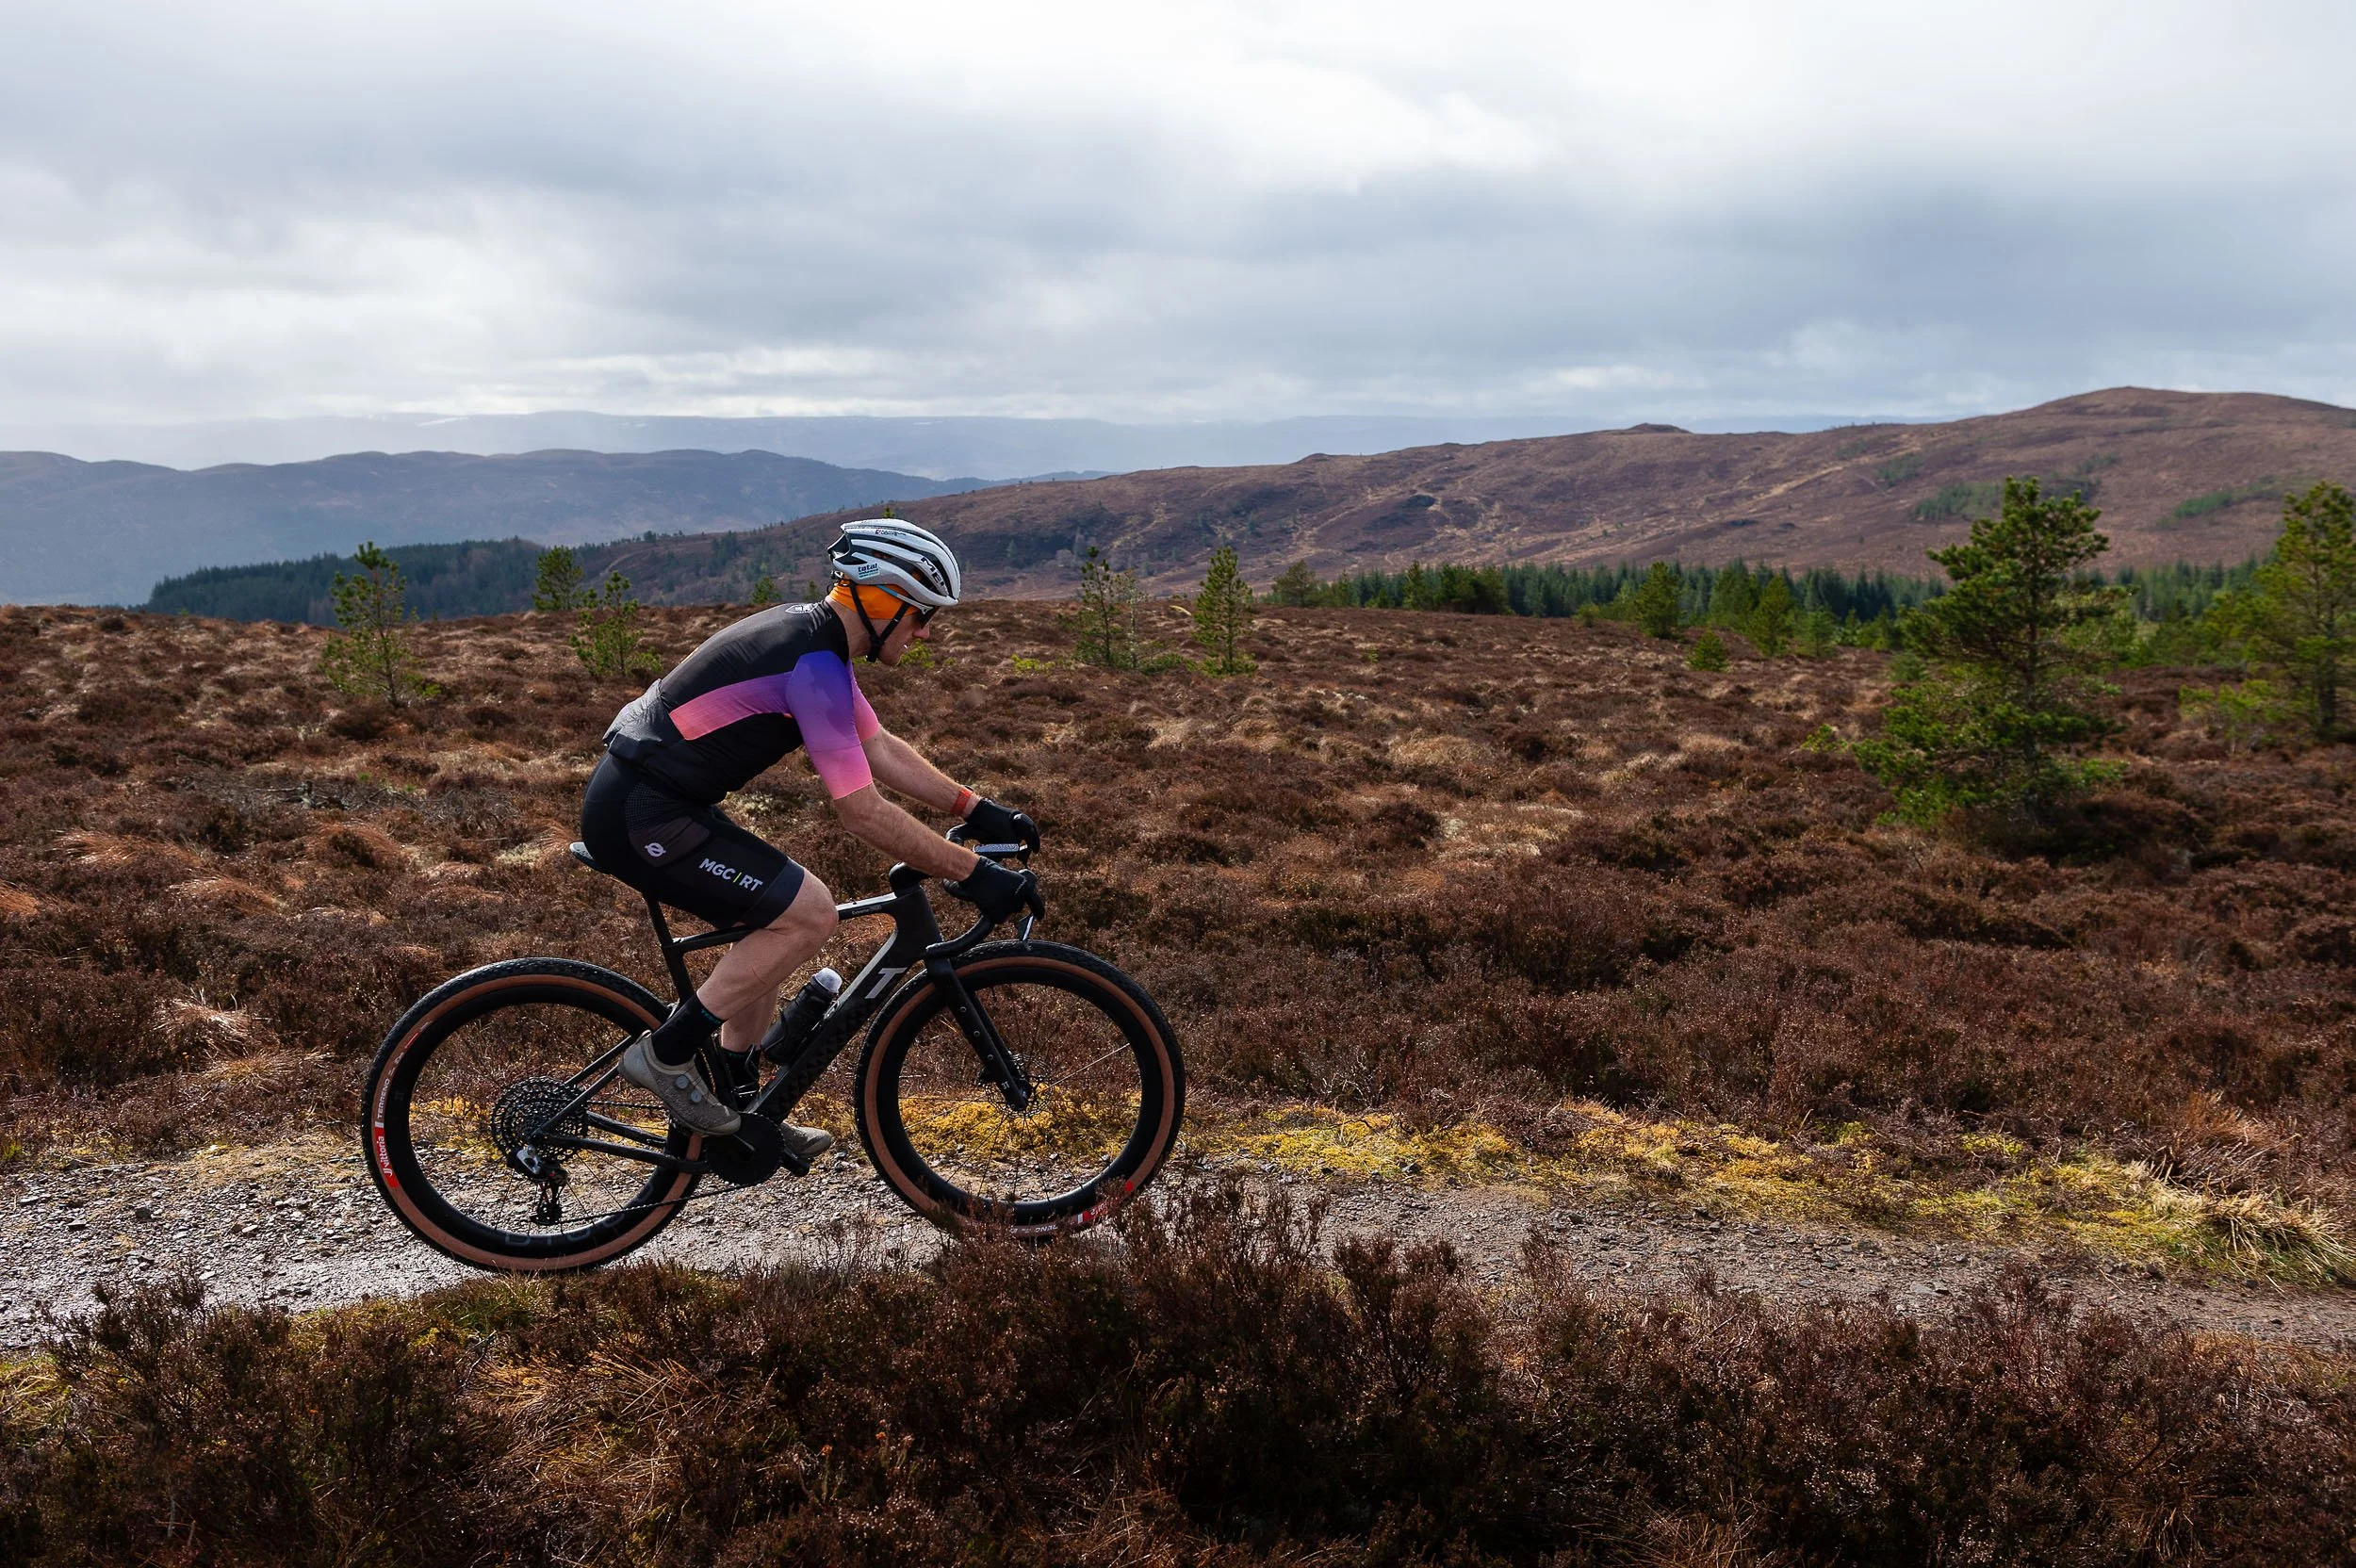
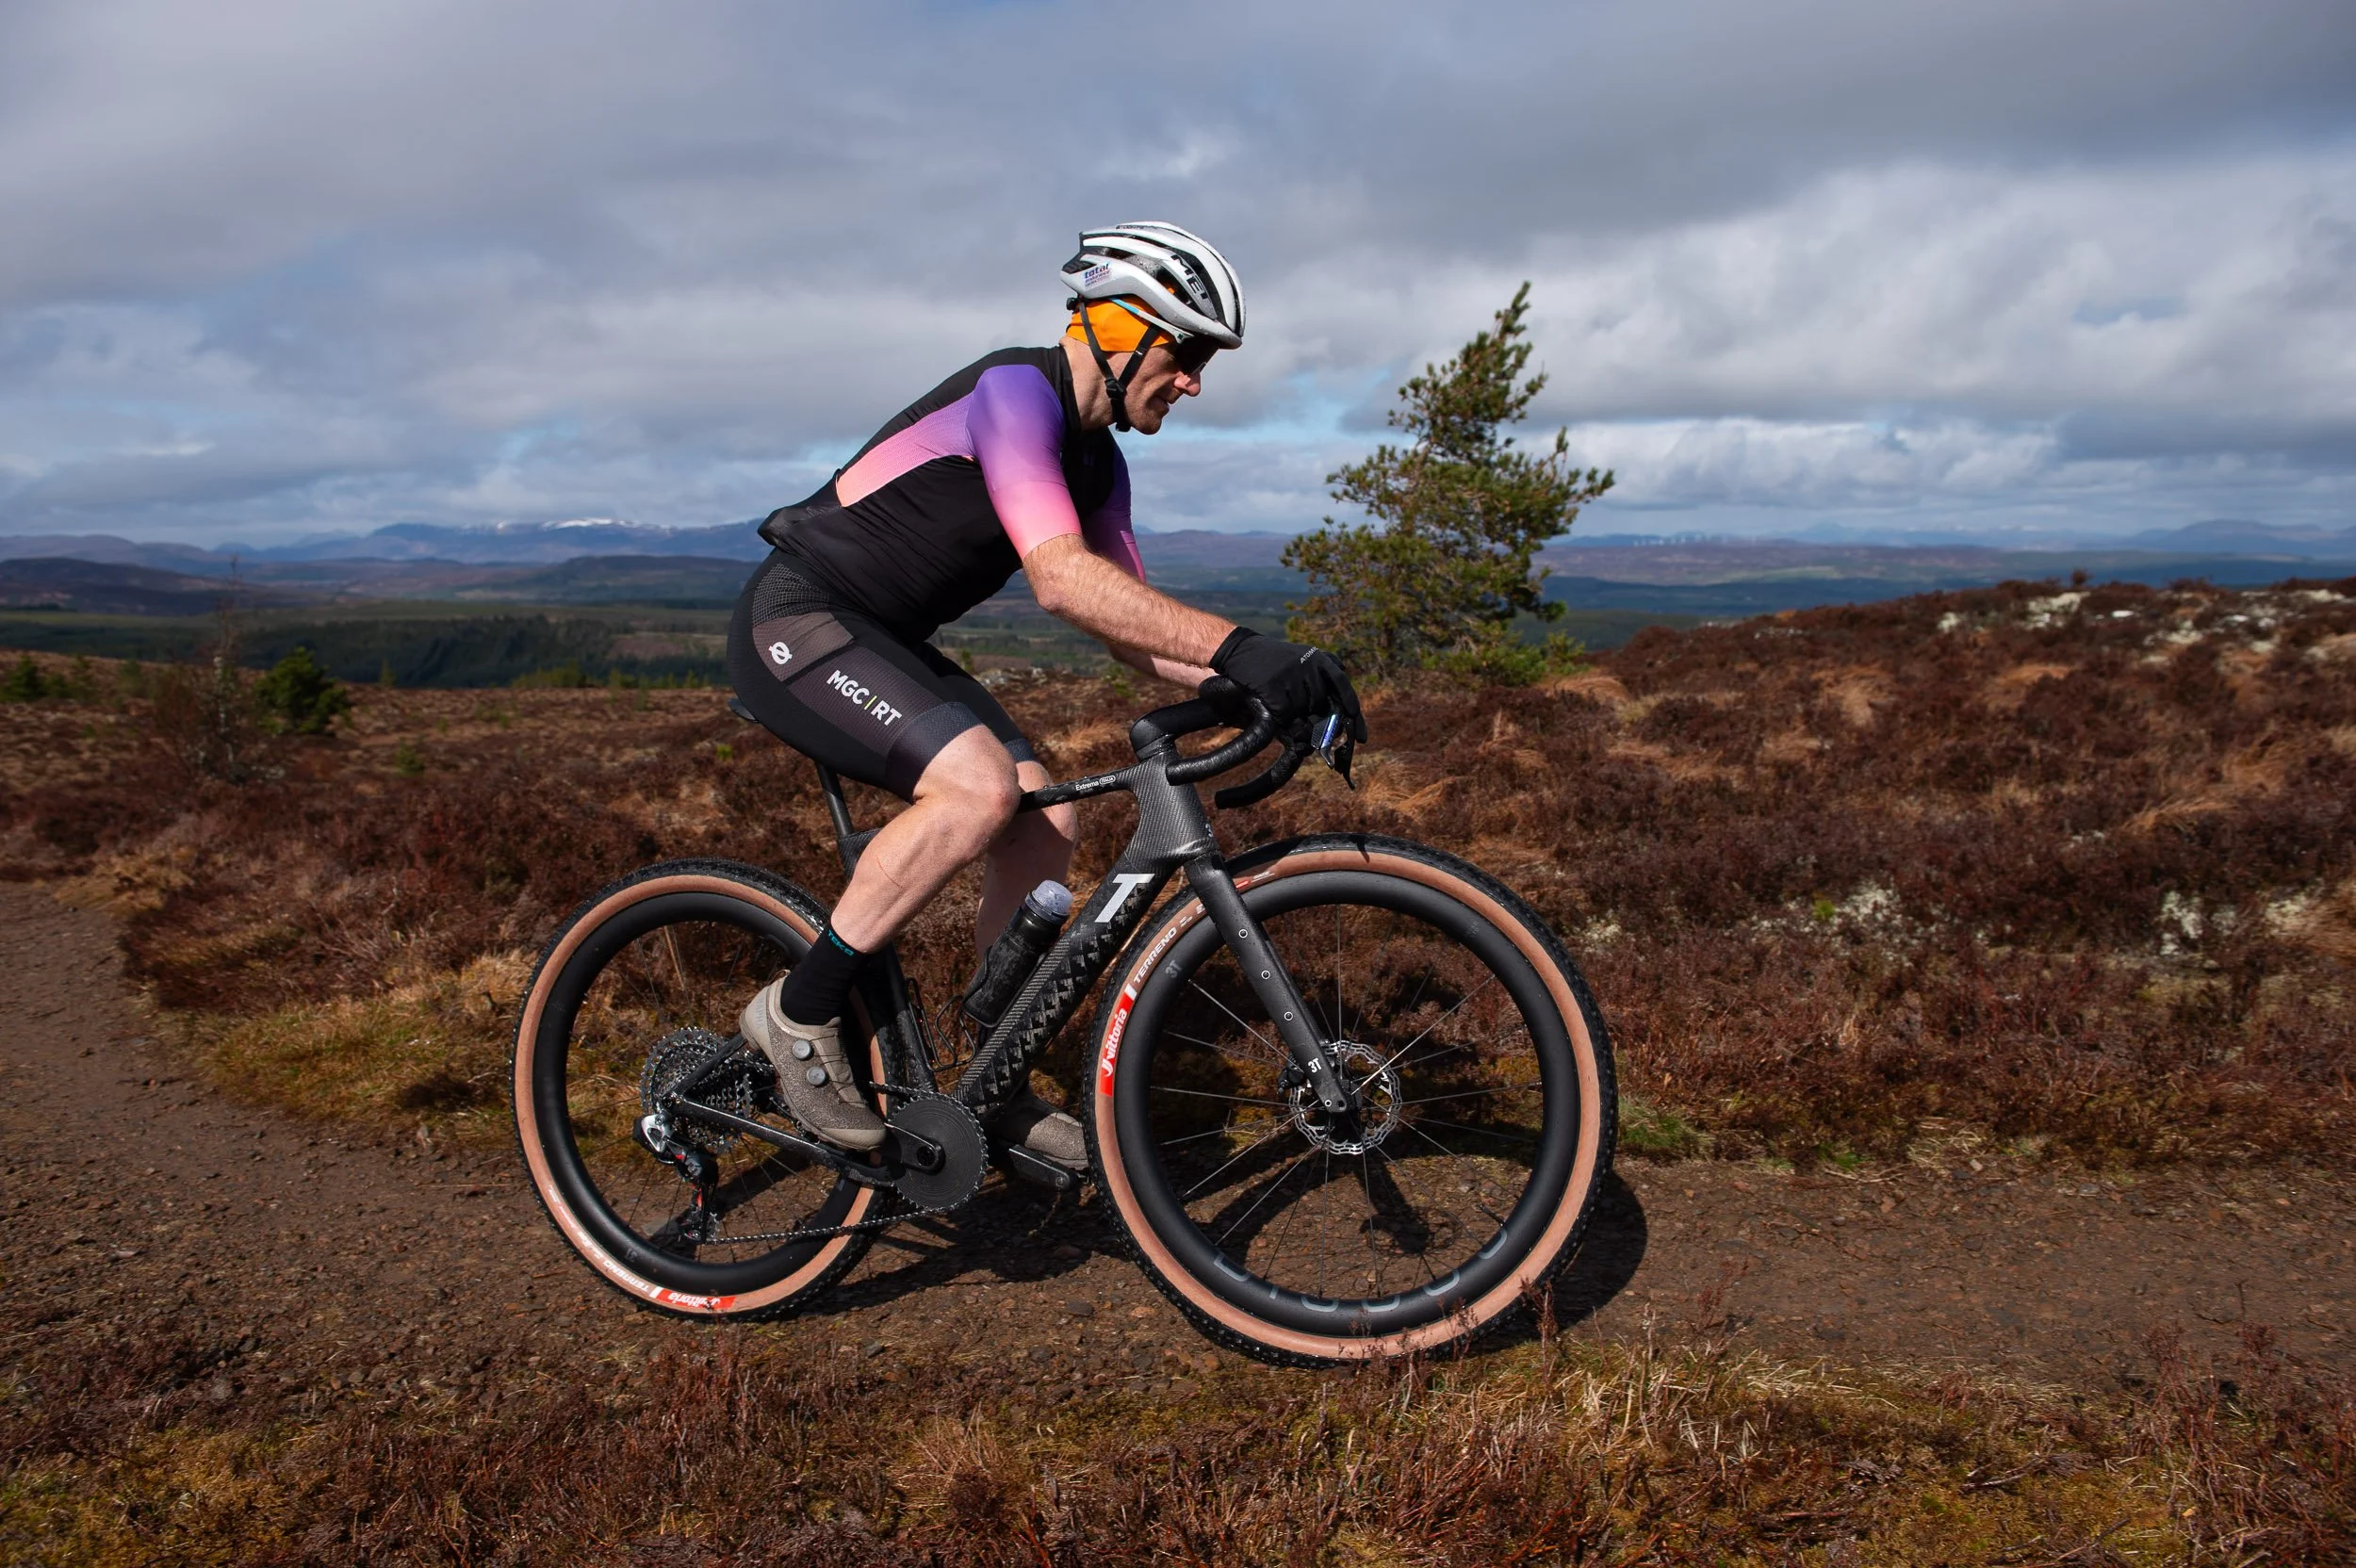
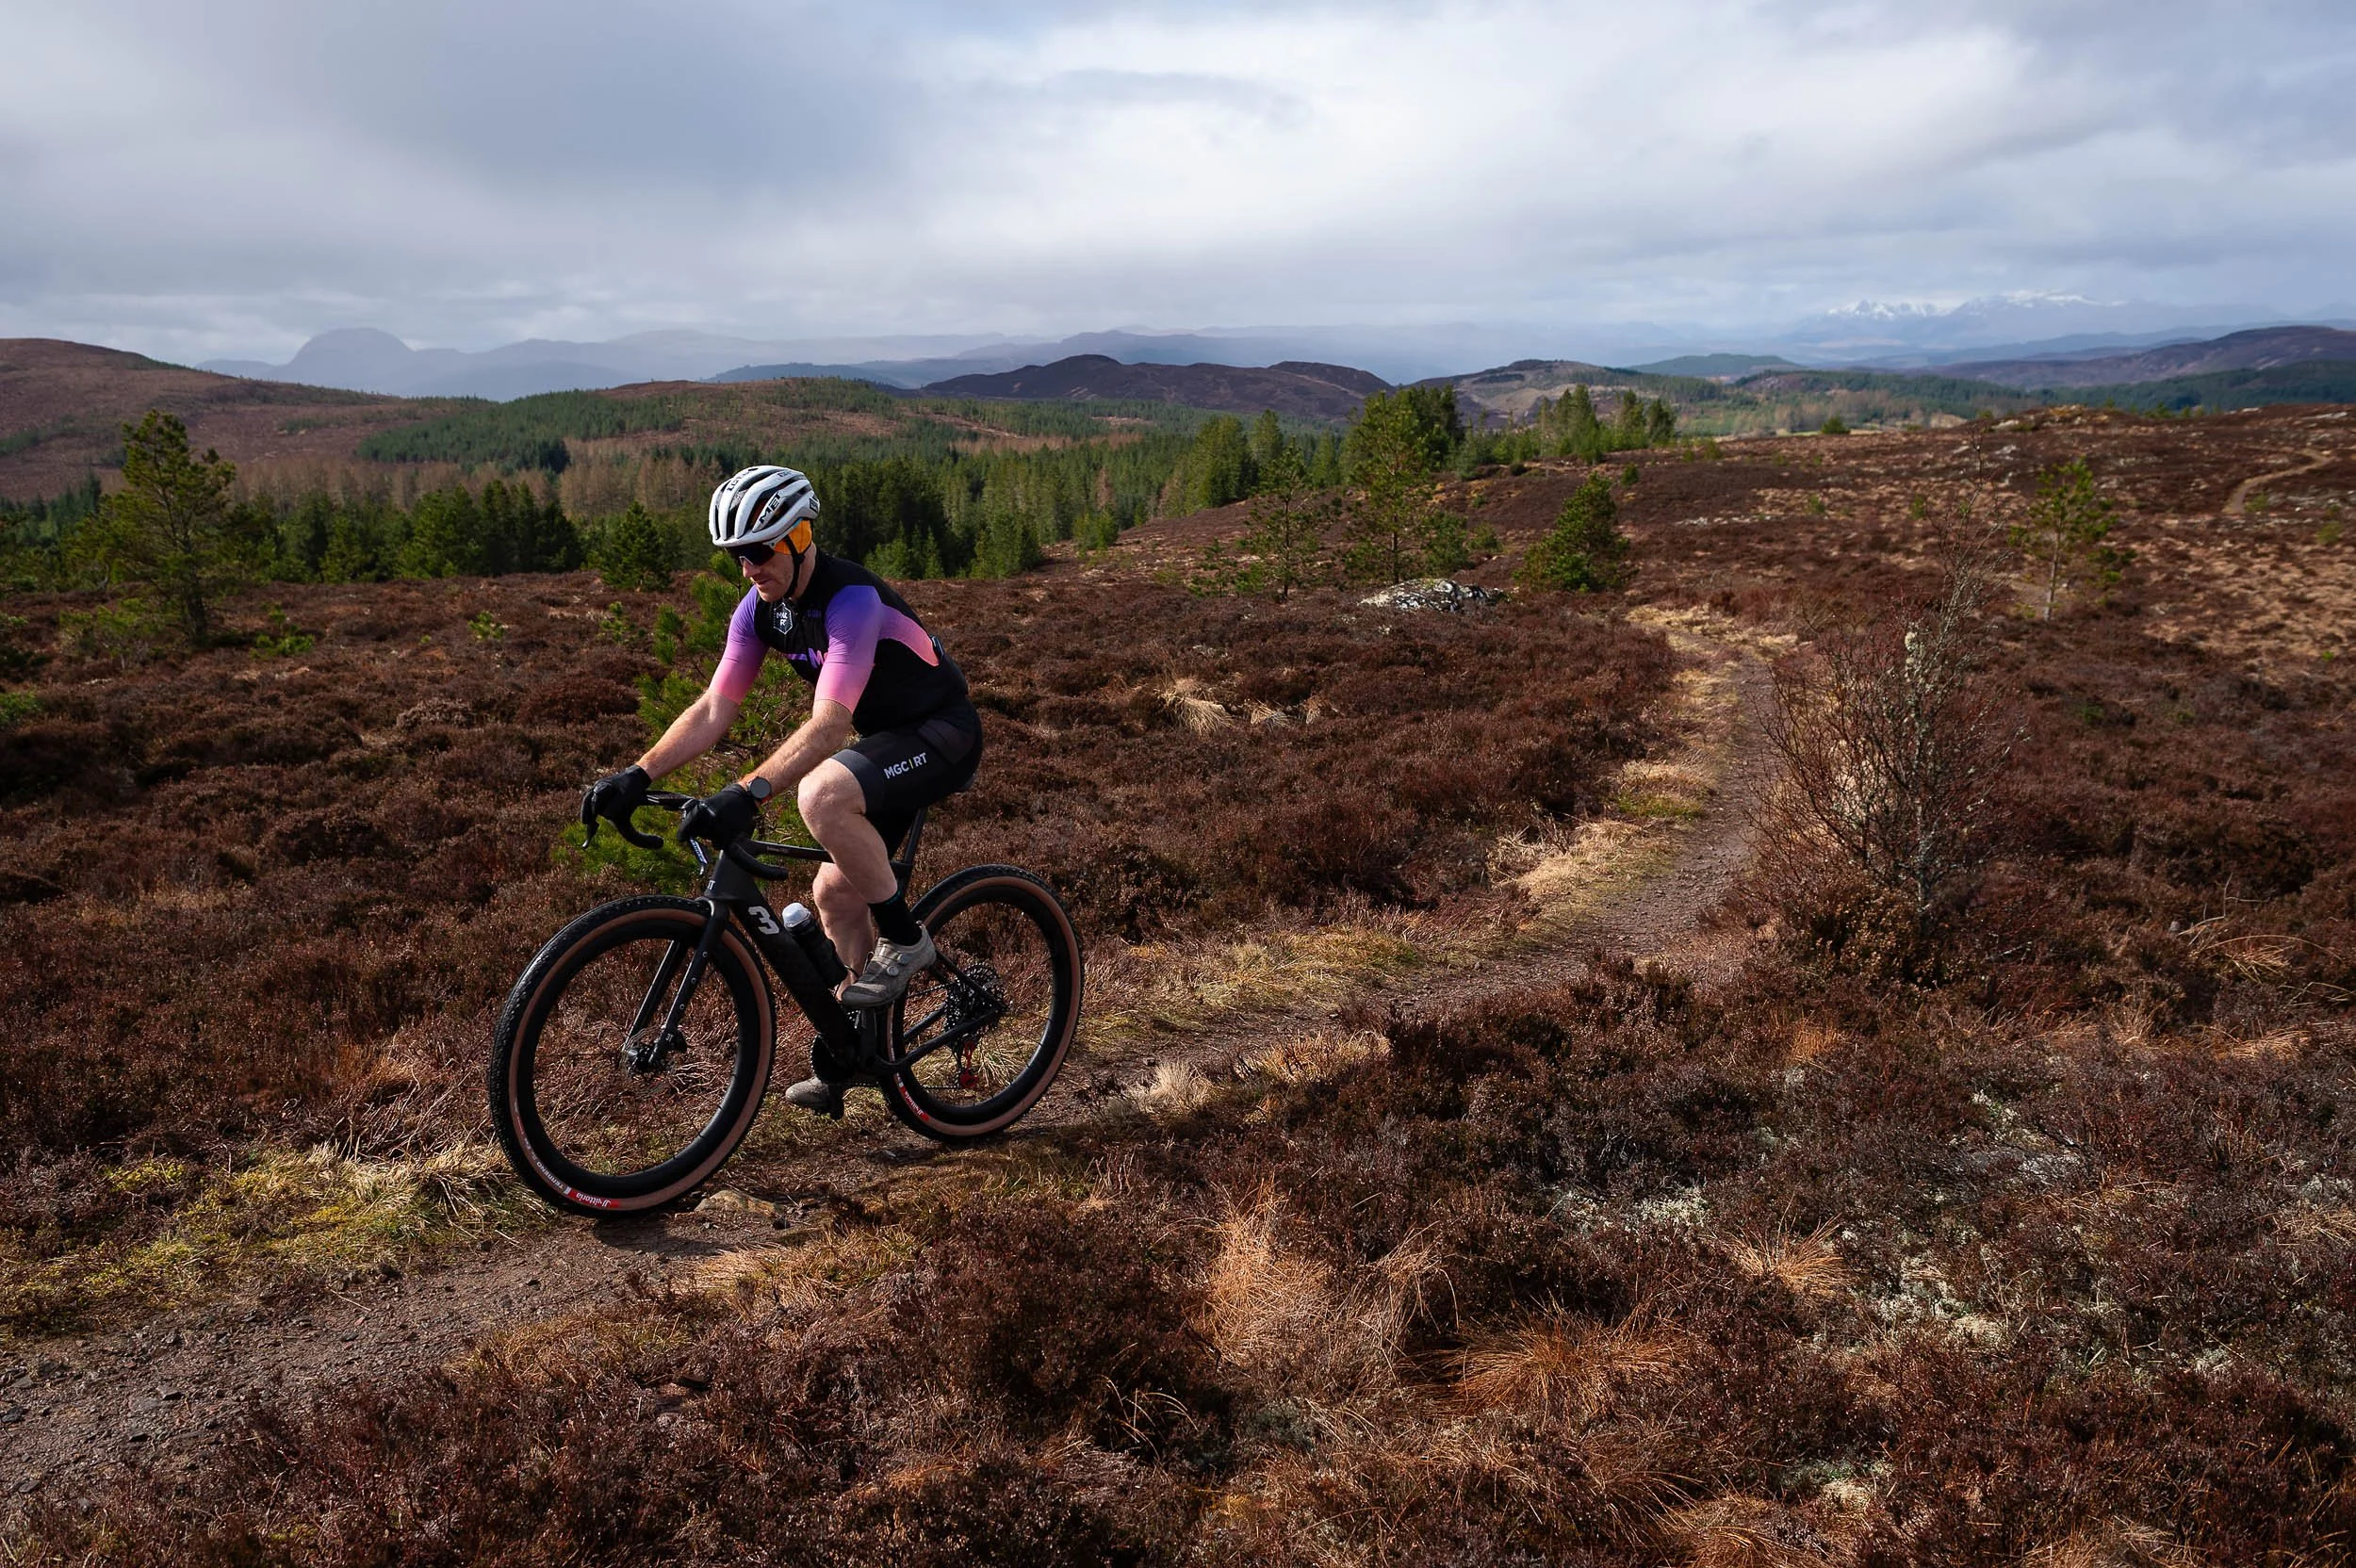
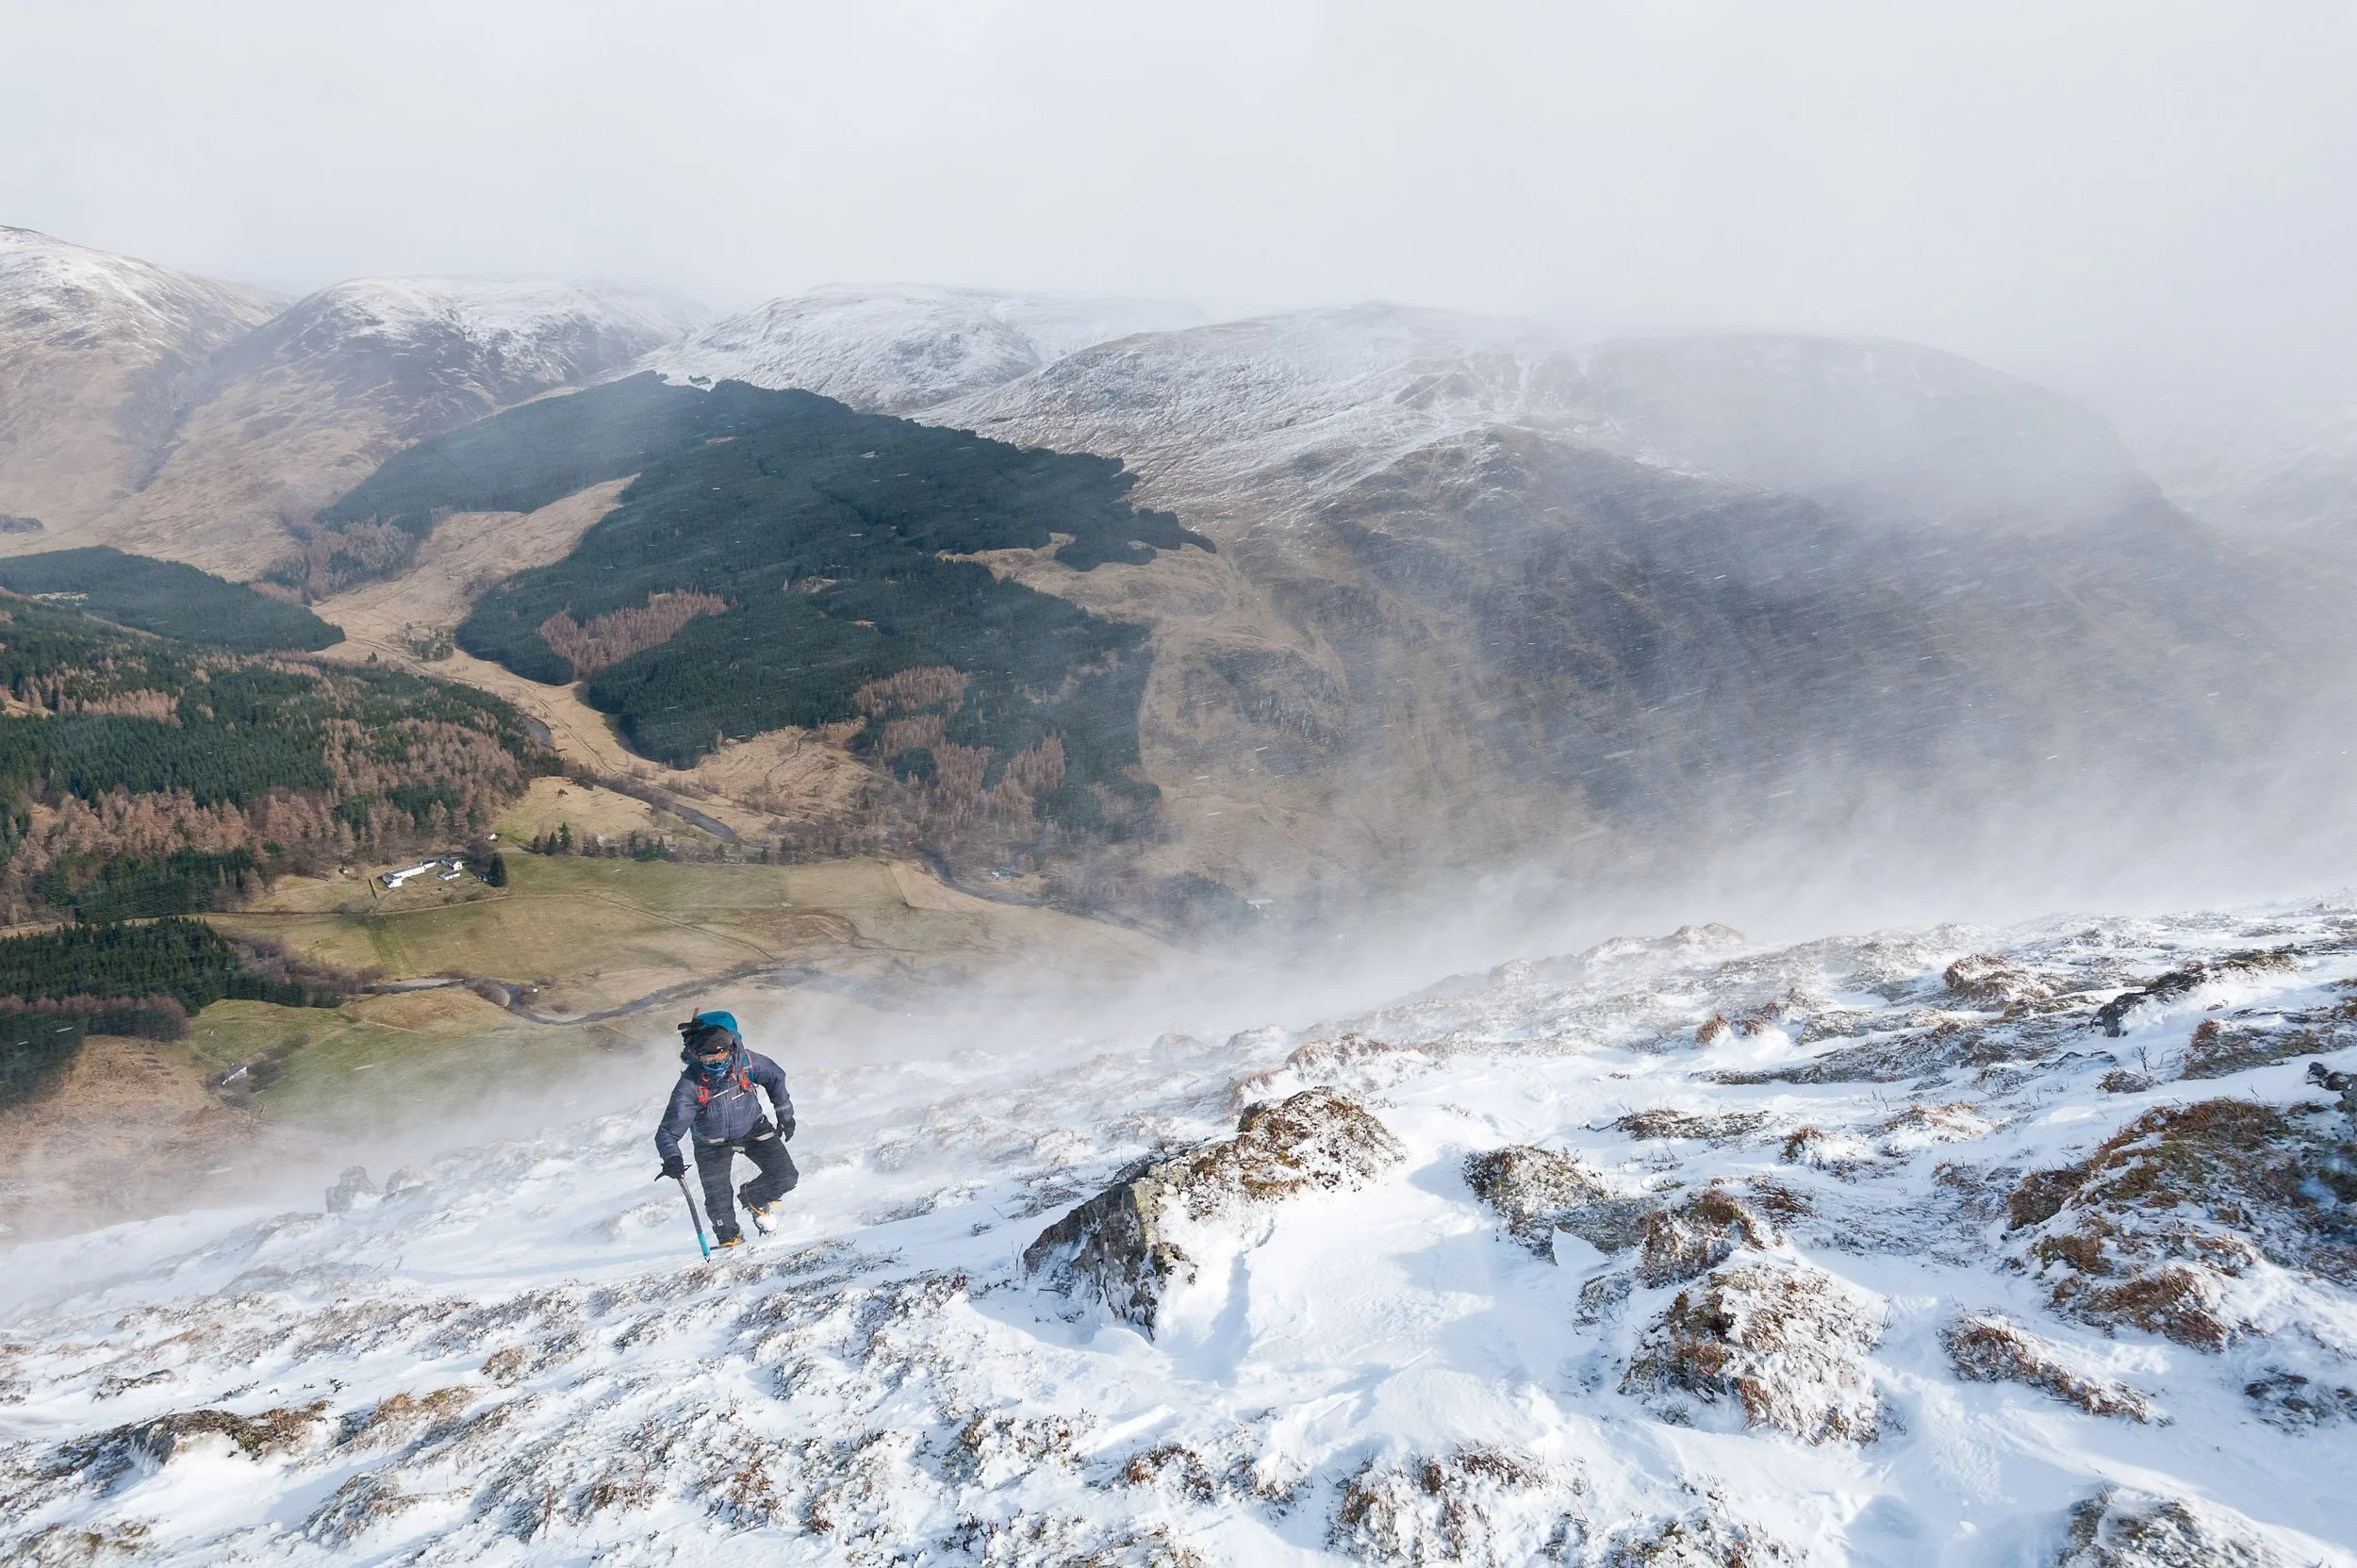
Photo essay for Scottish Field - Scotland’s hills in Winter
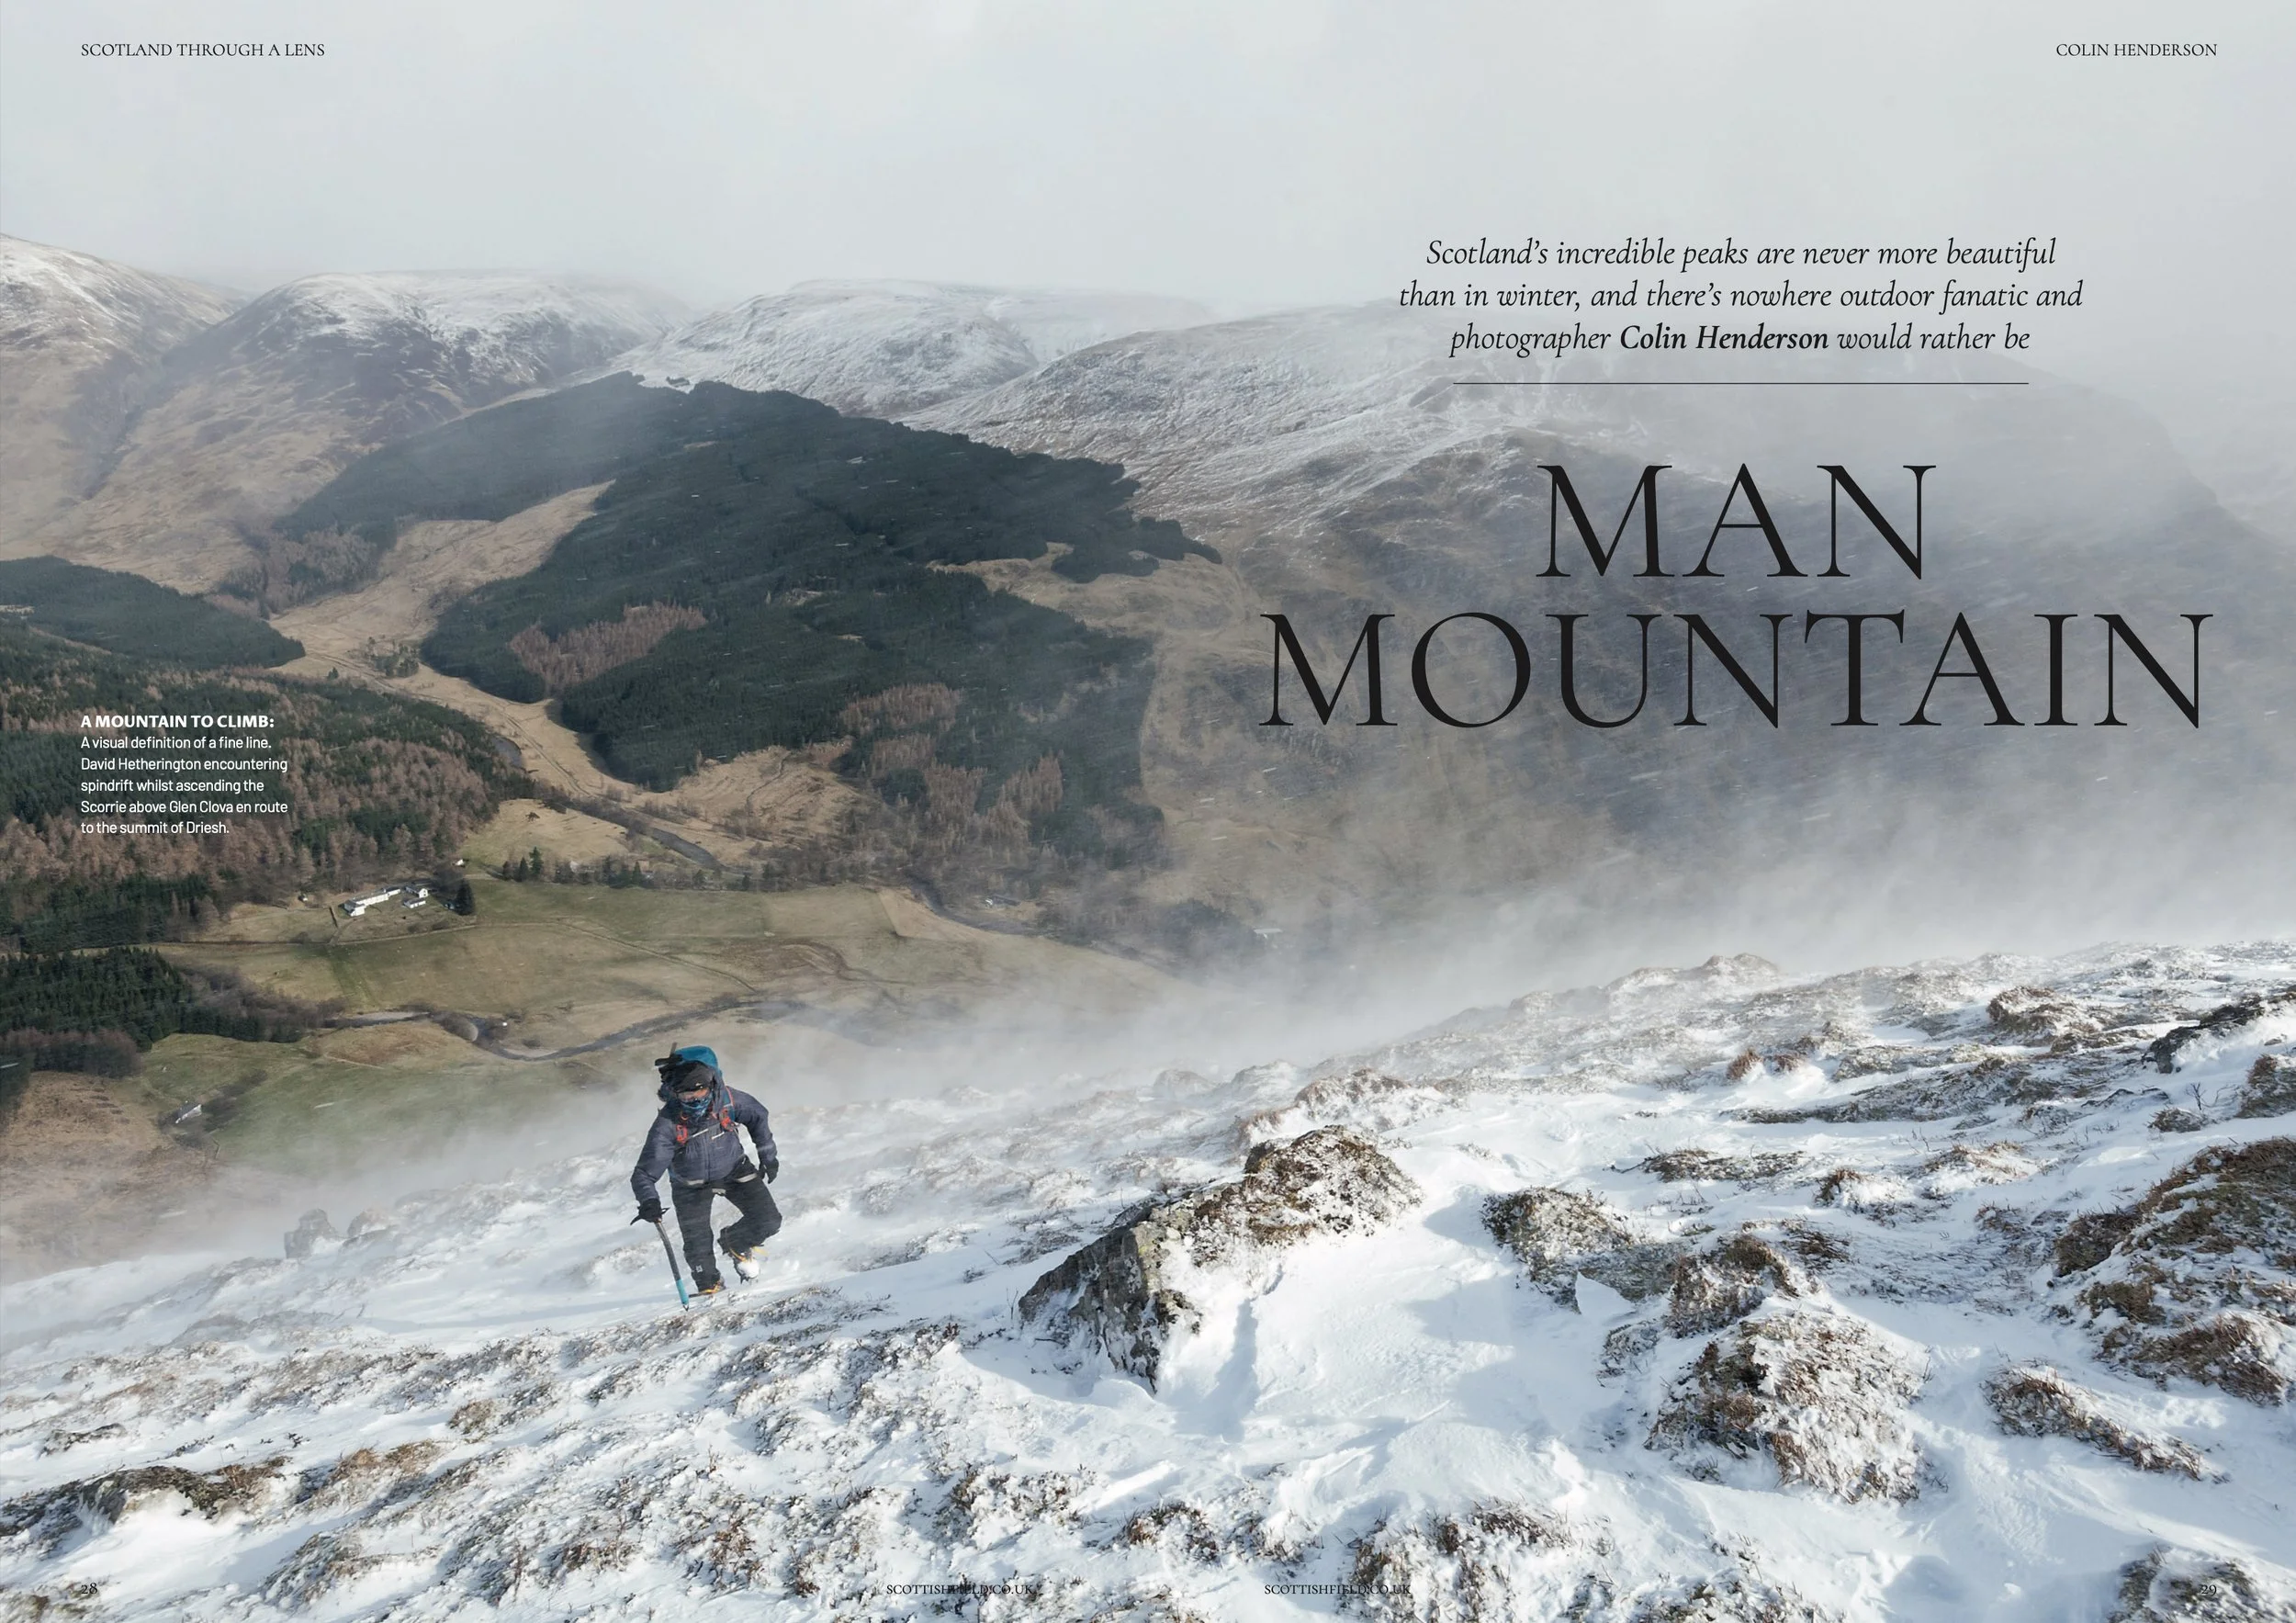
Scottish winter photography for a ‘Scotland through a Lens’ feature in Scottish Field magazine
Graphic Designer Grant Dickie’s choices from a selection of the photography I’d curated illustrating Scotland’s Munros and Corbetts in Winter, to support a ‘Scotland through a Lens’ feature in Scottish Field magazine, Scotland’s premier quality lifestyle publication. You can read a short Q&A Scottish Field colleague Ellie Forbes and I produced to complement the feature on the Scottish Field website.

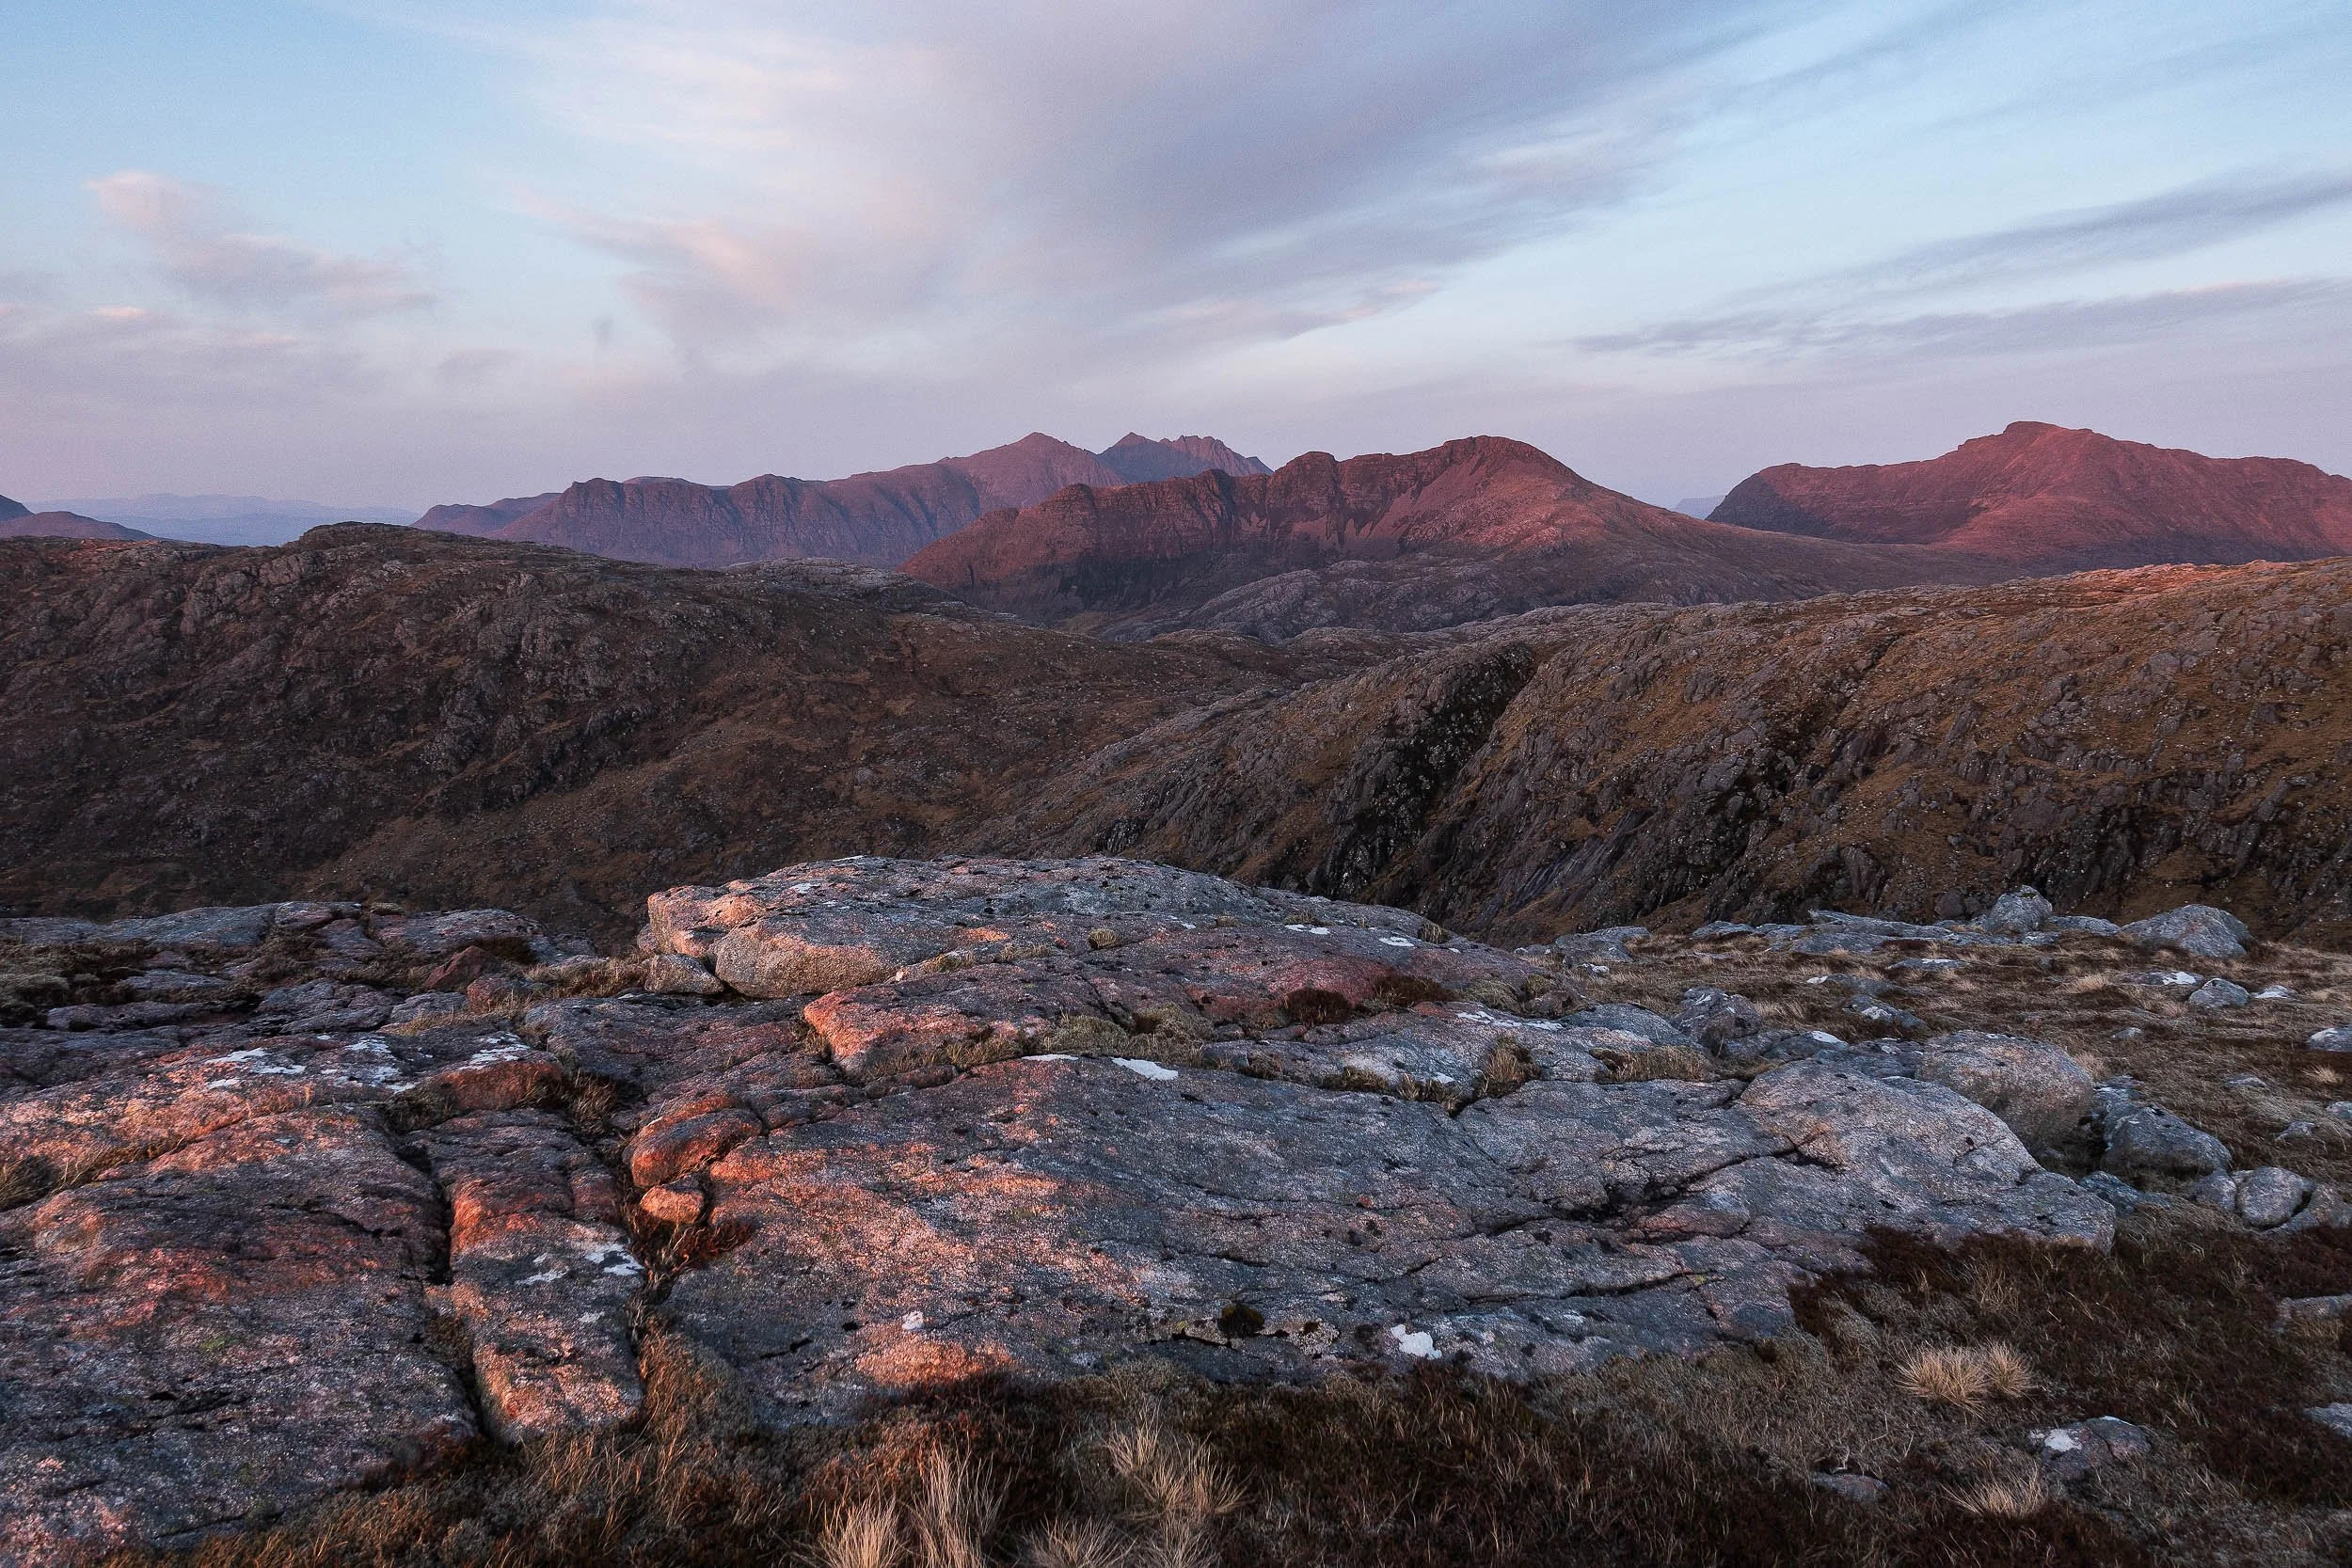
Wild camping and photography - Spidean Coire nan Clach (Beinn Eighe)
Sunset and sunrise from the summit of Spidean Coire nan Clach, a Munro on Beinn Eighe in the North-West Highlands of Scotland
Part of a Wild camping and photography series.
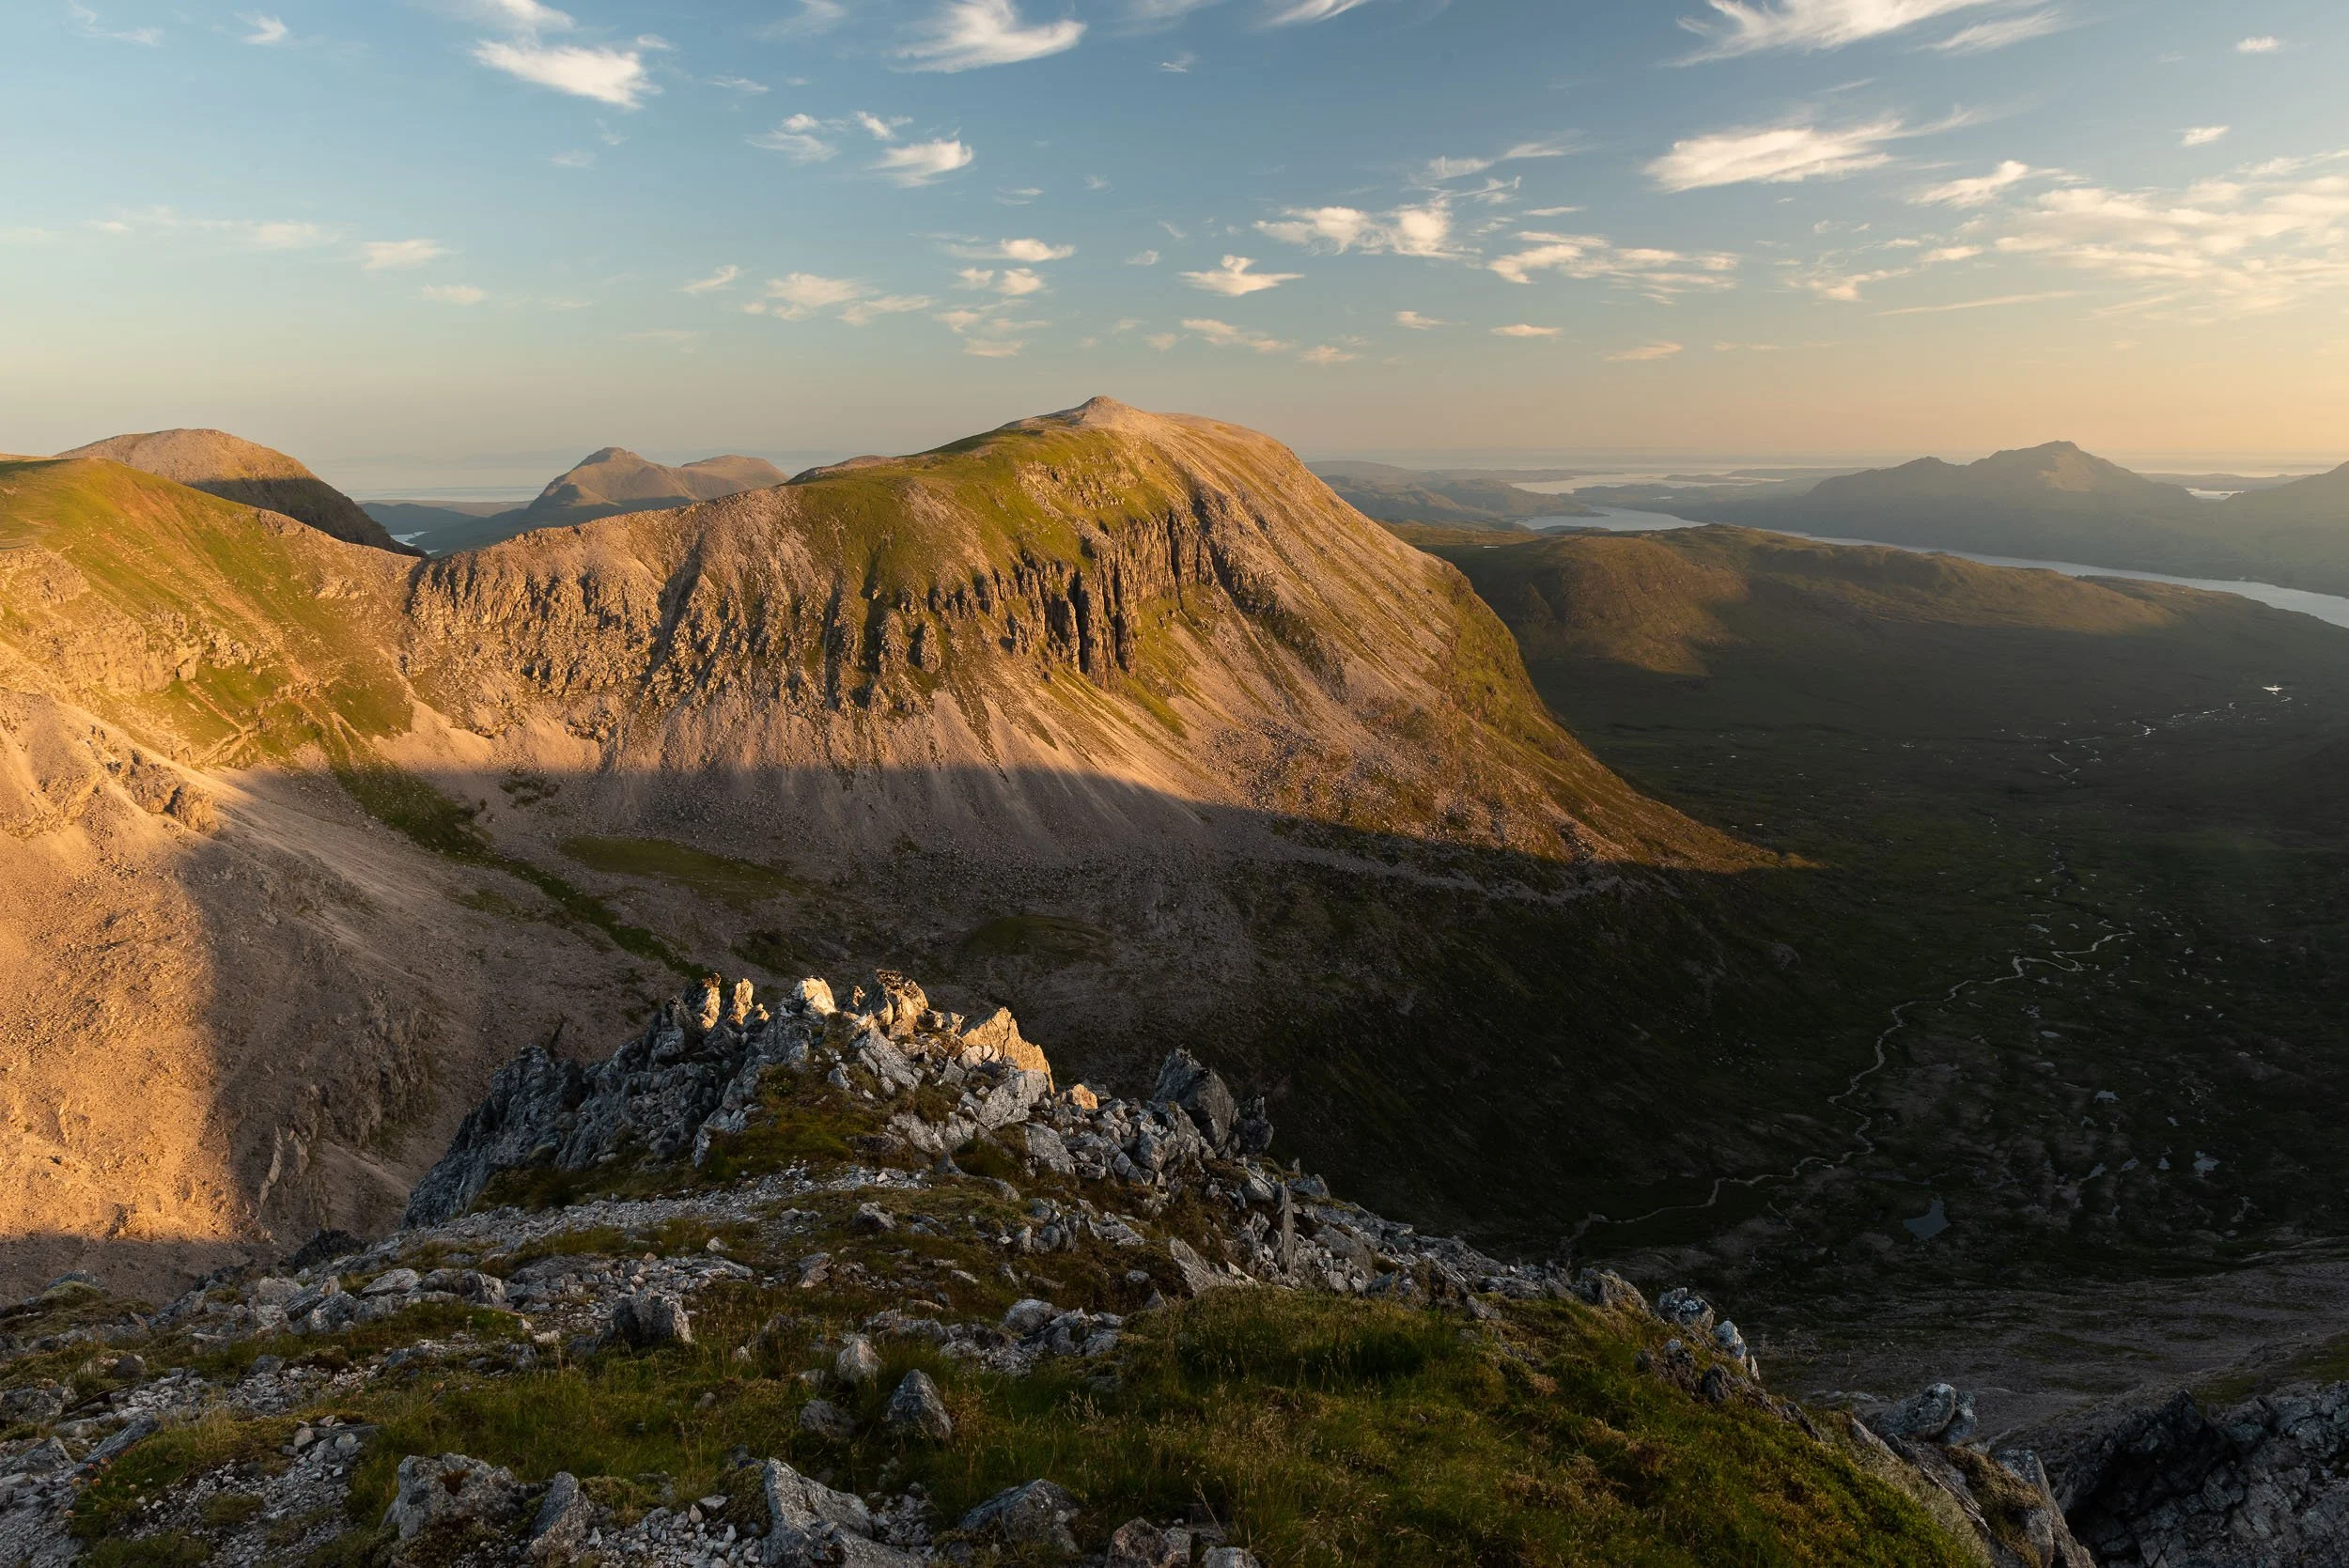
Dawn light on the rocky ridge between Spidean Coire nan Clach on Beinn Eighe towards Coinneach Mhor and Ruadh-stac Mòr
The Beinn Eighe massif in Torridon was designated as Britain's first National Nature Reserve in 1951. The NNR website details how the massif 'embraces a vast area of 48 square kilometres' between Loch Maree and Glen Torridon, 'stretching from loch-side to mountain top', with a 'huge cluster of rugged peaks, ridges and scree-covered slopes' in between. Two of these peaks are Munros, or Scottish peaks over 3,000ft / 914.4m meters high. To the west is Ruadh-stac Mòr, above the fantastic Loch Coire Mhic Fearchair, and to the east, at the end of a c2.5km long ridge that includes the Black Carls, is the rocky Spidean Coire nan Clach.
This was my thirteenth (you’ll find out fourteenth) ascent of the Munro, Spidean Coire nan Clach, on Beinn Eighe above Glen Torridon. I used to photograph the Celtman Extreme Triathlon and I always made a point of going to the summit - it’s a fun, easy scramble - but this was the first time I’d chosen to spend the night. My objective was to capture a panoramic photograph of the ridge between this and the second Munro Ruadh-stac Mòr, to create a personal memory which would appeal to any Celtman competitors who have ran the ridge during the race on their way to a coveted Blue T-shirt.
After a hot and muggy ascent, I was blessed with a cool breeze which increased to c.40mph through the night and saw me cooried in beside the trig point at 972/977m with a warm jacket on but no sleeping bag. Sunset and sunrise was nice but it wasn't the best it could be for photography but the joy of being alone on top of a Munro never stops. A midnight clamber along the rocky ridge to Spidean Coire nan Clach’s summit was fun - if regrettably too short - as is the continuation of said ridge out to the Black Carls (which I've done before, on an east to west traverse of Beinn Eighe from Kinlochewe - and would highly recommend).
I’d have loved to have stayed out but unfortunately work needs pressed and I was home for 9am. Regrettably this was when I discovered that I had dropped a memory card at the car park in Glen Torridon when I opened my camera bag to retrieve my car keys, and I had lost all my sunset images from the evening before. A big mistake which was both very annoying and highly embarrassing - definitely an amateur mistake. My immediate thought was to go back and get it but it was a 90-minute drive and I’d had minimal sleep the evening before, and I was very tired. For safety reasons I chose instead to put out a message on the Walk Highlands and UK Hillwalking websites and trust that it might turn up. This proved to be no avail - my bad - and, after a few weeks of stewing about it, I decided I was just going to have to go back and take some new photos. No great hardship for me other than the 850m climb - and I struck lucky with even better light - but it was a large lesson learned as regards to backing up cards on location, plus having a label on my cards which has my contact details on it.
Getting there
There’s no rail service to Glen Torridon, the closest being Garve, which is reached from Inverness, but it is possible to get a bus from Inverness to Kinlochewe. Both options however leave you a long way from the starting point, which is the car park with a small copse of trees at grid reference NR977579. I’d suggest therefore it’s best simply to drive, sharing the transport with others if possible.
The usual hillwalking route on Beinn Eighe is to follow the ridge west towards Coinneach Mhor and then Ruadh-stac Mòr before descending the steep (and these days very bare at the top) scree gully into the fantastic Coire Mhic Fhearchair. You’ll find the details on Walkhighlands.co.uk, with the Harveys Torridon map I’d propose best for navigation or the British Mountaineering Council’s Fisherfield and Torridon version. On both occasions here though, due to ongoing recovery from a long-term injury, I chose simply to ascend Spidean Coire nan Clach on its own and I bivvied overnight right next to the cairn marked at Pt 972 (977m) on the map. This has just enough space for a sleeping mat for one. (If you’re interested in taking similar photos, my recommendation would be a RidgeRest rather than an inflatable mat as the ground is quite rocky).
Camera equipment
Nikon D810
Nikon 24-70mm F2.8
Lee Filters, remote triggers, etc.

Strong afternoon sunshine lights up the rocky summit of Spidean Coire Nan Clach on Beinn Eighe

The view over Allt Coire Ruadh-staca and Glen Grudie as the sun sets behind Poolewe

The sun setting behind the summit of Ruadh-stac Mòr, a Munro on Beinn Eighe

The sun setting behind Loch Ewe from the summit of Spidean Coire nan Clach
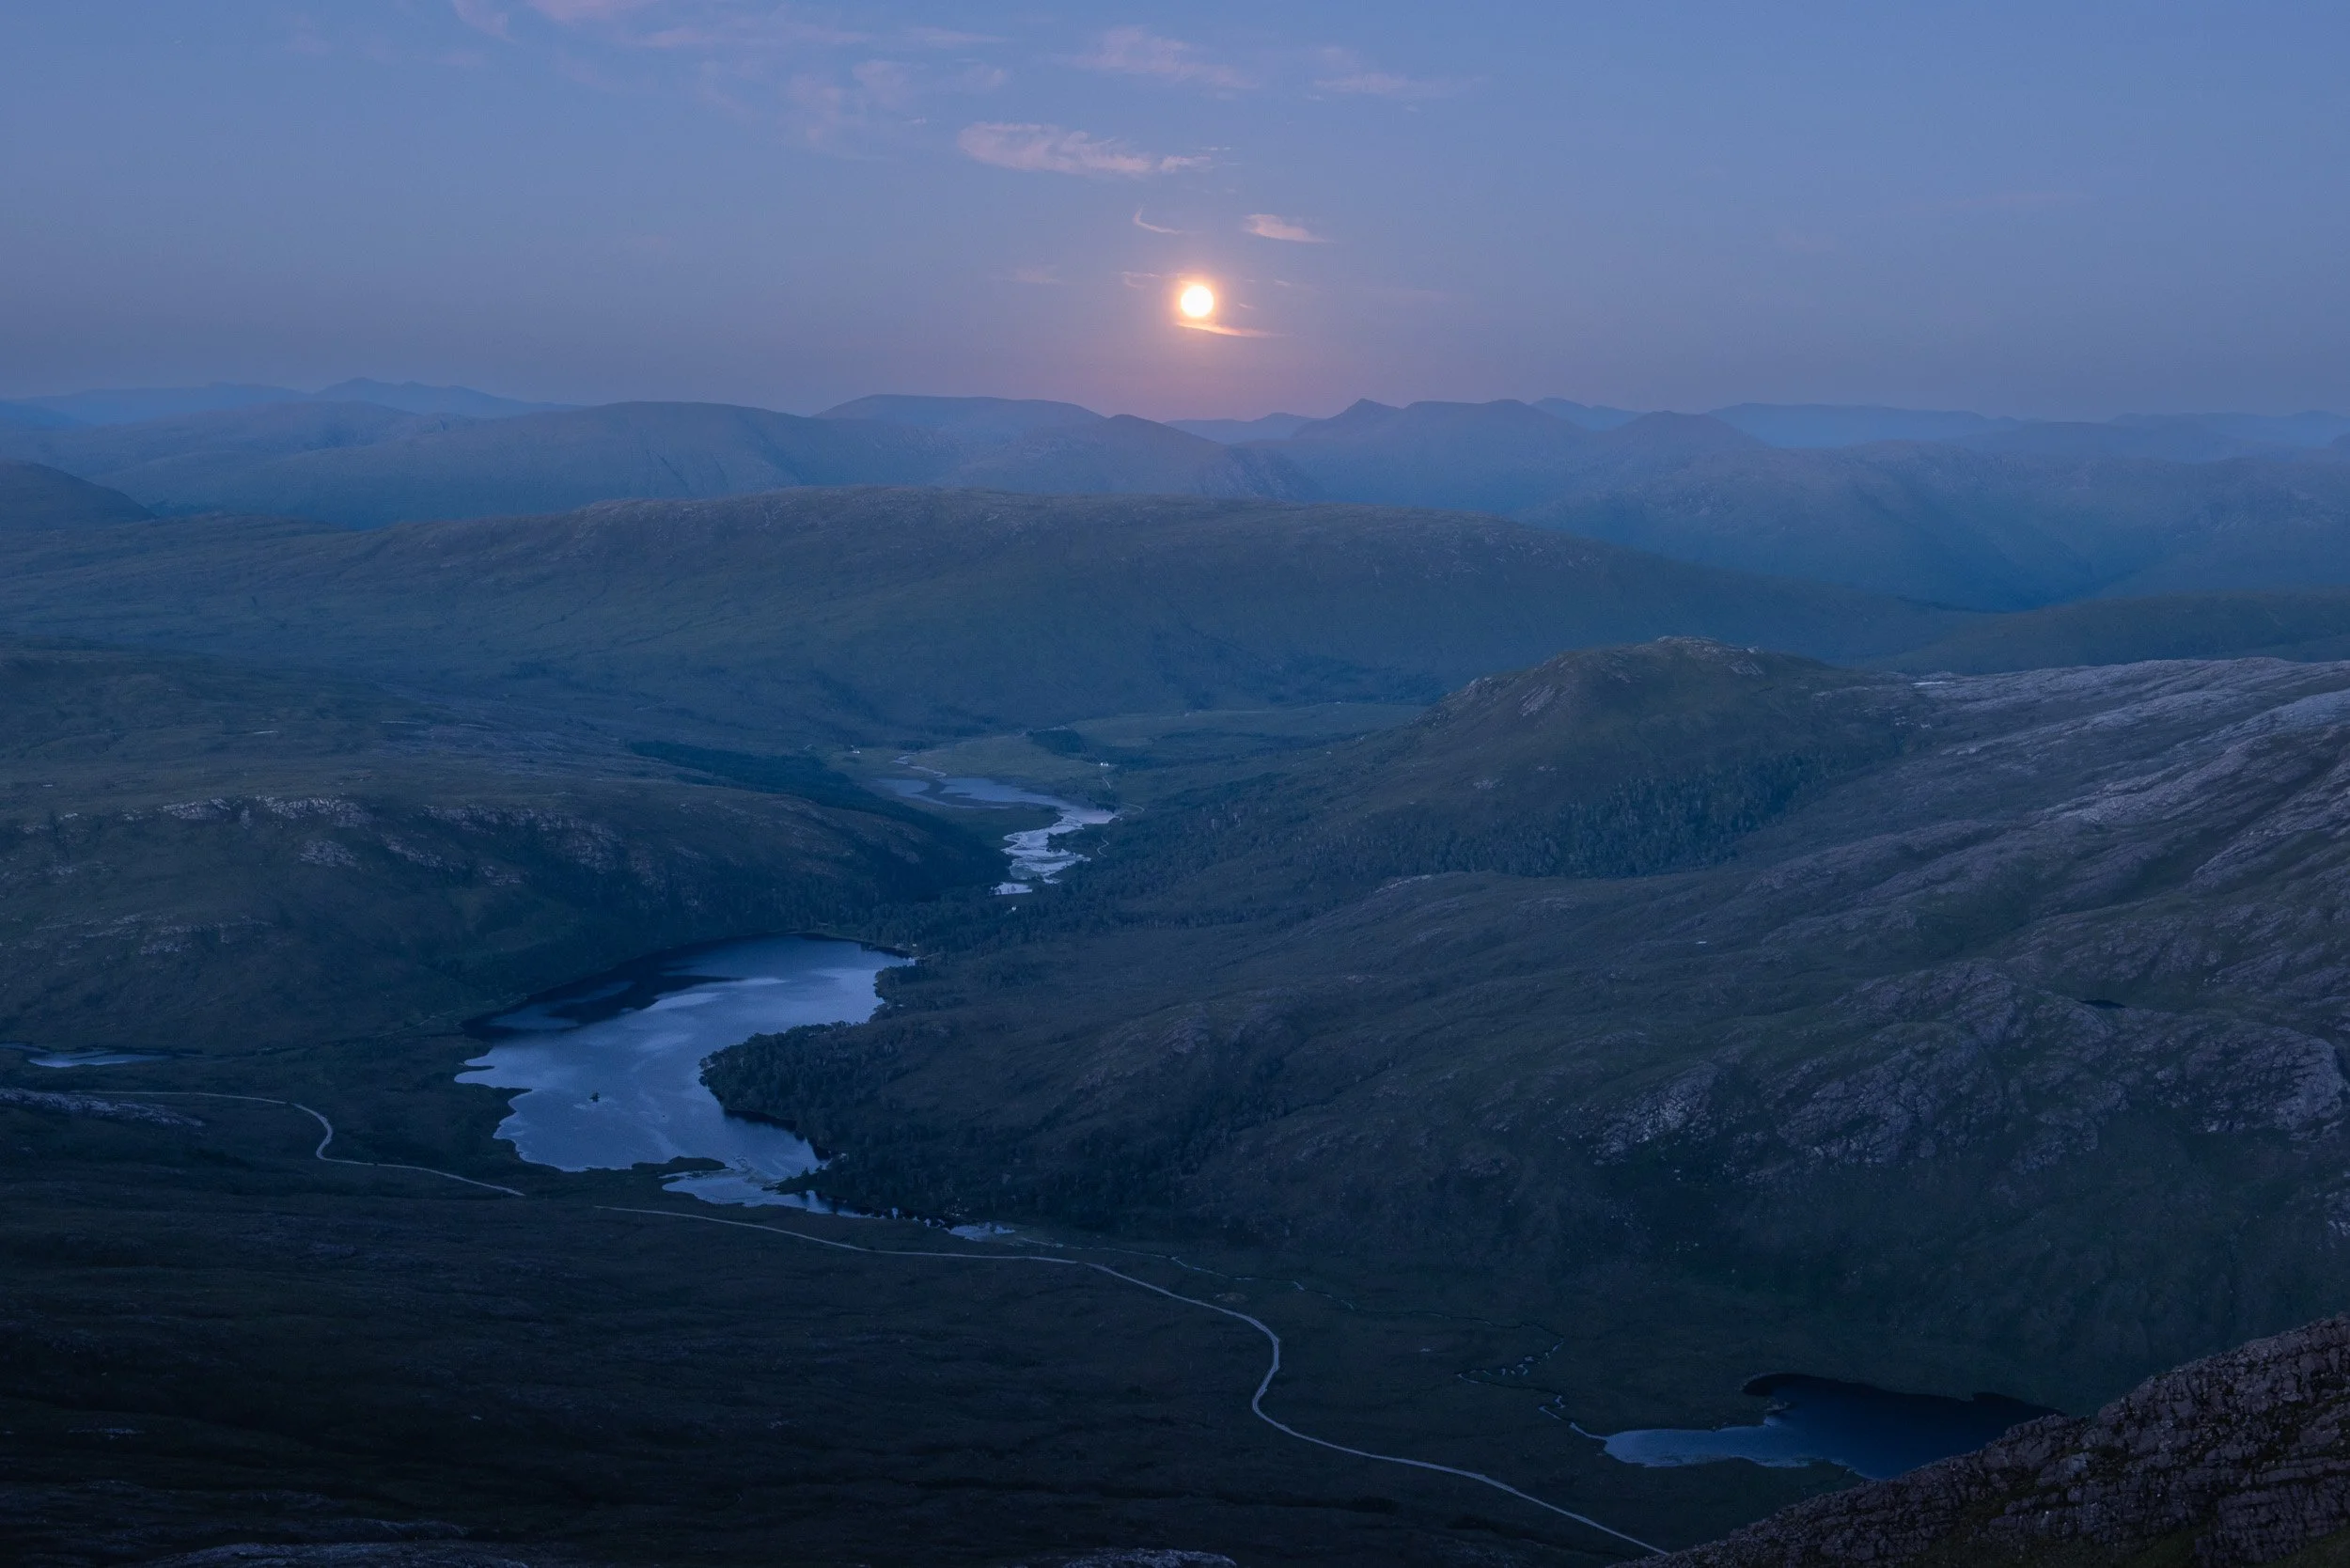
The moon rises above Loch Clair in Glen Torridon, Scotland, as seen from the summit of Spidean Coire nan Clach

The morning sun colouring the sky pink behind Spidean Coire nan Clach summit ridge

Looking east at dawn from the summit of Spidean Coire nan Clach, including the Black Carls

Dawn breaking behind Stob Coire nan Clach in Beinn Eighe National Nature Reserve

The morning sun rising over the shoulder of Spidean Coire nan Clach, with the rocky ridge out to the Black Carls

Dawn light on the Letterewe and Fisherfield hills behind Spidean Coire nan Clach

Dawn light on the rocky ridge between Spidean Coire nan Clach on Beinn Eighe towards Coinneach Mhor and Ruadh-stac Mòr
The day breaks along the rocky ridge of Spidean Coire nan Clach towards Liathach and Ruadh-stac Mòr
Early morning light on Ruadh-stac Mòr

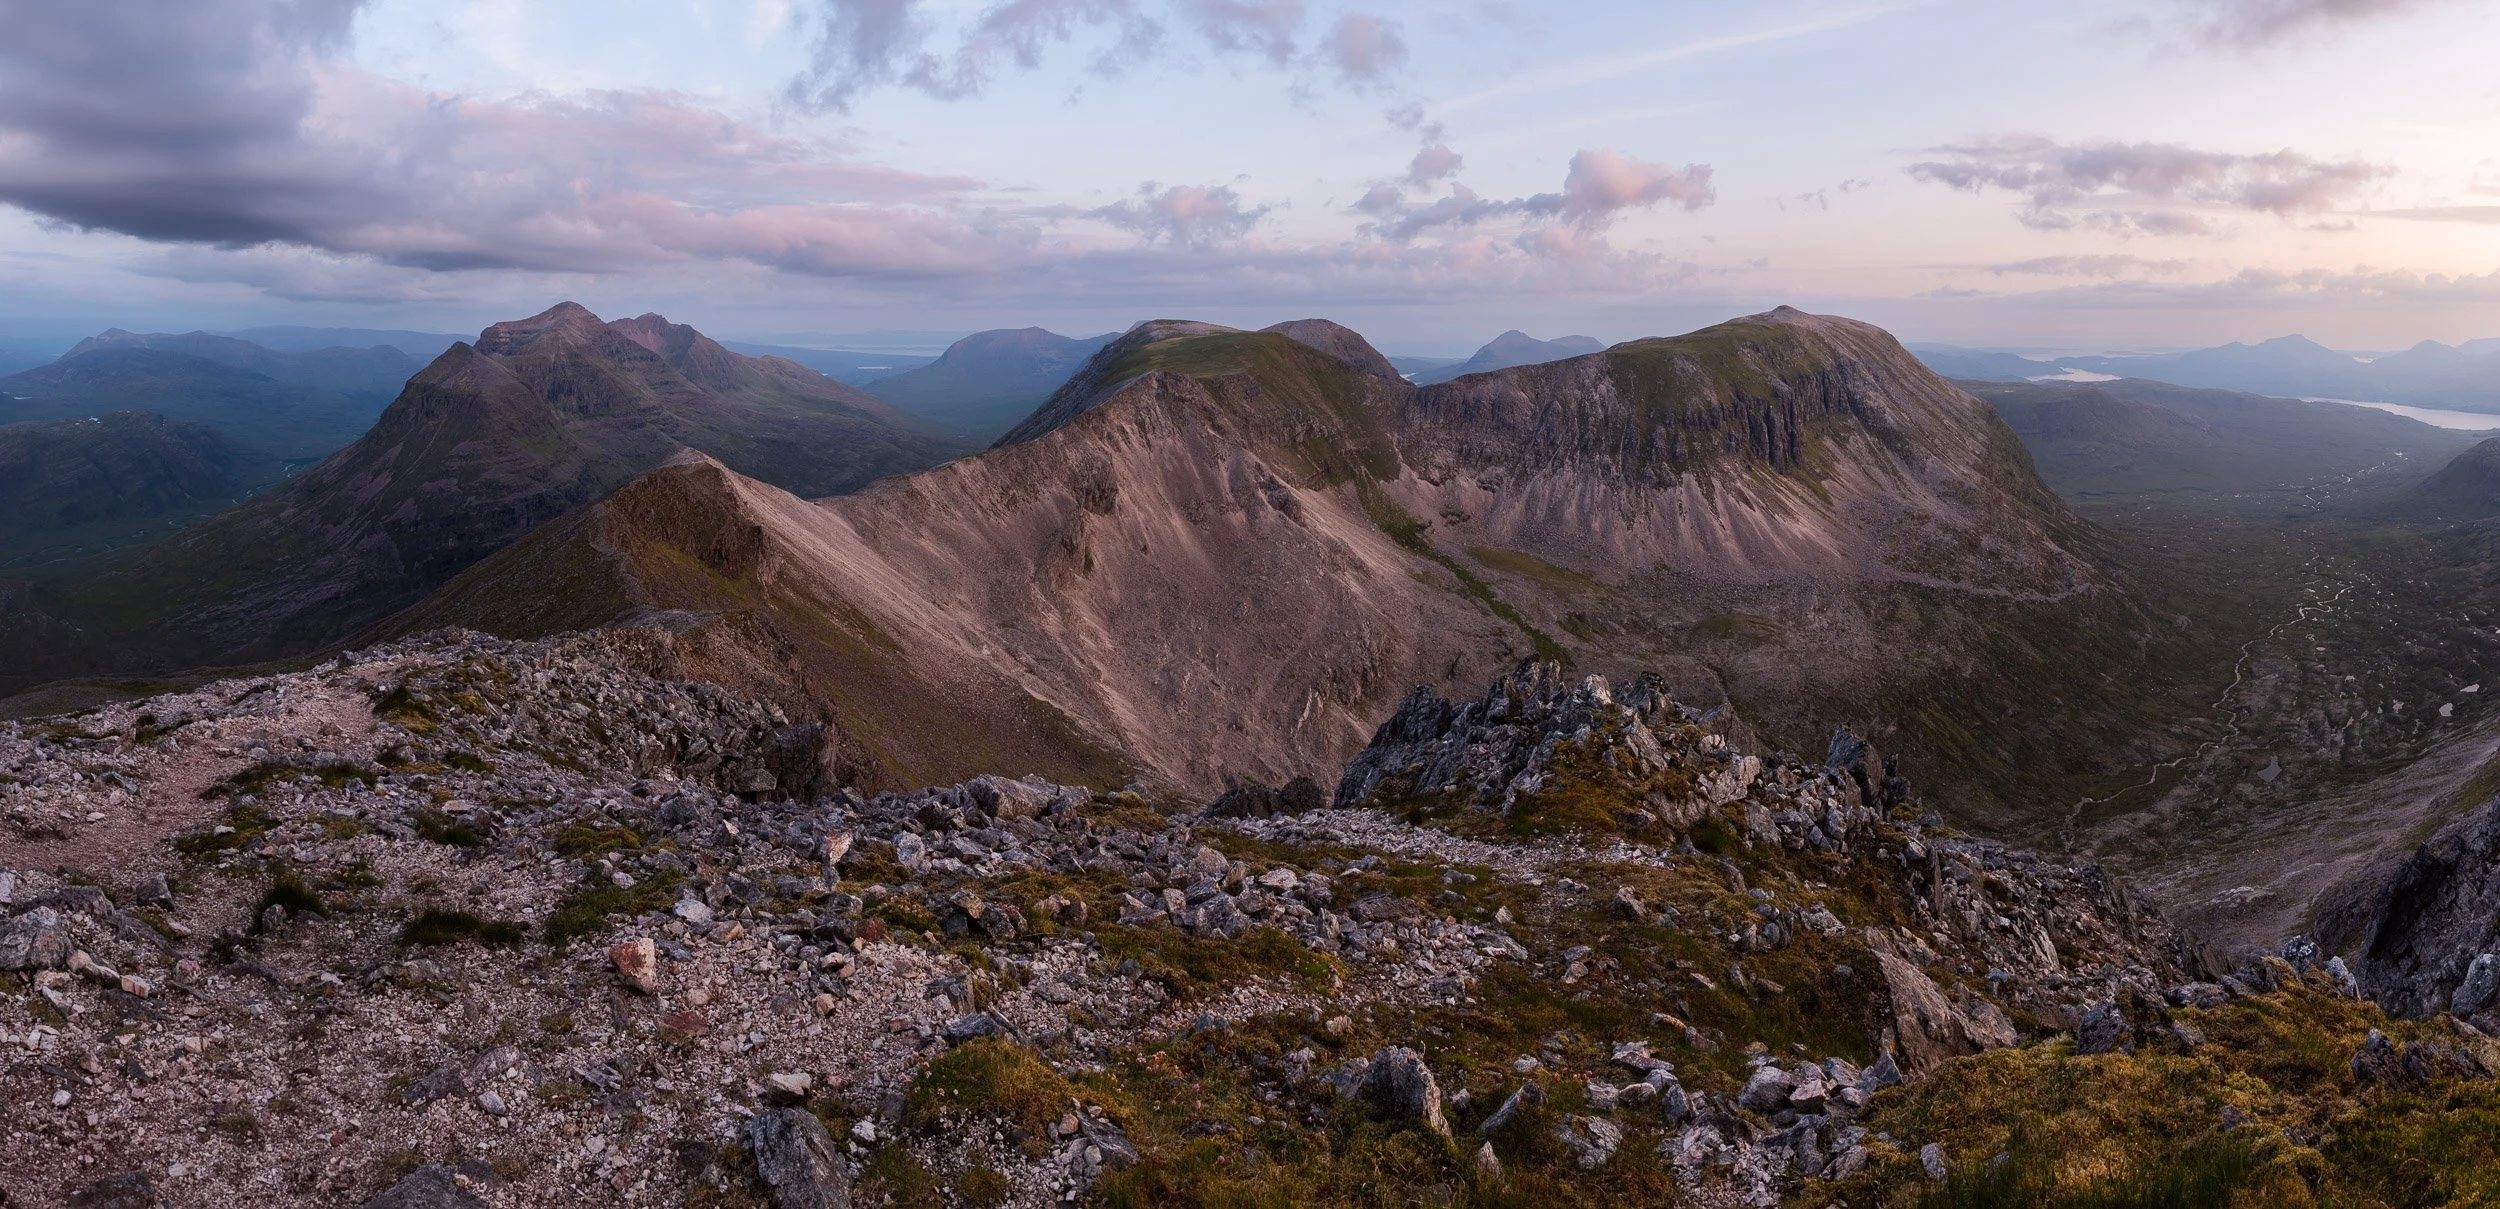
Looking west from the summit of Spidean Coire nan Clach on Beinn Eighe towards Liathach and Ruadh-stac Mòr

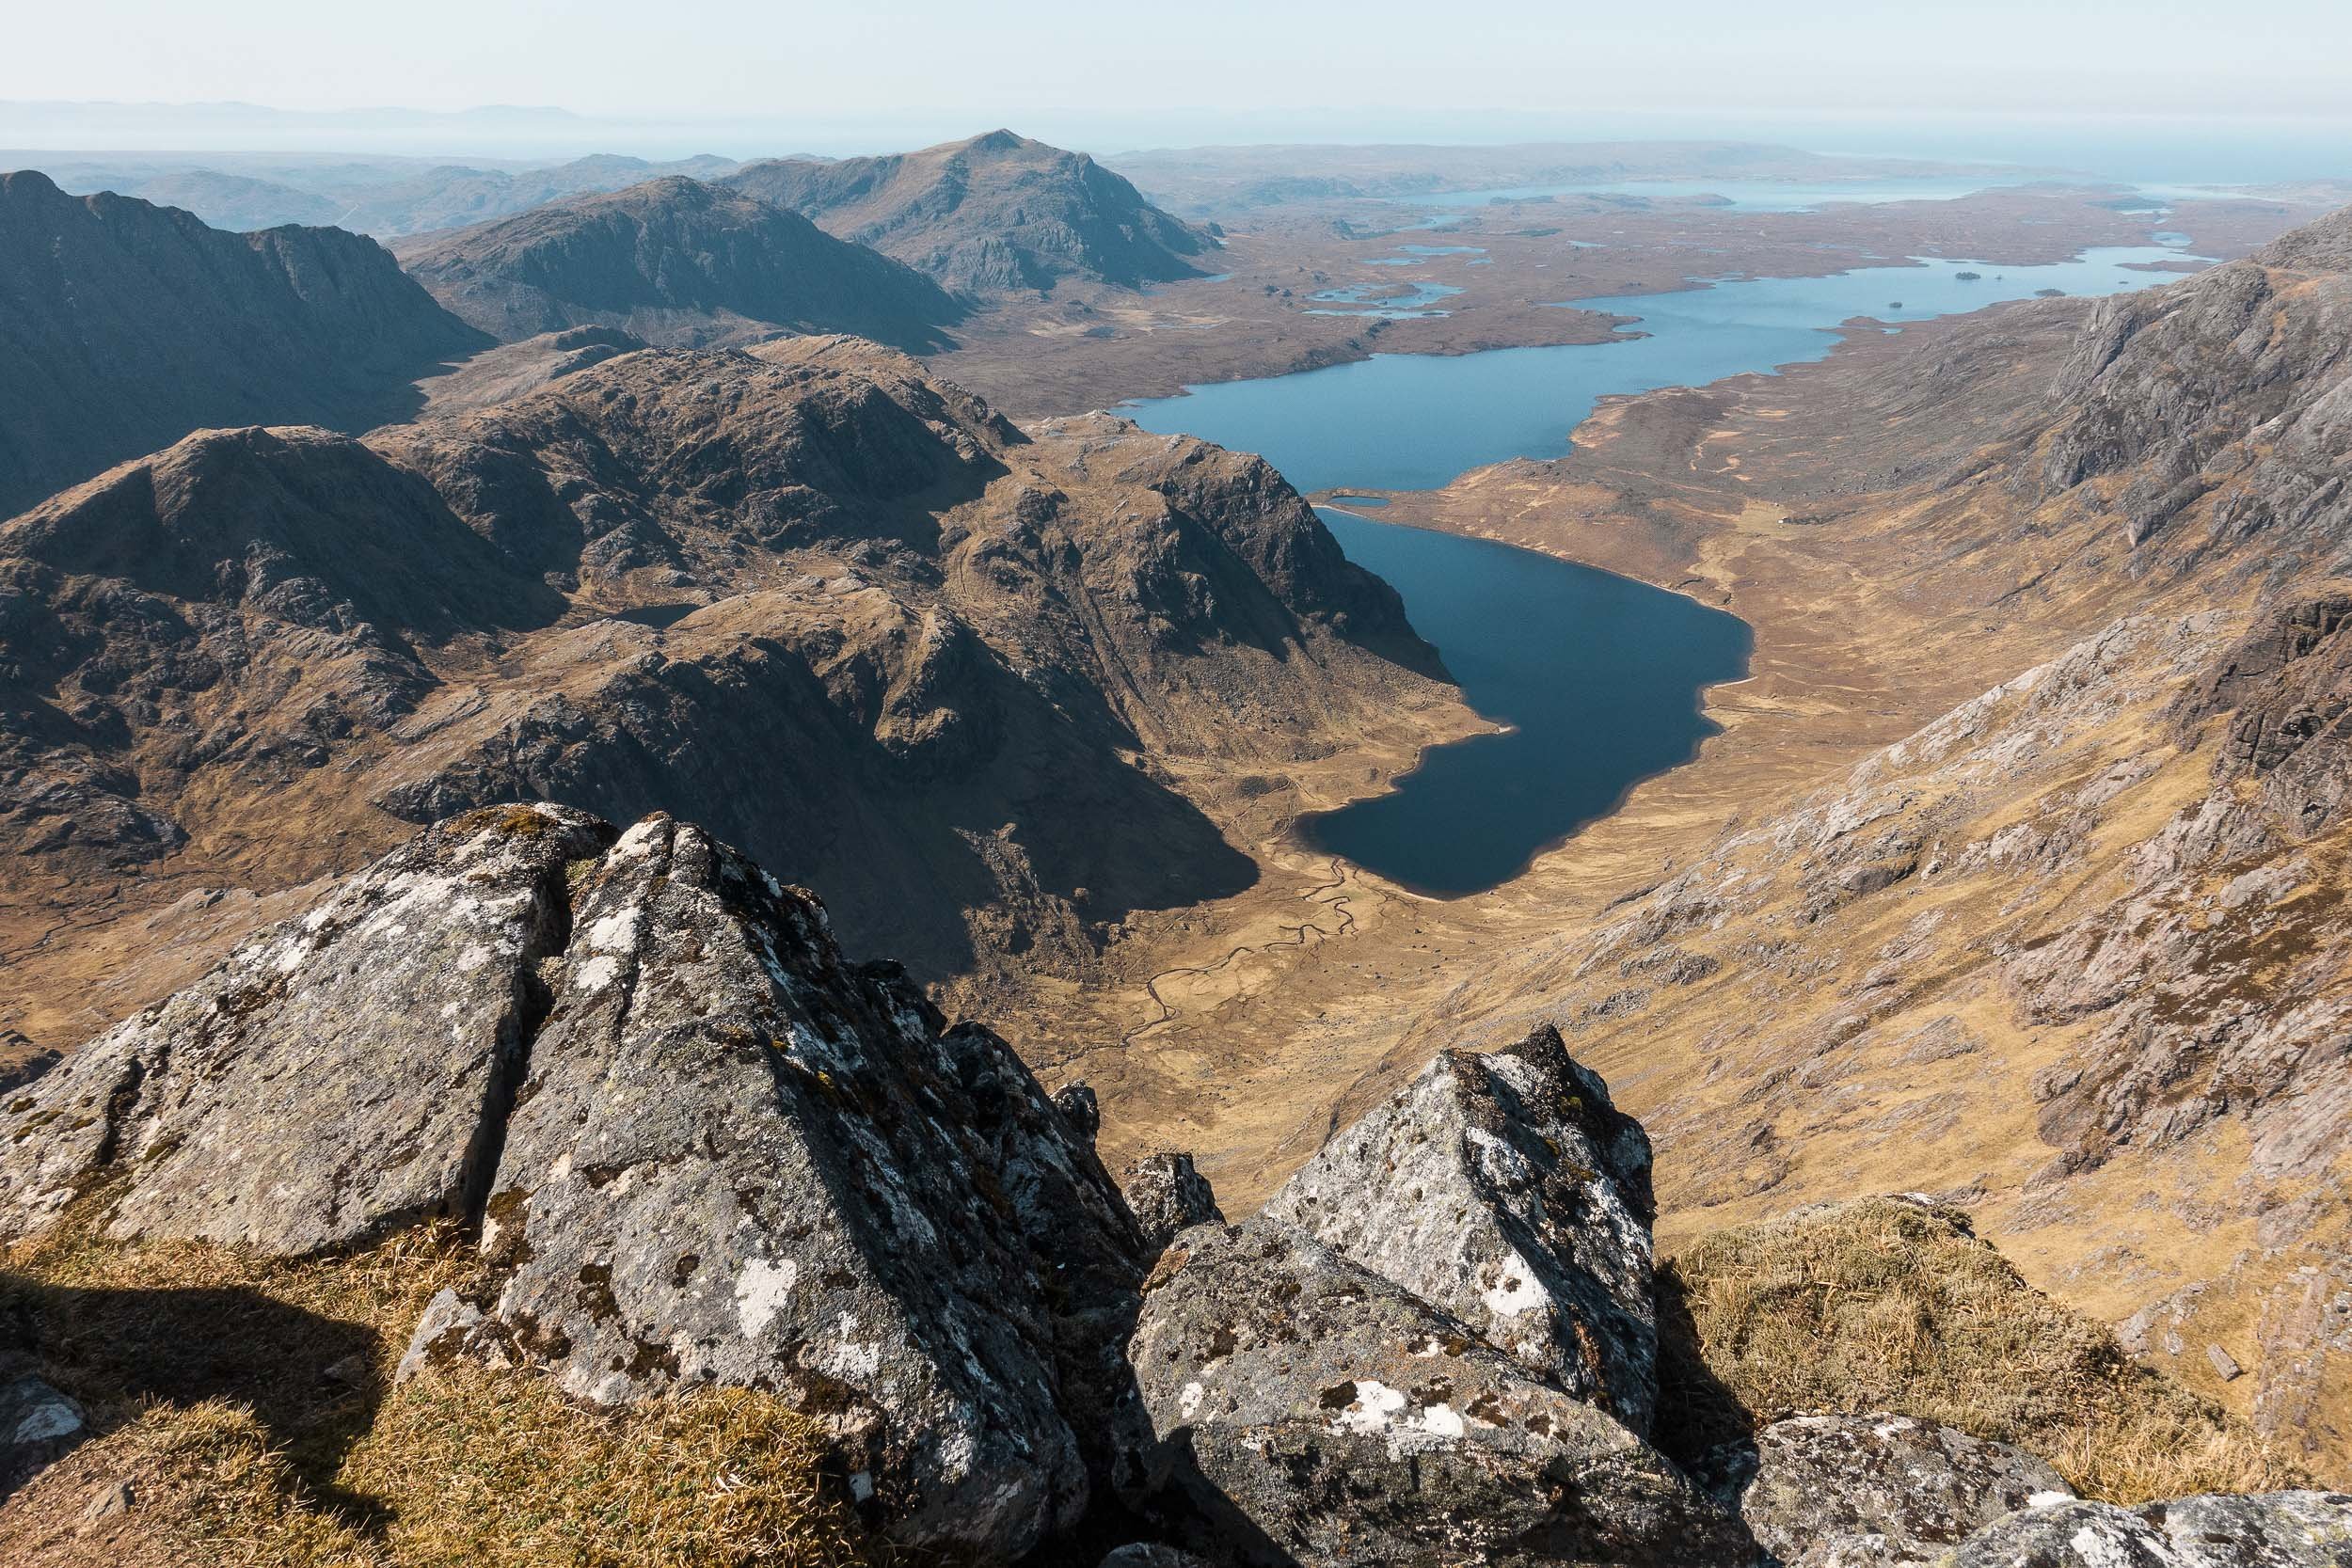
Letterewe Corbetts - On the edge of Fisherfield
Joining a friend on the Letterewe estate, on his journey to complete the Corbetts.

From left to right: Beinn Lair, Beinn Airigh Charr, Beinn Tharsuinn Chaol, Beinn a' Chaisgein Mor and A’Mhaighdean on the Letterewe estate in the North-West Highlands of Scotland
Letterewe and Fisherfield are two parts of Scotland I’d always understood to be owned by estates of the same name but as I researched this post I learnt they’re not. Rather, the area (which, combined, is managed as a large and, for Scotland, somewhat remote, deer forest) is owned by different estates including Letterewe plus Dundonell, Eilean Darach, Little Gruinard and Larachantivore. (Source: West Ross Deer management Group). The largest land-owner, I believe, with 43,000 acres of land, is the Letterewe estate, which shares on its website that is ‘protected from insensitive development and has no surfaced roads’.
There’s two common routes into Fisherfield / Letterewe, an area often labelled - I’d suggest erroneously - as ‘The Great Wilderness’ (although the ‘great’ part is definitely true). Corrie Hallie is one starting point on the A832 in the North-East for Fisherfield forest, with Poolewe for Letterewe in the North-West. I’ve also accessed Letterewe from the South-East, walking in along the north shore of Loch Maree before heading northwards over Bealach Mheinnidh towards Fionn Loch and Carnmore, plus I’ve climbed some of the the Fisherfield Munros from Incheril and the Heights of Kinlochewe. It’s also possible to access the hills from Gruinard Bay in the north. All of these routes involve long walk-ins, initially on tracks, then stalker’s paths that lead upwards onto grassy and rocky hillsides forming a landscape that hosts six of Scotland’s Munros (Slioch, Sgurr Ban, Mullach Coire Mhic Fhearchair, Beinn Tarsuinn, A’Mhaighdean and Ruadh Stac Mor), six Corbetts (Beinn a' Chlaidheimh, Beinn Dearg Mòr, Beinn Dearg Bheag, Beinn Lair, Beinn Airigh Charr and Beinn a' Chaisgein Mor) and two Grahams, which I’ll mention below.
The purpose of our visit to Letterewe was for a friend to finish all his Corbetts (which are 222 Scottish hills between 2,500 feet and 3,000 feet high). Joining him was myself, plus another friend who has completed all his Munros, Corbetts and Grahams (climbing his last one of each in 2024 over one weekend, which I’d propose is somewhat remarkable). I’m lacking behind both with only 254/282 Munros completed, and a paltry 77 Corbetts.
Our mini expedition started mid-morning on the shores of Loch Ewe, at Poolewe, near Gairloch. It was still early enough in the season to be cold in the shade - especially at night-time - but a stable, high-pressure weather window had brought sunshine and blessed us with perfect conditions for backpacking, enough so that I chose a bivvy bag over a tent, happy there was no risk of midges and a manageable risk of ticks.
We followed a great single-track path to start, passing Kernsary farm to reach Carnmore lodge and bothy before we double-backed on ourselves and climbed our first hill, the Graham, Beinn a' Chaisgein Beag. We’d walked 25km from our car. A boat or pack-raft would have been handy for crossing Fionn Loch (translation: the white loch) which the estate shares is full of brown trout. Just after 8.30pm, we stopped for the night on the bealach to the north of Beinn a' Chaisgein Mor (Grid Reference: NG983806). There were two small lochans nearby, one of which would have provided us with water, if we’d used a good filter, but we’d chosen to carry our liquid up.
The following morning, after a leisurely start, we climbed Beinn a' Chaisgein Mor, the rocky summit providing us with fine views of all the remaining hills we planned to ascend on our two-night, three-day trip. The Corbett count for my friend was now 220/222, so just two to go. Before then, we’d chosen an ascent of the north-west ridge of the Munro, A’Mhaighdean, which I’m recalling none of us had done this before but we’d all highly recommend it. There’s nothing difficult (although we did join further up) but there’s some mild clambering through crags with two squat, rocky pinnacles near the top that need some consideration to bypass, unless you’re carrying climbing equipment to descend / ascend them direct. (Tip - At the first bluff, if you’re facing towards the summit, reverse back slightly and descend left into a steep gully and take the first right). The summit of A’Mhaighdean is easily reached thereafter. And it has amazing views, often described as the best in Scotland.
A key goal of our trip was to visit another part of Letterewe that we hadn’t been to, which was Beinn Tharsuinn Chaol, a rocky ridge between the waters of Gorm Loch Mor and the remarkable cliffs of Beinn Lair. In the end, given the time of day, we traversed mostly underneath this ridge line on the south side, descending early to reach Bealach a' Chùirn and a welcome stalker’s path which led us neatly around to Bealach Mheinnidh, which we’d chosen for our second camp of the trip. After getting ourselves ready for the evening, we climbed Beinn Lair in really nice evening light and my friend’s Corbett count was now 221/222. Just one to go!
Our journey to our friend’s final Corbett, and the last hill of our trip, was characterised by steep ascents followed by even steeper descents, which thankfully were softened by fine views. We climbed 280m to the summit of the Graham, Meall Mheinnidh, and then made a punishing 460m descent and 540m ascent up to the summit of Beinn Airigh Charr. Corbett 222/222 was celebrated in style with a half-bottle of champagne before we reluctantly started our long walk back to Poolewe. Our spirits remained high throughout, as the view over Loch Maree towards Torridon and the Isle of Skye as we descended was amazing, as was the landscape looking out towards Poolewe.
Camera equipment
Apple iPhone


Lenticular clouds in Scotland
Lenticular clouds behind the Munro, Slioch, in the North-West Highlands of Scotland.

Lenticular clouds over the Munro, Slioch, in the North-West Highlands of Scotland
Lenticular clouds (Latin name Atocumulus Lenticularis, or ‘like a lens’) are ‘lens-shaped orographic wave clouds forming when the air is stable and winds blow across hills and mountains from the same or similar direction at different heights through the troposphere’. (Source: UK Meteorological Office). Orographic means ‘relating to mountains’, which is likely why I’ve always found lenticular clouds highly attractive, their dramatic shapes filling the sky and providing a fine backdrop for mountain landscape photography.
At their most magnificent, lenticular clouds bring up comparisons with alien life forms and UFOs. An excellent indicator of strong jet-stream winds at altitude, they are the result of air currents that rise up over mountainous regions and cool and condense into water droplets. As the air descends, it warms and the water droplets vapourise and disappear. At its peak however, any air just above the dew point forms into clouds that remain still above the wind - picture a standing wave over a submerged rock - and they don’t move, no matter how strong the wind is. Such clouds I understand are generally a good indicator of an incoming bout of bad weather.
I first encountered great saucer-shaped clouds in the early 2000s when I was in Patagonia, trekking around Cerro Fitz Roy and traversing a section of the Southern Patagonia Ice Cap, plus later, when researching a travel guidebook to Los Glaciares National Park in Argentina. I wasn’t focused on photography back then - there’s not any lenticular clouds in my landscape portfolio at present - but I do have a great example I feel I can share, which is the cover image for US photographer Linde Waidhofer’s large-format coffee-table book, ‘Unknown Patagonia’, which has beautiful images from Chilean Patagonia. You can view Linde’s image and purchase the book at her website - www.westerneye.com.
It’s been very rare for me to see lenticular clouds in person, either in Patagonia or Scotland, and I’ve never had the opportunity to properly photograph them. This is still the case as the images below were captured in what I’d term ‘run and gun’ style from the road-side beneath the Munro, Slioch (‘the Spear’) and further east as we returned from a backpacking trip in Letterewe in the North-West Highlands of Scotland. I’m proposing however that they illustrate exceptional enough conditions for Scotland to warrant sharing.
Camera equipment


Scotland backpacking - Glen Affric Munros
Photography from a hill walk and wild camp on the Munros in Glen Affric in the North-West Highlands of Scotland.
Glen Affric is a scenic national nature reserve in Scotland’s North-West Highlands, often visited for the beauty of the Caledonian pine forest that surrounds Loch Bheinn a’ Mheadhoin. For hill walkers, if you include nearby Loch Mullardoch, there are over 12 Munros (Scottish mountains over 3,000ft/914.4m high) within a 13km square location. Our objective was to ascend two of these Munros, Càrn Eige and Beinn Fhionnlaidh, before pitching our tent on the summit of a third, Màm Sodhail. The cloud inversion we experienced through the day - the result of warmer temperatures up high and colder below - was an unexpected bonus.


Winter hillwalking in Scotland — What to take
My clothing and equipment list for winter hillwalking in Scotland’s Munro mountains.
A companion post to my Scottish Winter camping kit list, with some updated thinking on clothing. As before, it’s not a super lightweight gear list but I’m proposing my choices are a good balance between weight and durability.

Scottish Winter weather can be unforgiving. Having the right clothing and equipment helps to make it safer and more enjoyable.
There’s two quotes I recall that I relate to Winter walking in Scotland, one which is “There’s no such thing as winter hillwalking, it’s all mountaineering” and the other being “On the coldest moment of the trip, if you aren’t wearing everything you brought, you brought too much”. (The latter to which I’d propose adding “Unless you're too cold”).
Winter walking in Scotland’s Munro hills is hugely fun, if you’re prepared for the mixed and often wild weather that will be thrown at you (which is indeed part of the fun). The below is a list of things i like to carry to help keep it that way. On top of this is navigating carefully and being hill fit so I can expend the least amount of energy across the ground I’ll cover, with the start of every year reminding me that deep, soft snow is really difficult to travel through.
Wear
Underwear — I prefer Merino wool for its odour-prevention properties and warmth. A heavier material helps to keep everything warm.
Trousers — Powerstretch tights are ideal, if not overly flattering these days as they’re super tight (tights). I have a looser pair of Karrimor Powerstretch leggings with pockets that are 20 years old and have many small holes in them but I’ve found nothing better. Soft-shell trousers are popular but are often fairly heavy. If you don’t mind wearing your waterproof trousers all day, a decent fleece layer may be all you need.
Socks — Wool is best, I’d propose, with Bridgedale’s 4-season models fitting me perfectly in size 11
Boots — I use La Sportiva’s Nepal Extremes for the warmth (a friend rates Scarpa’s Mont Blanc Pro model). Both however are what’s termed as B3 boots and are overkill for basic hillwalking. Ask your local outdoor shop about for B1 and B2 rated boots (such as Scarpa Mantas, which I’ve always rated but they are now more tech-orientated and I’ve not used them for a long time). I’d then suggest that you buy any suitable boots from that shop, rather than online, so the business is still there the next time you need advice.
T-shirt — Merino wool for me (Artilect’s M-Sprint which, at 115gsm, is super light and dries fast). I’ll add a long sleeve version or a 100-weight fleece top if it’s colder.
Arm warmers — Unusual for hillwalking, I imagine - more used for cycling - but I generate a lot of heat and when wearing a short sleeve base layer I find them excellent for keeping my arms warm and my core cool. (I use a pair from Endura, made from Powerstretch-style fleece).
Windshirt — I rate Patagonia’s Houdini windproof because it’s got a hood, but it would be better if it had cinch cords at the front. You can use your shell jacket instead and save carrying that weight but a windproof is much more breathable.
Hat — I prefer a thin nylon head-band (Dynafit) as it allows heat to escape from the top of my head - anything fleece or wool is too hot for me to walk in. If I choose a hat, Vaga’s Club Cap has an uncanny ability to not blow off my head, despite strong gales.
Gloves — Rab Powerstretch or Montane Trail Lite gloves I find to be an excellent first layer, with more protective pairs carried in my pack
Warmth
Fleece or softshell jacket — I still rate Rab’s Winter Guide jacket but it was discontinued back in 2022. It’s very heavy (850gm) but it has a nice ‘bomb-proof’ feeling about it when I put it on (as long as there’s a windproof layer on top - I find the Vapour-Rise fabric, despite Rab’s marketing claims, to be not very windproof at all). There was a later version which was a bit lighter but I imagine you’d always prefer to be wearing one than carrying it. The current (2024) Vapour-Rise Summit jacket unfortunately I find too light and a middle option might be Patagonia’s Nano-Air Hoody, but it’s expensive and a thick 200 weight fleece will definitely do (I used a Berghaus Spectrum pullover for many years).
Insulated jacket — A jacket to keep me warm when I’m stopped and for wearing in the worst weather. I’d recommend Rab’s Generator Alpine for a good forecast and for backpacking and Mountain Equipment’s Citadel jacket for a day walk, or perhaps their Fitzroy model as a ‘do it all’ alternative. If I’m planning to be a long way from the road, I’ll also consider a pair of Mountain Equipment Compressor Pants.
Buff — Any model will do. I have a Celtman-branded one, which is made of a shiny nylon, plus a cycling one from Castelli, which is more like a thin fleece. I prefer the latter.
Balaclava — Powerstretch again. Lots of head protection in a light package.
Gloves — I’m wearing gloves, as above, but they’re thin and not windproof so they’re best suited for lower down. Waterproof gloves are an option for a heavier layer but I’ve always found when they get wet they stay wet (sometimes for days afterwards). My current choice is a Mountain Equipment Randonee glove, a soft-shell glove with a pile inner which I’ve found to be excellent. If they do get too wet, I can just squeeze the water out of them.
Insulated mitts and outers — I like a third layer for my hands, for emergency purposes. My preference would be a pair of thick Primaloft mitts, such Mountain Equipment’s Citadel Mitts, but they don’t fit me and their Fitzroy model Mountain Equipment no longer make. I’ve not yet found any suitable alternatives. I’m using instead a long-discontinued pair of sheepskin mitts from Extremities that have a separate, thick outer waterproof shell. They’re not light but they’ve proved themselves to be more than warm enough during a very long open Winter bivvy.
Wet
Waterproof top - I switch between a Mountain Equipment Lhotse and a Montane Ajax depending on the moisture expected. (The former is a neater fit so I wear a belay jacket over the top. The latter I can fit underneath my shell jacket in wet weather if need be). I don’t think you’d go wrong with the 3-layer versions from Montane, Rab or Mountain Equipment, all of which have hoods they have optimised for UK Winter weather. (The protection from any hood I’d propose shouldn’t be underestimated).
Waterproof bottoms - Berghaus’ Goretex Paclite Pants I’d propose are a good balance between too heavy and too light. The assumption being you’ll be walking with a good forecast. Goretex Paclite Plus or 3-layer Goretex are the more bombproof options for livelier weather.
Gaiters — Essential for wet ground and/or when there’s lots of fresh snow around. I prefer to wear gaiters these days rather than carry them, using a comfortable older pair from Rab.
Hydration
Water bottle — Treadlite Gear’s bottle pouches give me access to water up front without taking my pack off, similar to a running vest. Their marketing says the pouches can accommodate up to a 750ml water bottle. I switch between a 600ml Smart water bottle and a 500ml Nalgene. I’ll also carry a 1-litre Nalgene, which I find simple to use with big gloves on. Arguably you don’t need both, but I like to keep hydrated.
Flask — If I’m on my own, I’ll likely bin the pouches up front and take an MSR Windburner stove because the weight is equal, sans the liquid, and I can use it more than once. When I’m walking with others, few wish to sit around in the cold waiting for a stove to boil so I’ll take a Thermos Ultimate flask for a hot drink (my preference being diluted orange juice with a pinch of salt).
Safety
Minimum;
Map / waterproof case — Essential and I’ll take two maps in Winter so I have a spare.
Compass — You likely won’t need two compasses but I lost one once - it came off around my neck - so I carry a lightweight spare (Silva Field). Their Expedition 4 model is my first choice.
Headtorch — I use Petzl’s Nao+ model, with either one or two batteries depending on how far I plan to be from the road. I might also take a Petzl Bindi as a backup.
Phone — I’d recommend downloading the Sarloc app, which was developed by Russ Hore, a former Mountain Rescue team member, plus registering your phone for calling 999 by text, i.e. emergency SMS. Modern mobile phones are highly water resistant but I’ll always carry it in a dry bag or waterproof case, and either turn it off or keep it somewhere close to my core so it’s warm and the battery doesn’t die quickly. (Airplane mode is your friend).
Ice axe — Petzl’s Summit 59cm is my default ice axe but if I don’t anticipate needing it, or using it very much, I’ll carry a very lightweight Petzl Ride, accepting a risk that it’s not optimal for ice axe arrest
Crampons — I have an old pair of Grivel G12 crampons, which are blunt and heavy. I’ve sharpened them many times but the latest G12s, and other models such as Petzl’s Vasak crampons are attractive, as they’re much lighter. Ten point crampons such as Grivel’s G10 might also meet your needs.
Blizzard bag — Blizzard’s Active Range (2-layer) I feel is a good choice for the Scottish Highlands. I have the survival bag but I imagine in a true emergency scenario I’d be cutting it into a blanket (picturing it would be difficult to get me or someone else inside with, e.g. a broken leg or ankle).
Bothy bag — It could be argued this isn’t required if you have a Blizzard Bag but I’d never go out without both. The protection you can get from a bothy bag (having sat in one for over 12 hours, wishing I had a blanket as well) is remarkable. I’ll carry either Terra Nova’s 2-man bothy, or if the forecast is benign possibly a Supalite Bothy Bag.
Ski goggles — I have a cheap pair which I’ve had to glue the foam back on a few times. Spending money on a decent pair would be sensible but googles are something I’ve found I rarely need to use, and the ones I have are functional, so I’ve never got round to it.
Recommended;
OS Maps app — Amazing, easy to use app as a back-up to your map and compass and a bargain as regards to price versus benefit.
Watch — I use a Garmin Fenix 5 model which I’ve programmed to display my grid reference, altitude, distance walked and speed on the front screen, which I find invaluable. Occasionally, I’ll upload a GPX file I can follow if need be, depending on the complexity of the route.
Garmin inReach — I like going out on my own and having a means of communicating back home is useful, as is the emergency response capability, for absolute worst case scenarios. The latest Apple iPhones have satellite messaging, which could be argued makes an inReach redundant, but the battery life is much longer and I’m happy to carry both as I don’t like to rely on a single such safety item. Garmin’s 2024 cost model changes, so you only have to pay monthly for the emergency element (with e.g. texts and weather forecasts chargeable), is ideal for my purposes and makes it a lot more affordable (handset cost aside).
Powerbank — Essential if you’re using all the technology above. I use Nitecore’s 10,000 power brick (10,000mAh = 6,400mAh) and the appropriate cables to charge my watch mostly, plus my iPhone and inReach.
Trekking poles — Walking poles make travelling in snow so much easier, as well as river crossings. I’m currently using a pair of Alpkit Carbon Marathon poles. They aren’t bombproof - I’ve broken one pole and the clasp came loose on another - but they’re fairly robust and nice and light.
Personal care
Suncream — SP50+ is the minimum I consider taking outdoors. I’ve been quite badly sunburnt three times and I have no wish to have this happen again.
First aid kit — I’m always considering risk in Winter and my aim is to need no first aid but I’ll always carry a decent-sized kit that covers blisters, mild to heavy bleeding and breaks. Anything major, especially if I’m on my own, is going to warrant emergency decision-making.
Nose/lip balm — Not essential by any means but my nose runs constantly outside in the Winter (okay, from October) and this saves me have chapped skin for days afterwards
Photography
In addition to the above, I’ll choose from one of the items below for photography;
Mobile phone — Occasionally I’ll rely solely on my phone (e.g. if the weather forecast is poor and I don’t expect to do anything with the photos) but I prefer to keep it for emergency purposes
Sony RX100 — A great balance between lightweight and quality outcomes. I’ll carry a spare memory card, battery, dry bag and Lenspen. Difficult to use as anything other than a point and shoot with big gloves on but not impossible.
Nikon D810 - Love it but it’s heavy with a 24-70mm f2.8 lens attached (and sometimes a 70-200mm f2.8 in my bag) so I’ll keep it for when I anticipate good photography opportunities (which doesn’t mean blue skies, stormy weather is much more interesting). There’s no need for me to carry a spare battery unless I’m out for a few days.
GoPro Hero 8 — The opposite to the above in that it needs lots of batteries (x3 at least for a winter’s day out and even then I’m caught short when the battery gets cold and it dies in minutes). I’d like the Hero 9 or later, which are compatible with GoPro’s Enduro battery, which has a vastly better battery life in cold weather.
Are you new to going out in Winter?
I’d recommend Mountaineering Scotland’s ‘Think WINTER’ campaign, especially the sections on Navigation, Skills and Avalanche.

Still the windiest day out I’ve had on a Scottish hillside, where we were driven to our knees on a 25-degree slope. Only Patagonia has come close.

Wild camping and photography - Beinn an Aodainn
Sunrise from a wild camp on the summit of Beinn an Aodainn in the Knoydart peninsula of Scotland.
Part of a Wild camping and photography series.

Beinn an Aodainn (also known as Ben Aden) is a Corbett in the North-West Highlands of Scotland. It’s located in Knoydart which is roughly 25 miles north-west of Fort William as the crow flies. A typically rugged landscape, it’s a long way from the nearest road.
Scotland’s Knoydart peninsula is commonly promoted as a ‘Last Great Wilderness’. I don’t believe this to be true (you can reach it by ferry, there’s a public house and there’s many man-made tracks and paths that aid your travel) but I do believe that another term for it - ‘The Rough Bounds’ - is highly accurate. The prevailing rocky or tussocky ground, and relentlessly steep slopes, makes for taxing hillwalking, especially with a heavy backpack (or - on two occasions where I’d initially thought I was fortunate to have blue skies - when you’re being baked under a relentless sun). Add to this a long walk from the nearest entry points to get to the foot of the peak - the shortest for Beinn an Aodainn is three hours - and you’re faced with some of the toughest hillwalking in Scotland. It’s a gold mine though for backpacking and camping.
This was my fifth time visiting Knoydart, having previously walked in from both Kinloch Hourn and Glen Shiel, taken the ferry in from Inverie and sea kayaked in along Loch Hourn. My friend had four hills left to do on his Corbett round - having completed all his Munros - and I’m slowly ticking off all my Munros. Garbh Chioch Mhor and Sgurr nan Coireachan are two of just three I’ve not done in these parts with the other being Meall Buidhe, which I’d bypassed back in 2011 due to nerve issues in my foot.
On that 2011 trip, we ticked off most of Knoydart’s Munros and Corbetts, including Beinn na Caillich, Ladhar Bheinn, Luinne Bheinn, Beinn an Aodainn and Sgurr na Ciche. On another trip I climbed Beinn Bhuidhe and on a different visit, we ascended Sgurr nan Eugallt and the Graham, Slat Bheinn, before topping out on Sgurr a'Choire-bheithe. Our plan that day was to do Beinn an Aodainn as well, negating the need for this current trip, but the length of our route, heat exhaustion, the late time of day and a plague of horse-flies all tallied up to us choosing to miss it out. The best things though, as is said, often come to those who wait.
Getting there
Our starting point for Beinn an Aodainn was near Kinloch Hourn, which is around 1h 40 mins travel from Fort William by car, or perhaps a taxi if you’re doing a through-route (see this Weekend Wonder: Ladhar Bheinn feature for more options). We walked along the shores of Loch Cuaich / Loch Quoich on a mostly boggy and very overgrown track, for approximately 3 hours, before heading first towards Lochan nam Breac and then into the corrie, following Allt Coire na Cruaiche to reach Bealach na h Eangair (following the route as described by Walk Highlands). We were on the summit of Beinn an Aodainn in just under six hours.
Camping-wise, there’s relatively few spaces I saw to put a tent on the summit of Beinn an Aodainn but we easily got two pitches and there looked to be places off to the north-west as well. I’d recommend taking a soft flask with a filter as there are numerous small lochans near the summit you can take advantage of. Otherwise (and probably also in drought conditions) you’ll need to carry all your water up the hill.
Camera equipment
Sony RX100 Mark V - I considered taking my full-frame camera but we had three Munros to do after this summit so I decided that the lighter the equipment I carried the better.

The walk in along Loch Cuaich

Looking back to Loch Cuaich from the ascent of Beinn an Aodainn. Our starting point was the far shoreline, out of sight to the left.
Bealach na h Eangair, with Loch Nevis visible between Sgurr na Ciche and Beinn an Aodainn (Click to view larger)

Loch Nevis from the summit of Beinn an Aodainn

Rock towers near the summit of Beinn an Aodainn
The rising sun behind a cloud-covered Loch Cuaich from the summit of Beinn an Aodainn (Click to view larger)


Early morning clouds dispersing from the shores of Loch Cuaich

Wild camping and photography - Beinn Laoigh
Photography from a summit camp on Beinn Laoigh, a Munro in the West Highlands of Scotland.
Part of a Wild camping and photography series.

Looking over to Ben Laoigh's rocky east ridge and Coire Goathach from Ben Oss
Beinn Laoigh, commonly known as Ben Lui, is a Munro in the West Highlands of Scotland. Located c.8km from the village of Tyndrum, the peak is seen often from the A85 roadside, it’s fine horseshoe-shaped northern corrie, Coire Goathach, providing a commanding view for passing traffic, especially so in when it’s in full winter conditions.
A winter ascent of Beinn Laoigh from the east, up the classic Central Gully, had long been my plan but my only previous ascent of Beinn Laigh was in 2001, from Glen Lochy in the west due to an outbreak of Foot and Mouth Disease in the United Kingdom. I’ve not climbed Central Gully - and likely won’t as my appetite for winter climbing has waned as I’ve got older - but on this occasion it wasn’t possible as a winter climb as there was no snow of note, despite being December. What had piqued my interest was a temperature differential of greater than twelve degrees, with the forecast for Tyndrum at 232m being below freezing conditions and Beinn Laoigh’s summit (at 1130m) forecast for plus 12 degrees Celsius - a classic recipe for a cloud inversion.
Cloud inversions, or more accurately temperature inversions, I understand are relatively rare. Most common in the colder months of the year, they’re caused - in my super simple terms - when the air temperature at lower altitudes is colder than the air at higher altitudes, which causes a layer of fog to form beneath you as you climb a mountain. I’ve popped out of the fog before on a Munro to find myself above a cloud inversion, which is great, but I much prefer waking up on the summit of a peak with the clouds beneath me.
Getting there
I travelled from Edinburgh to Glasgow Queen Street by train (Scotrail) and then took an onwards connection from Glasgow Central to Tyndrum on the Fort William line. From Tyndrum, the common route to Beinn Laoigh is a long (c.9km) but straight-forward walk from Dalrigh up Glen Cononish, home of a gold mine, to the foot of Coire Goathach, which I followed for a while but, because I was ticking off Munros on my Munro round, I broke off early up the steep south-west slopes of Beinn Dubhcraig to climb Ben Oss first. Heading south-west from Ben Oss and then north-north-west up the flanks of Beinn Laoigh to its summit felt somewhat adventurous but it was mainly a lot of hard work, especially with camping and photography gear. I arrived at the summit at 4pm, just as the sun was going down, and I pitched my tent just off the summit, at a small area of grass which I imagine is the only possible place on this fine rocky mountain to put a tent.
Camera equipment
Nikon D810
Nikon 24-70mm F2.8
Lowepro Toploader AW 75


The moon rising above the waters of Glen Cononish, which eventually flow into Loch Tay

Wild camping on the summit of Beinn Laoigh

The view south from Beinn Laoigh summit towards the Arrochar Alps, as the sun sets

Ben Cruachan and Stob Daimh from the summit of Beinn Laoigh

Looking over Beinn a' Chleibh towards the Paps of Jura

A cloud inversion fills Glen Cononish beneath the east ridge of Beinn Laoigh

A cloud inversion fills Glen Cononish as seen from the rocky summit of Beinn Laoigh

The slopes of Beinn Chuirn, a Corbett above the gold mine in Glen Cononish, and beyond towards Glen Lochy

A large split rock on the summit of Beinn Laoigh gives a commanding view down a cloud-filled Glen Cononish

Descending into the clouds on the return to Tyndrum

Charlie Lees - Mountain running
Charlie Lees running on the Grey Corries ridge in Lochaber, West Highlands of Scotland.
Professor Charlie Lees is a well-respected consultant gastroenterologist at the Western General Hospital, Edinburgh and honorary senior lecturer at the University of Edinburgh. We’re on location on the Grey Corries Munros in the West Highlands of Scotland.


Wild camping and photography - Màm Sodhail
Overnight on Màm Sodhail, a Munro above Glen Affric in the North-West Highlands of Scotland.
Part of a Wild camping and photography series. (View more images from this Glen Affric backpacking trip in a separate blog)

The moon rises behind the ridge leading out from Mam Sodhail to Sgùrr na Lapaich
As I’d packed for a weekend’s backpacking with a friend in November, in Glen Affric in the North-West Highlands of Scotland, I realised that I hadn’t missed the weight of a DSLR camera, especially on top of the 12kg of hillwalking and camping equipment I was planning to carry.
Throughout the summer season I’d been illustrating my outdoor activities with a light-weight Sony RX100 compact camera, photographing trail running routes in Edinburgh’s Pentland Hills plus some attempts I’d made on Tranter's round in Glen Nevis. It was a change therefore to be carrying a professional DSLR up and down hills again. The image quality and usability of my work models - a Nikon D810 in this case - is streets ahead compared to my Sony and I was banking on the photographic opportunities a favourable high pressure forecast, squeezed in between two periods of low, looked to offer. Old-school DSLRs and professional lenses however aren’t light and I was conscious I was adding an extra 2kg to the weight of my pack for a trip that we'd mapped out as 40km distance over two days, with 2100m ascent.
The weight penalty of professional camera equipment I felt was worth it on this occasion. Glen Affric is often referred to as one of Scotland’s most scenic glens and the Walk Highlands website describes two of the peaks we'd chosen for our backpacking trip - Càrn Eige and Màm Sodhail - as the "highest mountains north of the Great Glen and spectacular viewpoints". Both mountains are Munros, two of the 282 Scottish peaks over 3,000ft high that are listed in Hugh Munro’s tables, with Mam Sodhail, or the ‘Hill of the Barns’, being the smaller of the two by just two metres, standing 1181m tall.
We’d started our trip the previous day at a car park in Glen Affric, camping c.6km from the car on what I imagined were the only two pieces of dry ground that day in Gleann nam Fiadh. The terrain was drier higher up and, in the morning, as we admired the golden colours of the landscape - it was abnormally autumnal weather for November - we ascended Coire Mhic Fhearchair and headed for Sròn Garbh and the rocky ridge that leads from Stob Coire Dhomhnuill onto Càrn Eige. From there we summited Beinn Fhionnlaidh and retraced our steps, our plan being to continue over Màm Sodhail towards another nearby Munro, An Socach, and camp on a bealach beneath that peak, ascending An Socach for our fourth Munro of the trip the following morning.
I distinctly recall standing beside Màm Sodhail's huge summit cairn, pondering the views Càrn Eige and Màm Sodhail were said to offer. We couldn’t see much at all but neither of us were even remotely disappointed. Since lunchtime, a thick blanket of cloud had filled the glens beneath us, 360 degrees around. It stretched as far as our eyes could see - at least all the way to Fort William in one direction, almost 100km away. Camping above a cloud inversion is not something I’ll ever turn down and we easily made the decision to stop for the day, much earlier than planned, pitching our tents about 3.30pm as the sun started to dip towards the horizon. Settling in to take in the glorious view we had above the clouds, I thought of the many times I had walked and camped in poor weather. These were special moments indeed. (If it’s any consolation, on exiting our tents the following morning, we found ourselves to be completely within these clouds, with absolutely no views at all).
Getting there
For Glen Affric, head south out of Inverness on the A82 toward Drumnadrochit. Take the A831 towards Cannich and then continue south-west along Glen Affric to reach the car park at grid reference NH215242. For Càrn Eige and Màm Sodhail, take the track through the woods which leads you first west and then north into Gleann nam Fiadh. Alternatively, drive further up Glen Affric and park at GR N201234, follow the track along the northern side of Loch Affric and ascend via Coire Leachavie.
Camera equipment
Nikon D810
Nikon 24-70mm F2.8
Lowepro Toploader AW 75

Mam Sodhail's large summit cairn

Wild camping on the summit of Màm Sodhail

Sgurr na Lapaich peaks out above the clouds

Clouds lap over the bealach between Màm Sodhail and Càrn Eige

Gleann nam Fiadh filled with clouds between Carn Eige and Sgurr na Lapaich

Looking over the Glen Shiel peaks towards Ben Nevis on the far horizon

Donnie Campbell - Mountain running
A portfolio of images of Donnie Campbell, a Scottish running coach and mountain endurance athlete.
Donnie Campbell is a mountain endurance athlete from Scotland (also a running coach - GetActiveRunning.com) who is sponsored by Salomon and other brands such as Suunto. A former Royal Marine Commando, Donnie was once Scotland’s Munro Round Record Holder, after running 833 miles and climbing 126,143m to summit all 282 Munros in 2020 in a blistering time of 31 days, 23 hours and 02 minutes, which included cycling and kayaking between the hills. Just one of a number of Donnie’s long-distance running achievements, it’s Donnie’s Munro Round (plus his completion of the 90km/8,500m ascent of the Charlie Ramsay Round in Winter) that impresses me most. A Scottish hillwalker for many years, I can easily relate to the playground Donnie was operating within but rather than what I expected that experience might give me, which is an appreciation of the mental toughness and physical strength it required to achieve it, I found it did nothing greater than make me gape at the size of the gulf that’s between us. Donnie’s endurance endeavours in the mountains have however encouraged me to expand my own horizons, such as teaching myself how to move more efficiently over longer distances in my local Pentland Hills, increasing the number of Munros I can summit in a single go (the most at present being 18) and been a major influence on what’s proving to be my long-term passion project outside of photography, attempting Philip Tranter’s Round.
Select work
Torridon


Cairngorms National Park


Ben Starav


Chamonix


