
Creating great outdoor sports photographs — Six things to think about

A paraglider in front of a glaciated Aiguille du Dru (Les Drus) near Chamonix in France
What makes a compelling outdoor sports photograph?
Why someone proclaims a photograph to be a ‘great photograph’ is usually a personal thing but when I see an image that really captures my attention, it’s usually because two or more things have taken place;
People — A dynamic moment has been captured, usually in a creative way.
Place — The photographer has used an inspiring location that really connects me with the scene and helps me understand what’s going on (either a location I’ve not seen before or, if I have, they’ve photographed it in a unique way).
Lighting — They’ve made great use of natural or artificial light to bring the image to life.
With the above in mind, here’s 6 tips you can apply when taking outdoor or adventure sports images, to help you catch people’s attention.
1.) Set yourself up for success

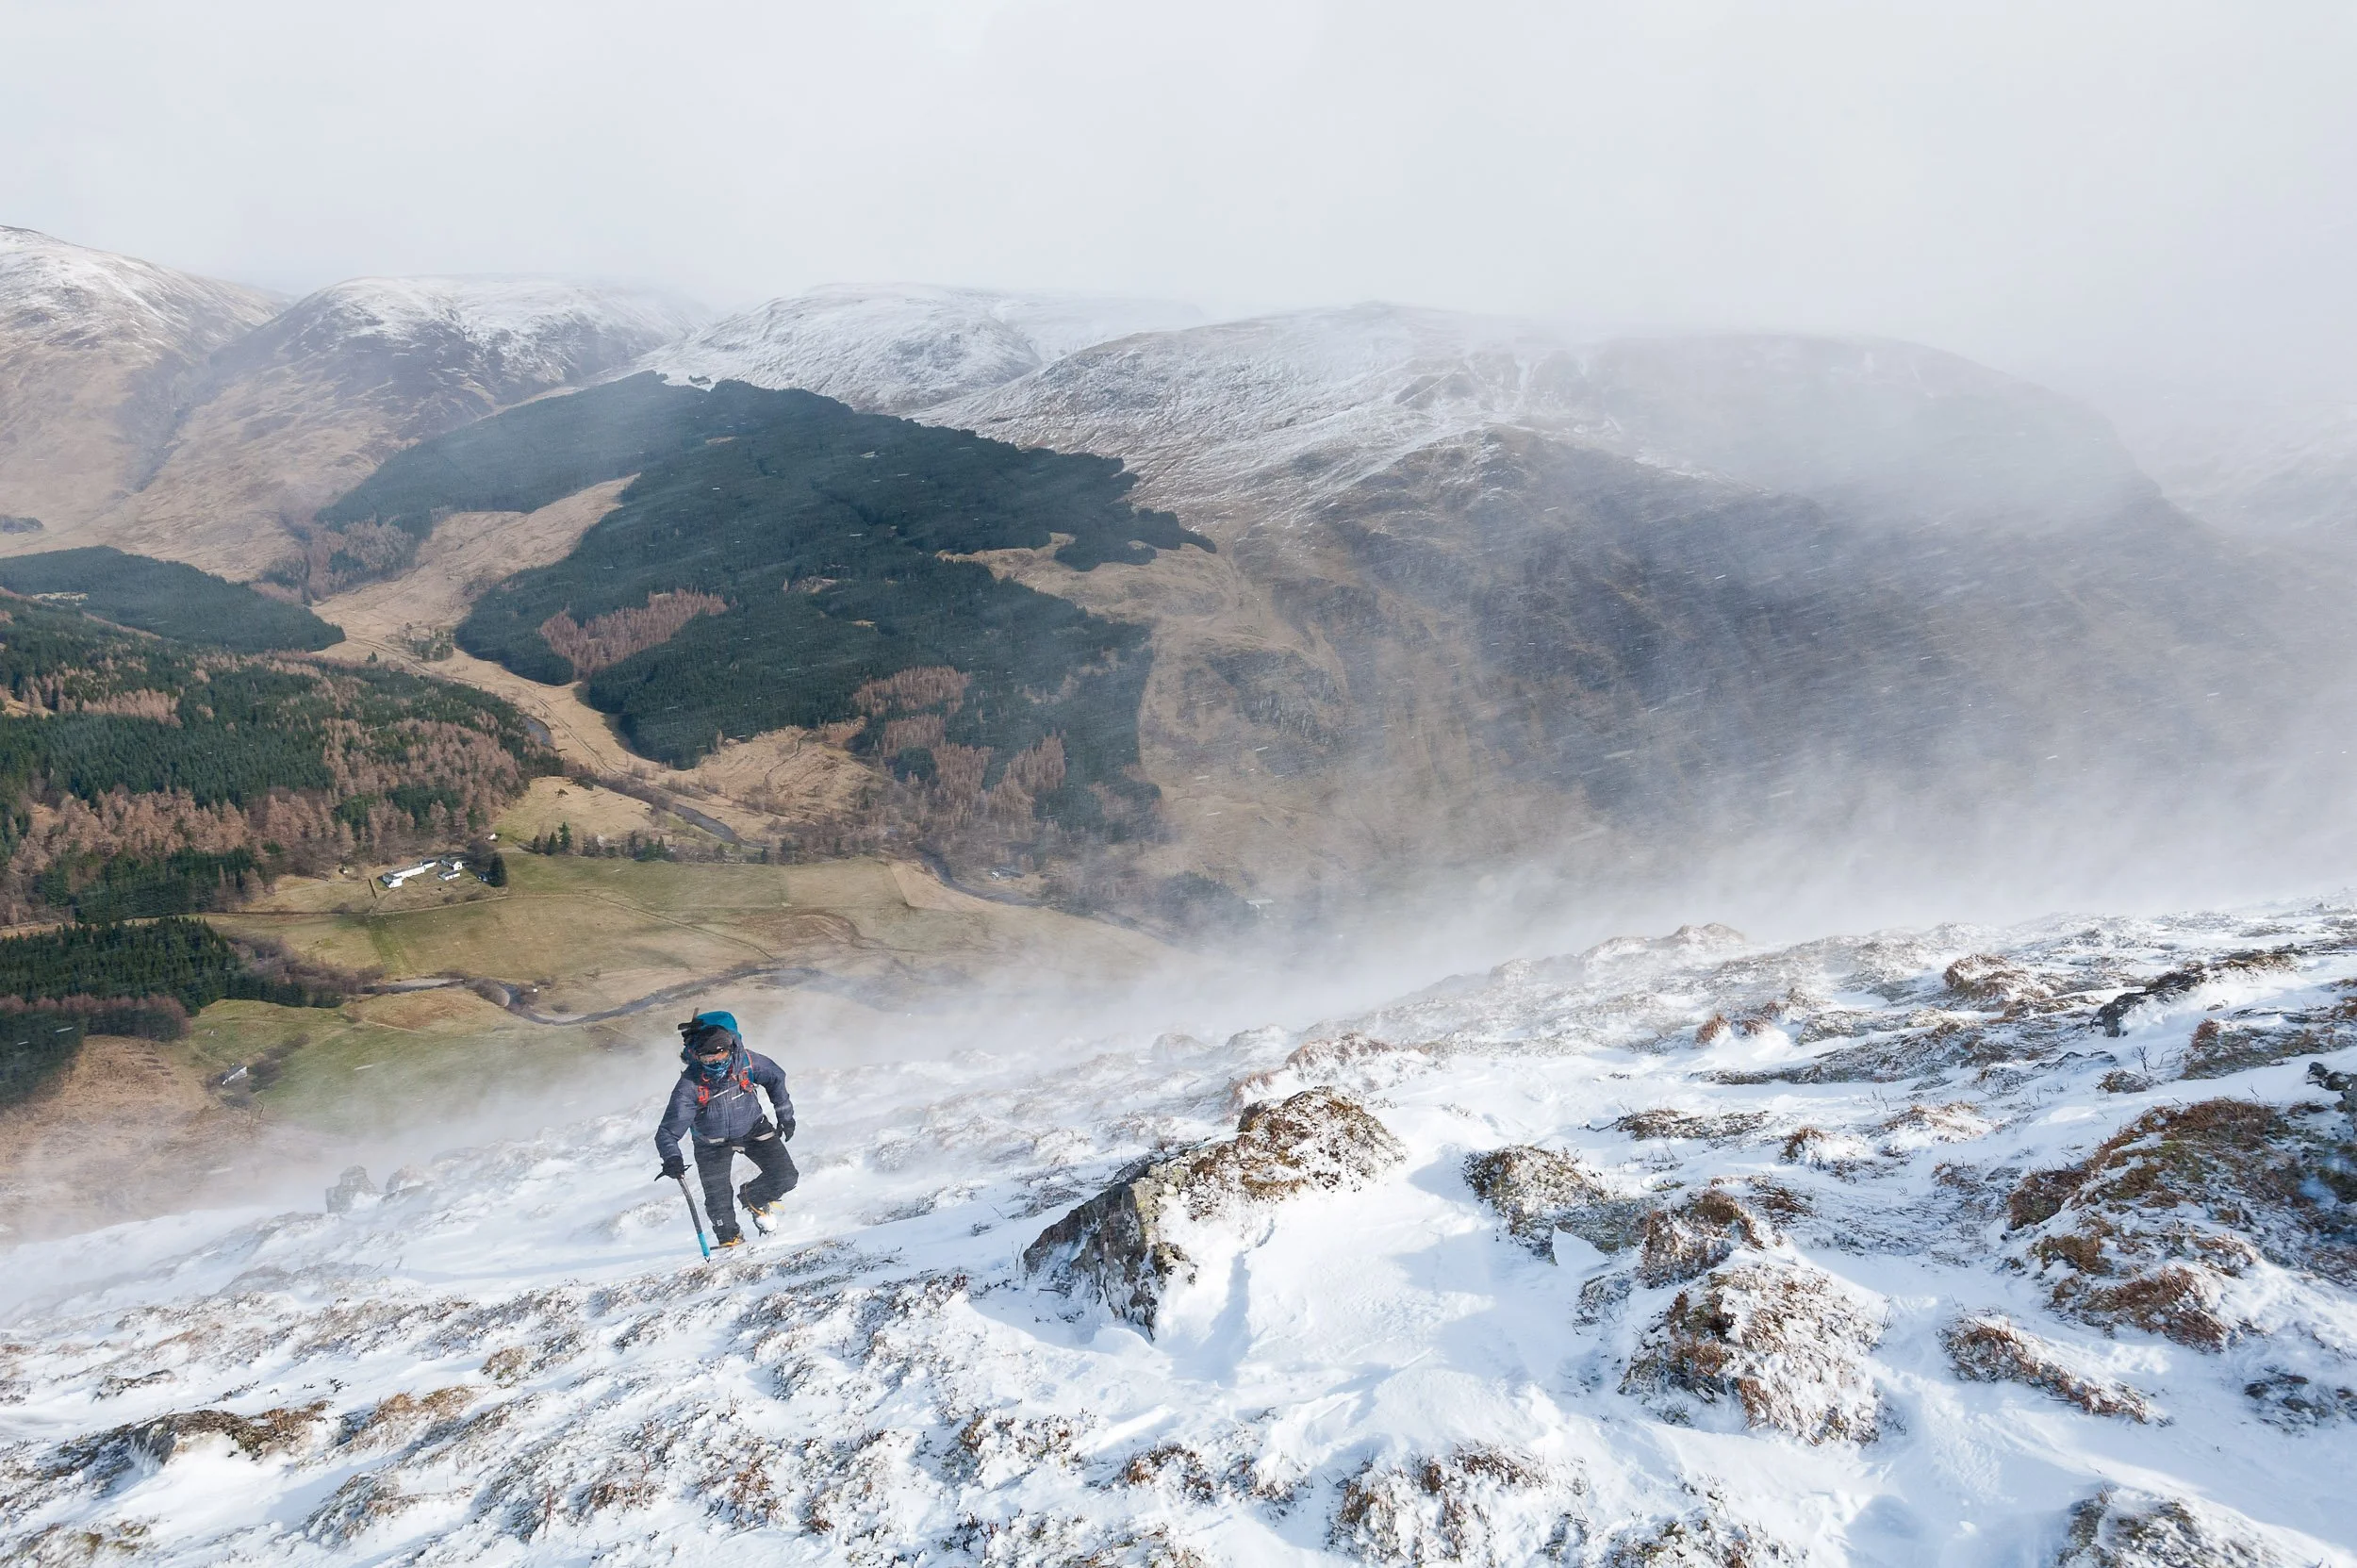
Anthony Meyer preparing his trekking poles for balance on a snowy, windy and wild Winter’s day out walking in the Scottish Highlands
A tedious opener, to be sure, but this is the only tip that’s related to the type of camera you have (e.g. a DSLR, mirrorless or compact camera which enables you to change camera settings). If you’re using a mobile phone, feel free to skip ahead.
a.) Prioritise a high shutter speed — I’d always recommend opening your camera manual and understanding how things work, if you don’t already. This will enable you to move out of Auto mode and optimise your chances of creating great outdoor or adventure sports images.
Shutter speed priority is a good choice initially, along with an understanding of ISO, so you can maintain the high shutter speeds required to freeze action. You can use slower shutter speeds, e.g. to express movement or when experimenting with panning techniques but if you don’t keep your shutter speed up, you’ll most likely have lots of shots of out-of-focus athletes.
Common shutter speeds for outdoor sports are;
1/2000s to 1/500s — Athletes moving quickly (e.g. running, swimming, mountain biking, etc.)
1/500s to 1/250s — Athletes walking (e.g. hiking, backpacking)
1/60s to 1/15s — Panning shots
b.) Shoot in burst mode — Professional outdoor sports photographers take a lot of shots. I’ll commonly shoot 1,000+ frames in a shoot where the athlete is moving quickly (and more if need be). A primary reason I do this is I’m looking to capture the athlete in the most dynamic pose for that sport. Whether it’s hiking, running, cycling or swimming, there will be certain body postures or movements a talented or elite athlete will repeat which look entirely natural and which epitomise the sport. (In trail or mountain running, for example, there are perhaps two moments in a stride that look hero worthy — the rest I often simply delete straight away). Shooting in burst mode maximises the chances you’ll capture those two moments.
c.) Use continuous auto-focus — Set your camera to continually auto-focus as you depress the shutter. Take lots of shots but don’t just ‘spray and pray’. Give your camera a chance and part depress the shutter long enough for it to to secure focus on the athlete before you actually shoot. Then take your burst of shots, giving yourself the best opportunity to capture the moment you’re looking for.
2.) Shoot sports you know
David Hetherington ascending the Scorrie on Driesh, a Munro in Cairngorms National Park, Scotland
Outdoor and adventure sports such as running, hiking and cycling all have pivotal moments that help define the sport (e.g. a whitewater kayaker powering through a foamy wave with one paddle in the air and the other immersed in the roiling water). If you shoot sports that you know, you’ll appreciate when these occasions are going to arise and it’s easier to anticipate the action. If you don’t know the sport, you can study videos or pictures of it online, or simply watch someone before you take photographs (contact your local sports club or team and see if you can make friends with who they view as the elite members). Establish the type of pictures you like, and why, practicing initially to emulate those shots before you advance and progress to your own style.
3.) Choose great locations
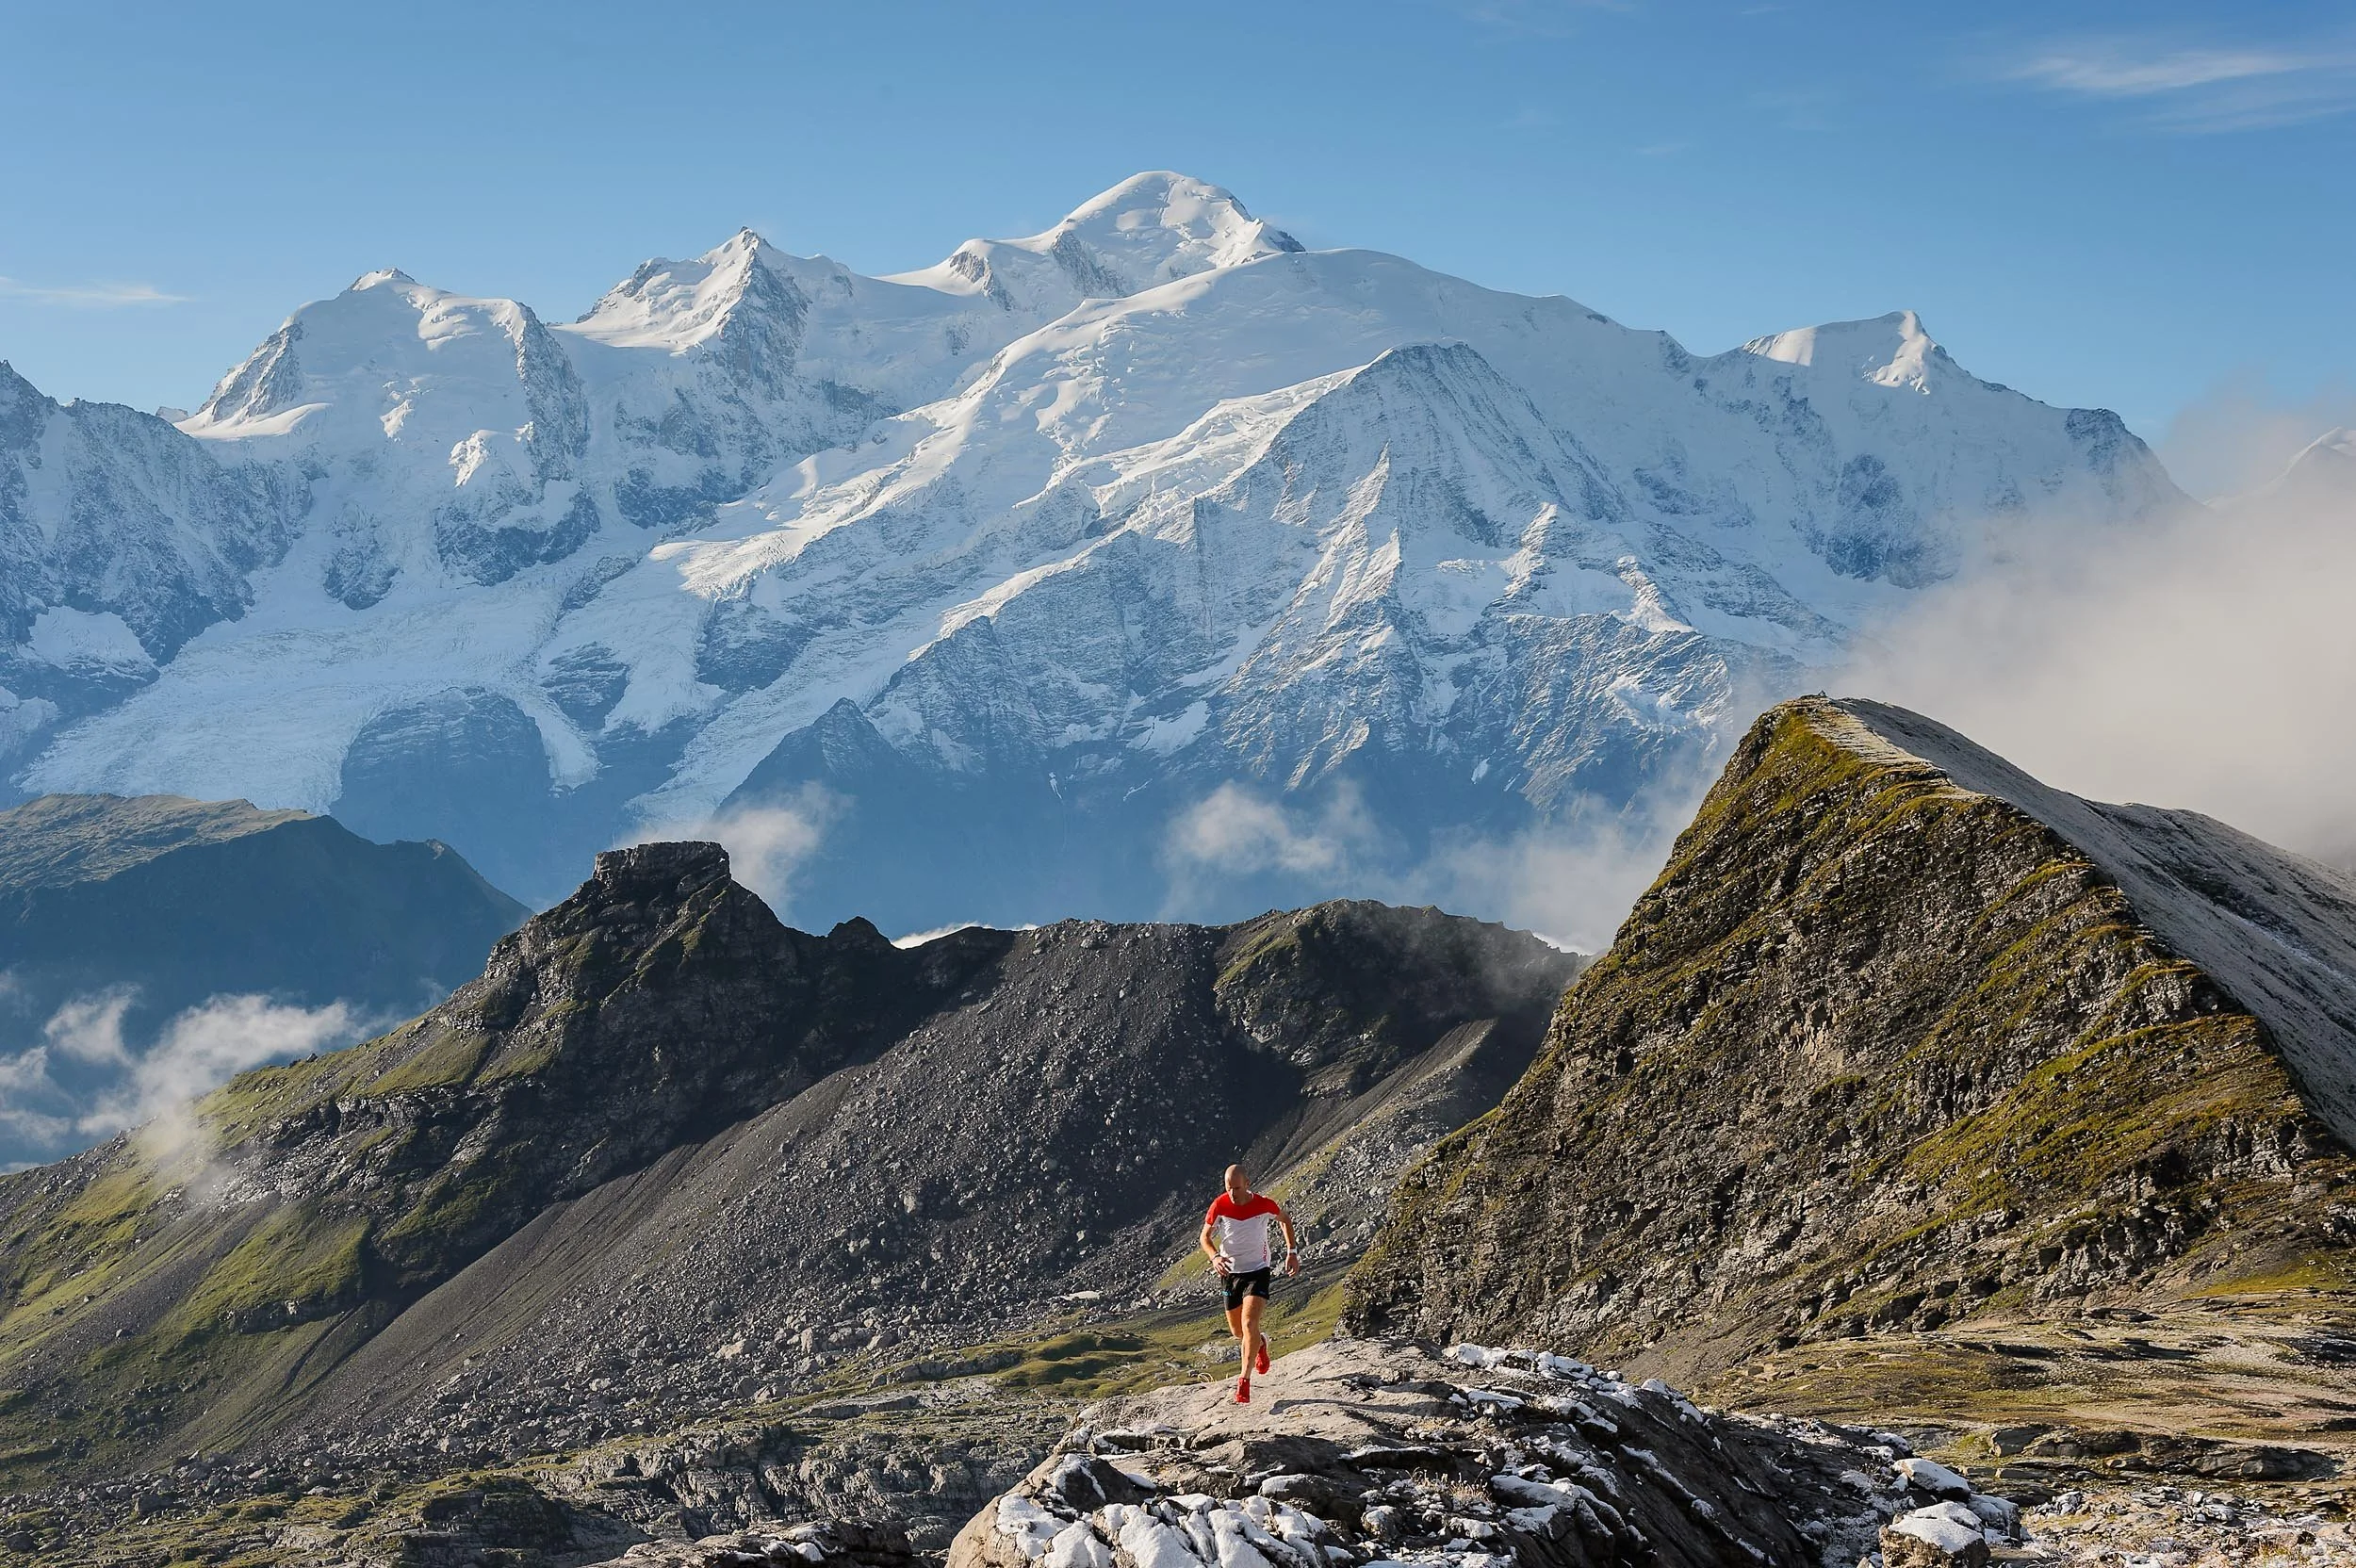
Donnie Campbell running at Désert de Platé near Chamonix, with Mont Blanc in the background
The internet is such a valuable resource these days for a landscape photographer and there’s many useful tools that will aid your planning (such as Google Maps, Google Images, Fatmap and the Sunseeker mobile app or Photographer’s Ephemeris). You can research in detail exactly which locations should be worth going to and when, with the huge advantage of knowing in advance where the light will fall. A great deal of work can be done at home or in the office and if you’ve planned correctly, it’s hopefully simply a case of waiting for a spell of good weather.
Once I’m on location, I’ll almost always start by thinking about the landscape first and then framing my images based on what I see in front of me. If I want the landscape to be a key element in a shot, say on a trekking or a mountain biking shoot, I’ll look for things that help bring depth to a scene (e.g. something in the front, middle and back of the image) and I like to have a strong horizon, such as a rocky mountain ridge, that helps me to offset an athlete in the frame. On a surfing shoot, where the landscape may be less of a priority, I’ll look instead to where the waves will break in a frame, so I can position the surfer accordingly. Whereas on a shoot with lots of graceful movement, say for a yoga or capoeira shoot, where I’d prefer to focus on the detail, I’ll choose to ignore the landscape altogether and focus completely on the athlete.
4.) Prioritise good light
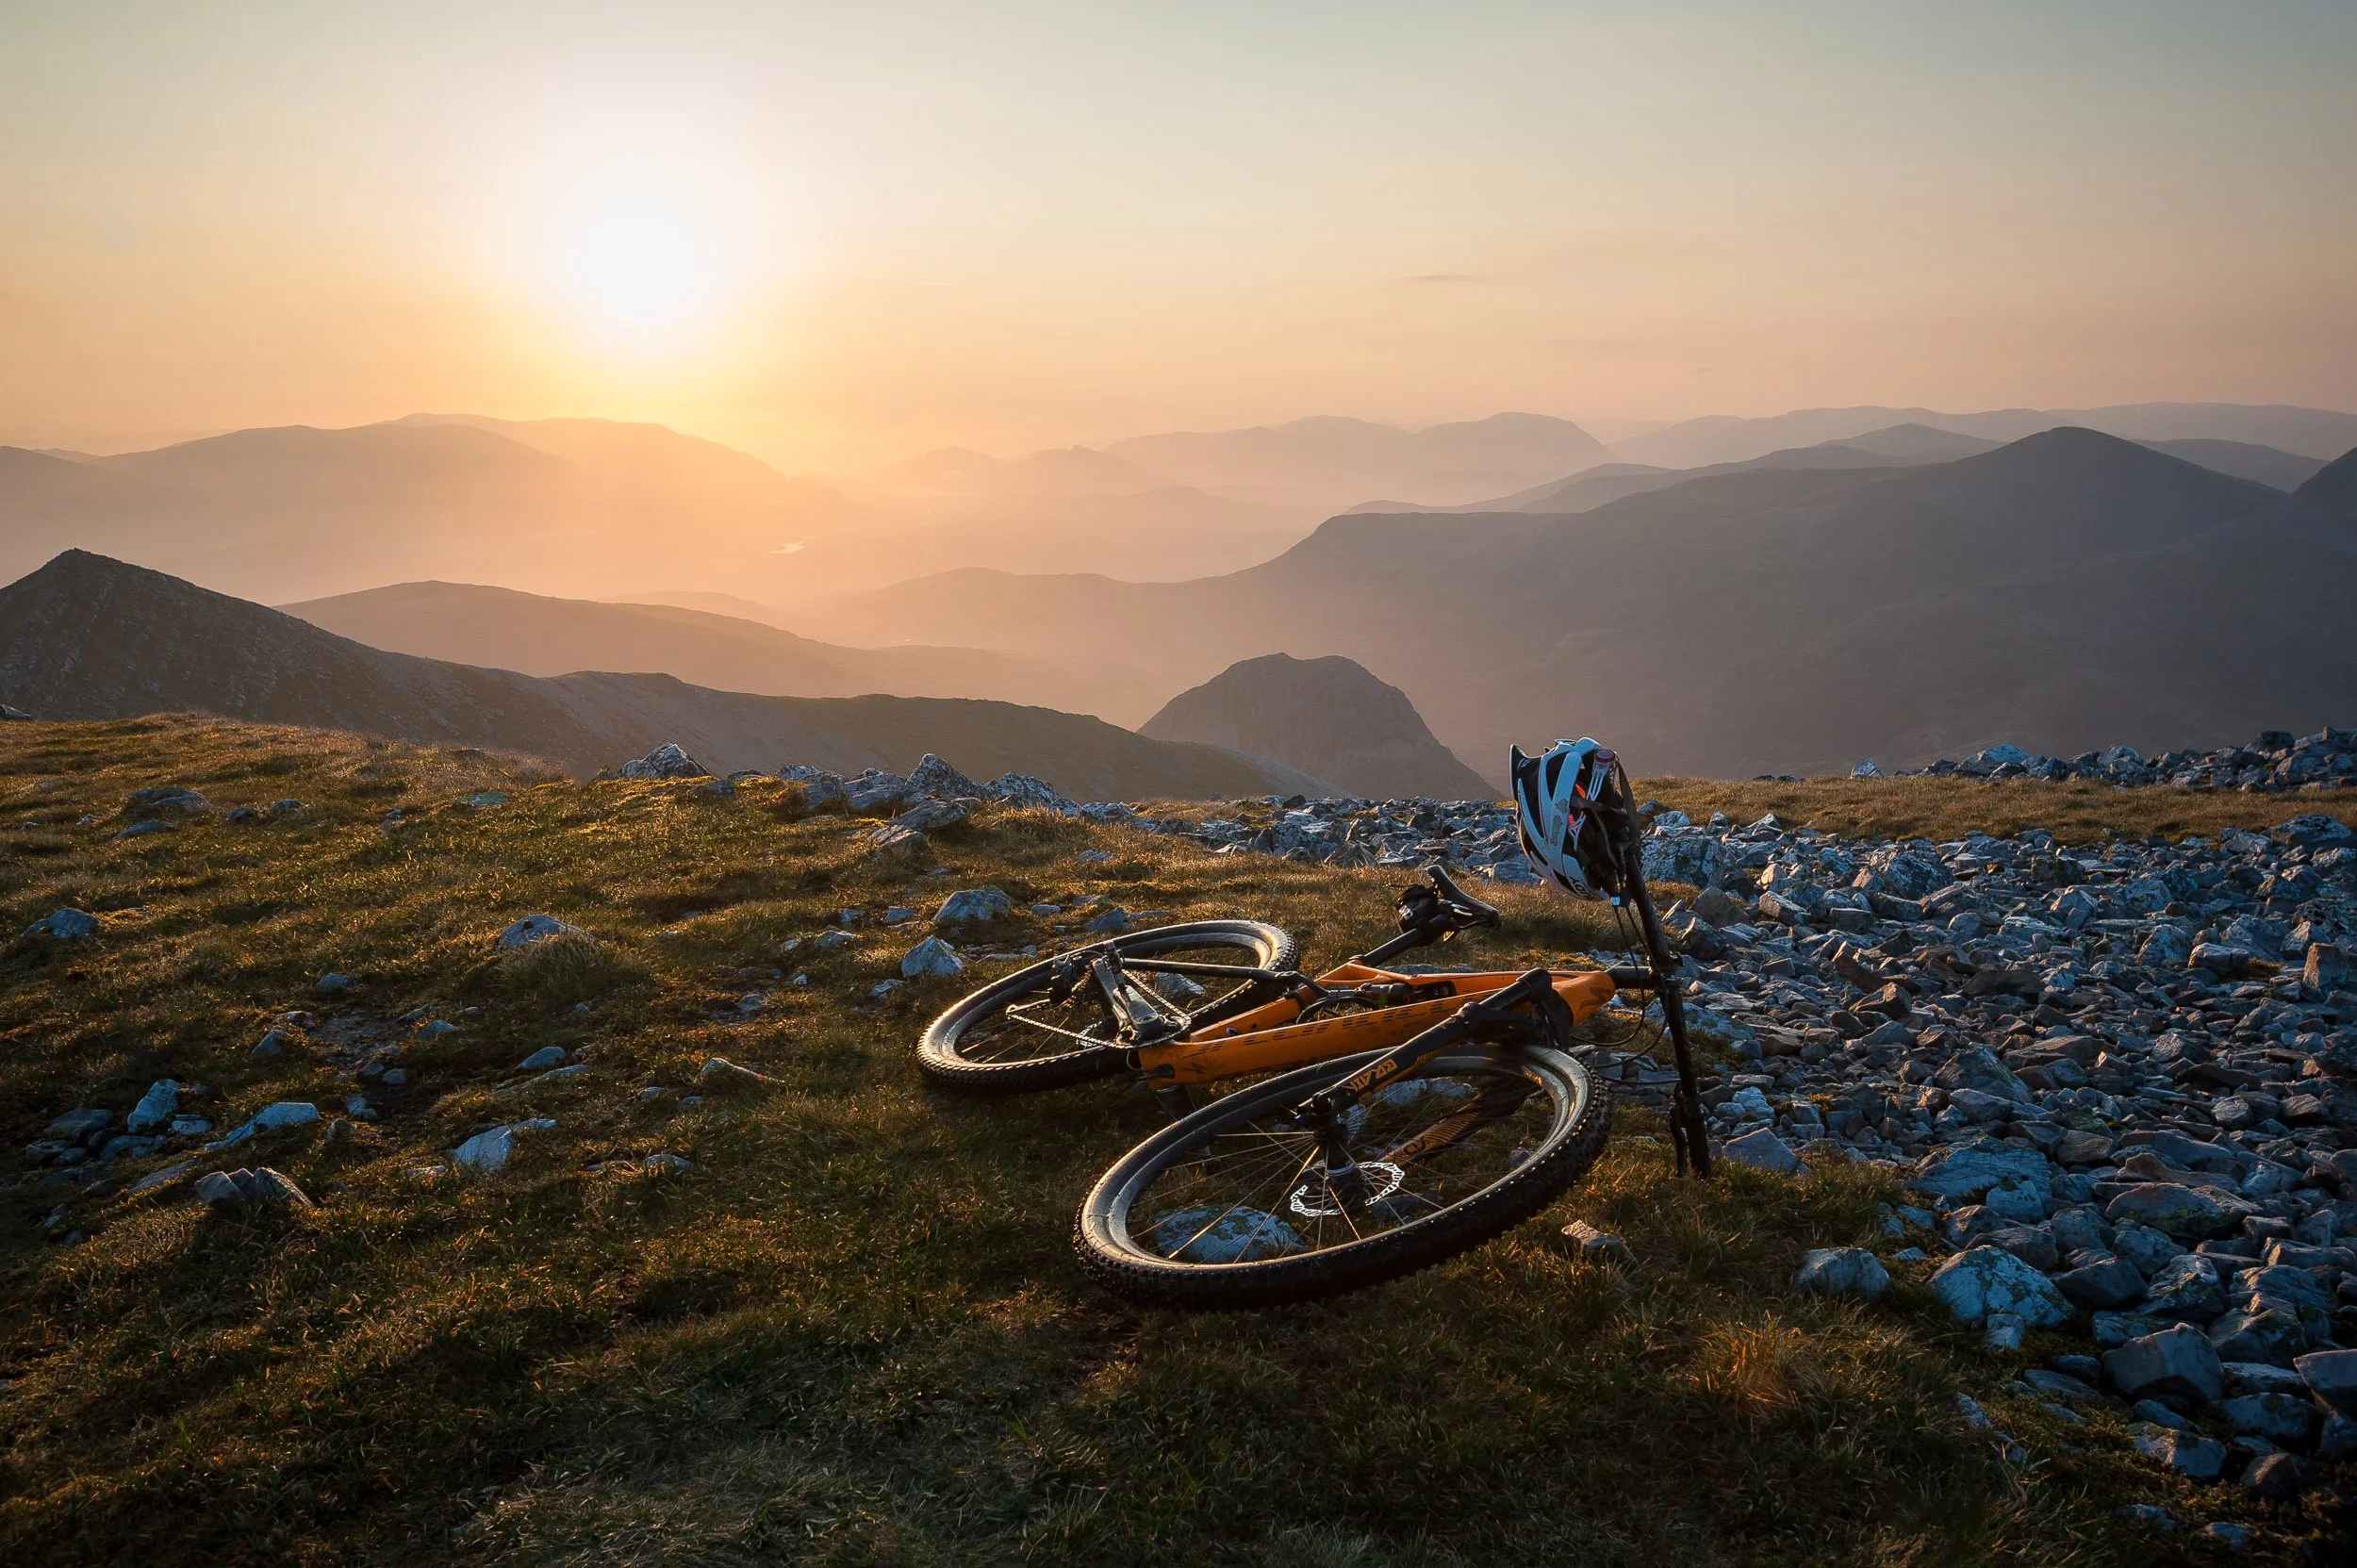
Mountain biking on the Grey Corries in the West Highlands of Scotland
Very simply, get up early and stay out late. Then get up early again the next day. Maximise the time you’re out shooting when the light is good. Don’t discount days when it’s really cloudy, as the sun can break through and shine magical light onto your scene in seconds. Consider adding your own light if the weather, or your vision, warrants it (for example, using a reflector or an off-camera flash to call attention to a certain part of the image, such as an athlete’s face or clothing).
Technology-wise, mobile apps such as Sunseeker are indispensable. They show the trajectory of the sun through the day, and more. When you’re researching a location, or you’re on location, think about where the sun currently is and where it’s headed. At dawn and dusk, an obvious position to place yourself would be facing east or west. Consider though positioning yourself at right angles to the sun or even shooting right into it, and see what drama it adds.
5.) Try different angles
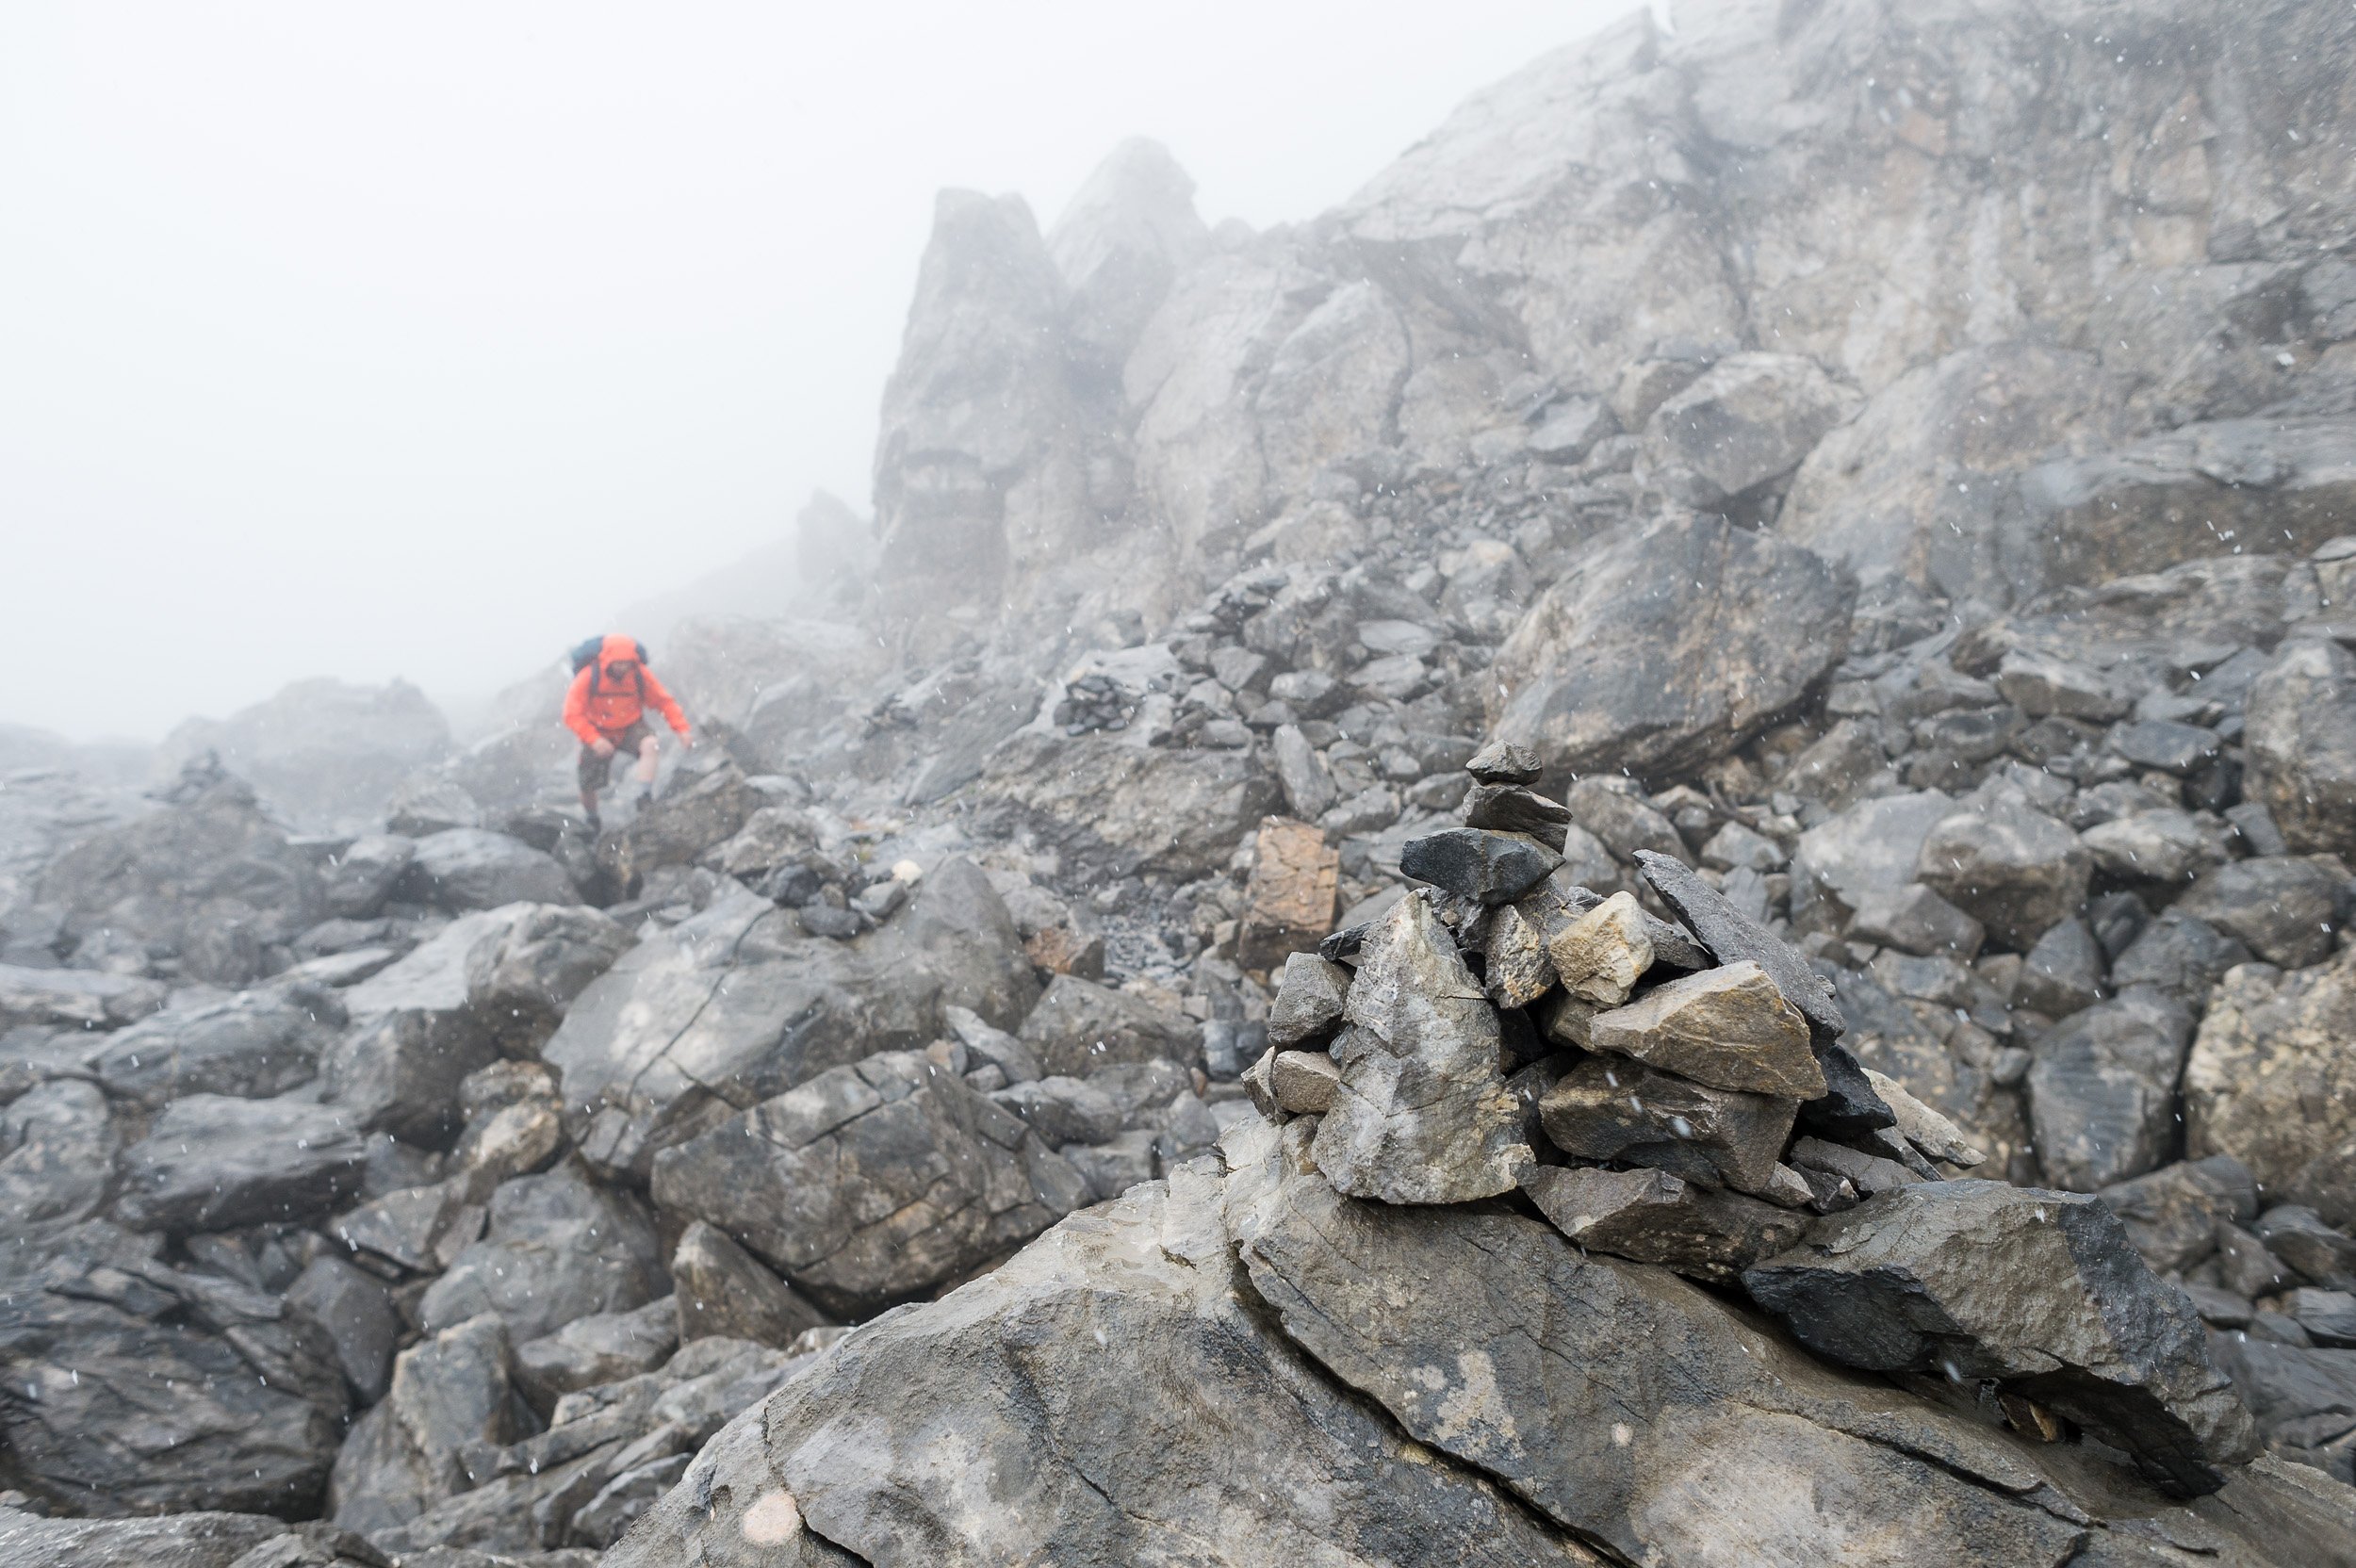
Alexis Basso trekking across the rocky boulder field en route to Col de la Portette and Refuge de Platé near Passy Plaine-Joux, France
There’s no specific position I’ll put myself in when taking a shot. I do though like being above a person so I will often look out rocky outcrops that I can climb upon and take in more of the scene. If there’s nothing suitable, I’m not averse to bringing a step ladder with me, if the location accommodates it. Or standing on the roof of a vehicle. One tip I’d share would be to try and get yourself into a position that someone taking a snapshot of the scene wouldn’t think of. Get up high or lie on the ground. Do both. And then try something else (such as using an element in the landscape as a foreground). Move around — consider a full 360 degrees — and seek to maximise the shot potential in every scene.
6.) Focus on composition
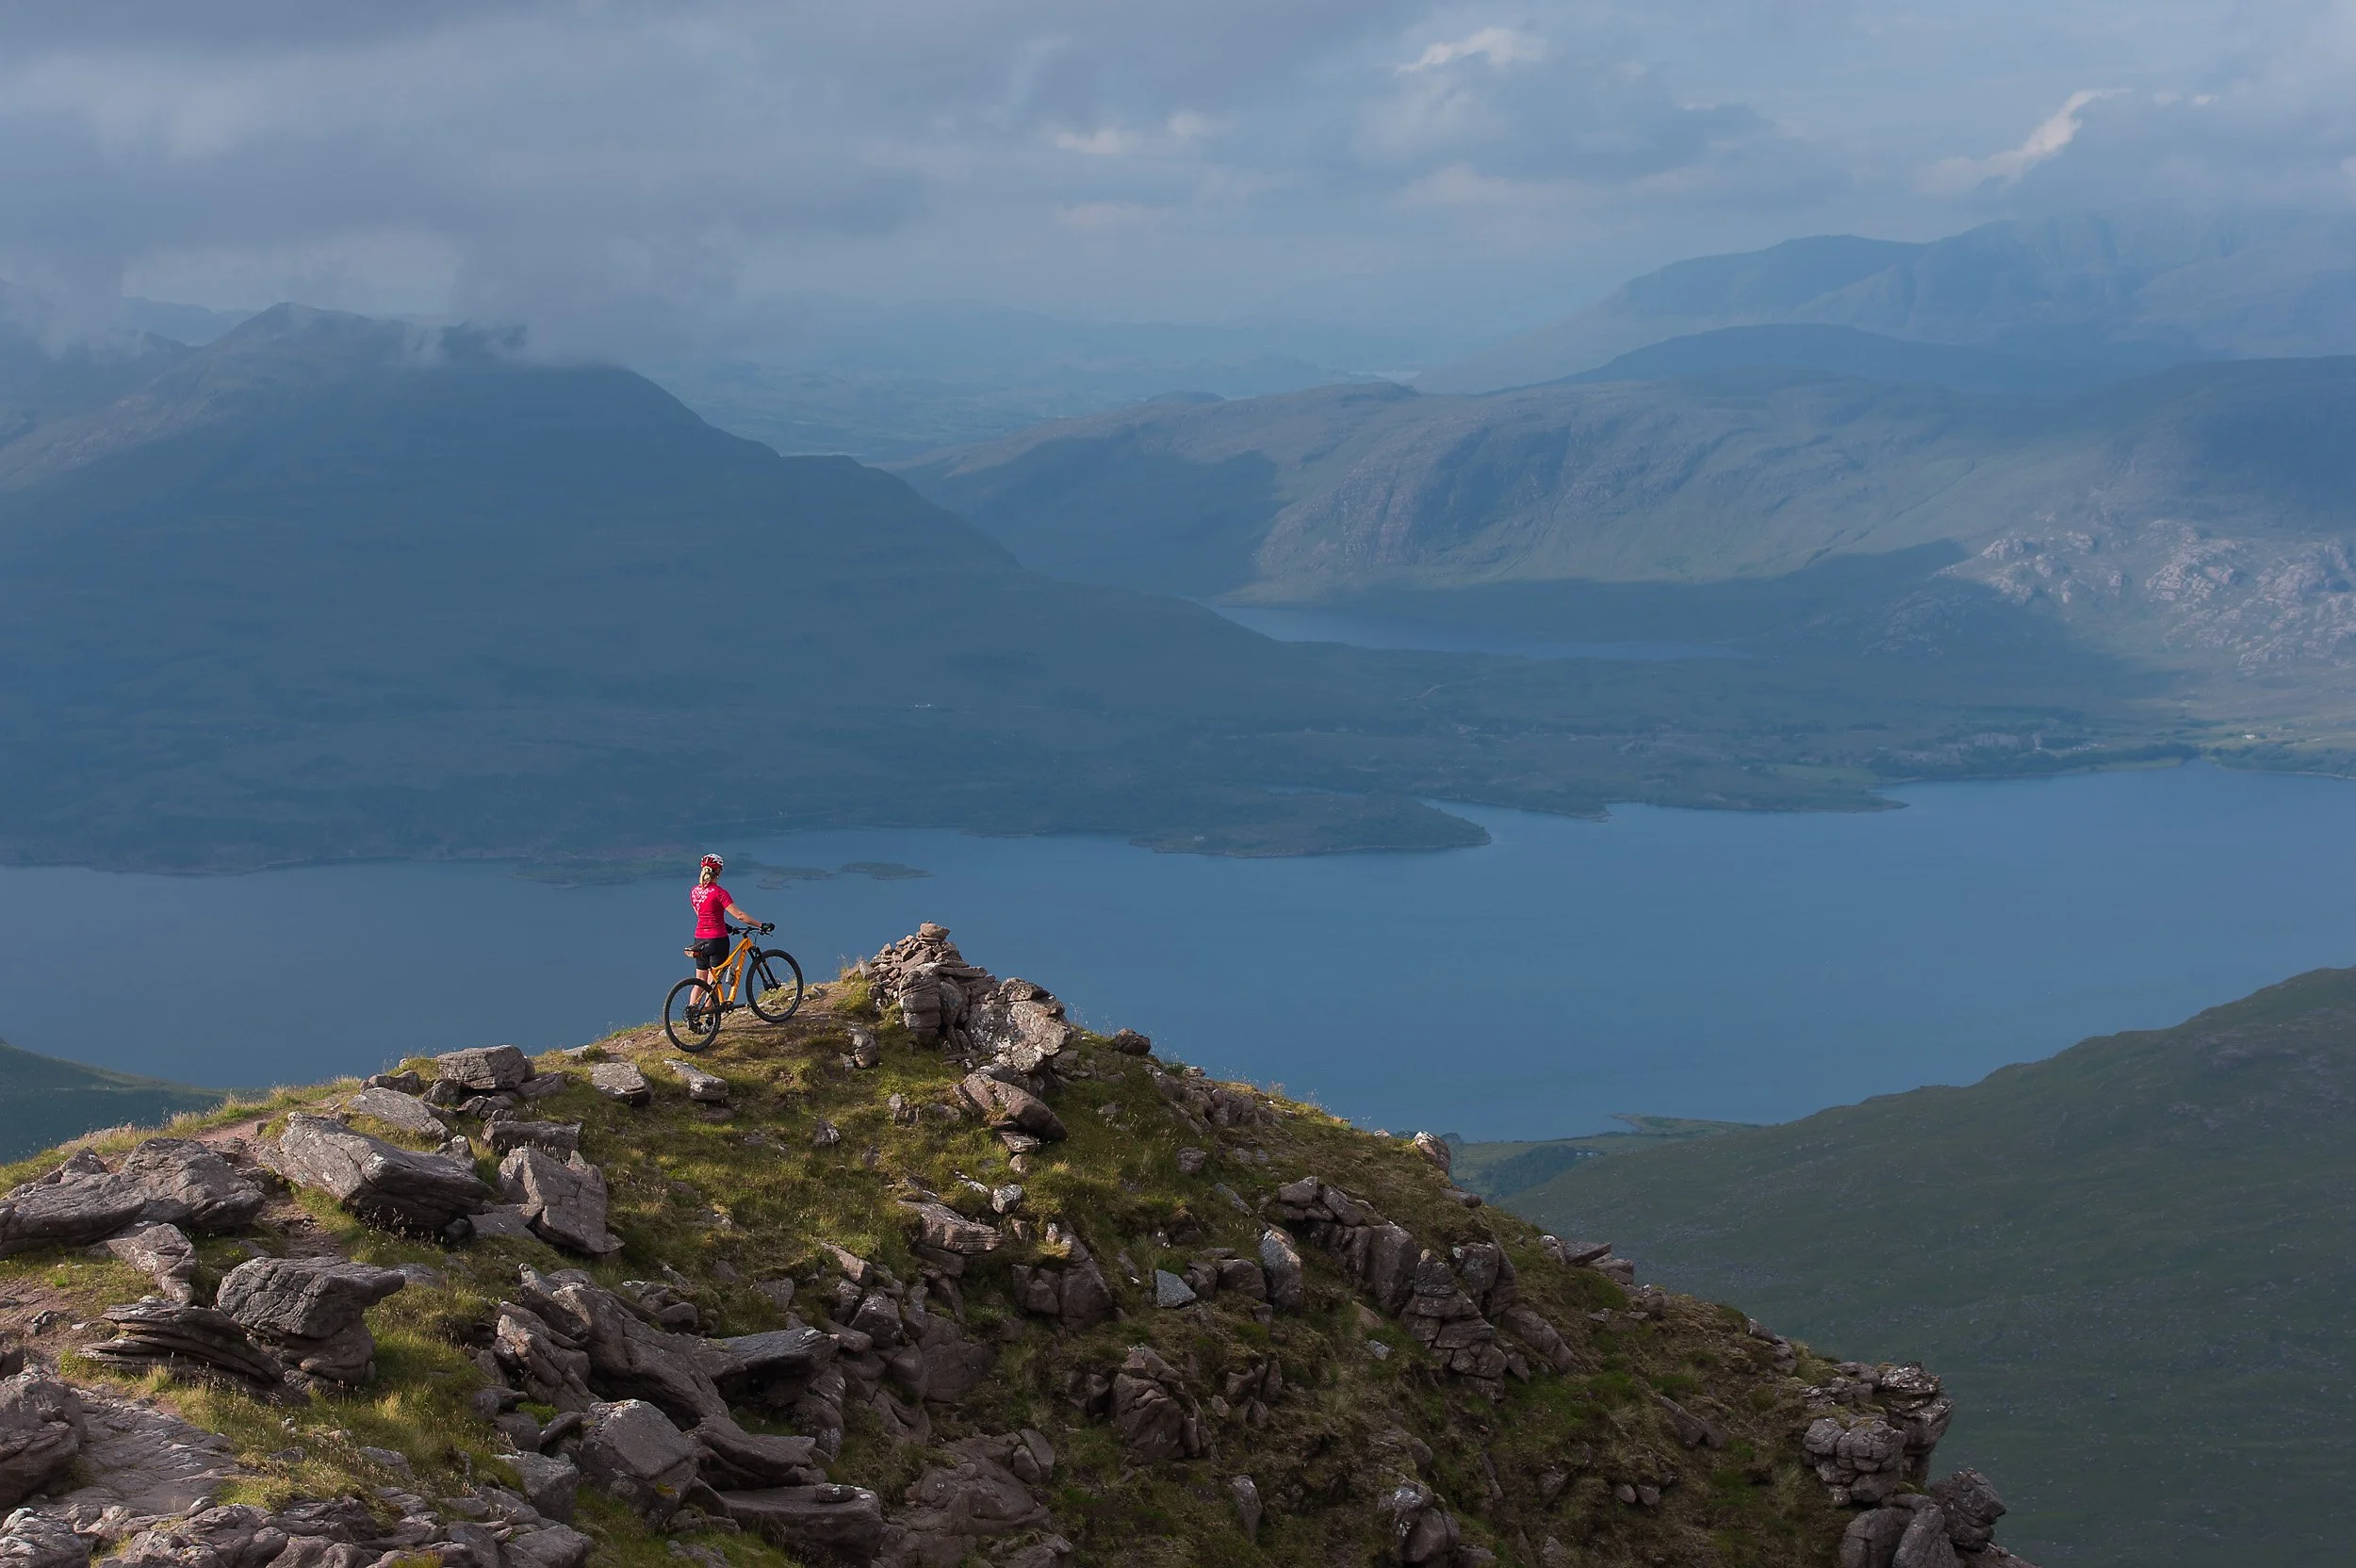
Gore-sponsored endurance athlete Naomi Freireich mountain biking on Beinn Alligin, a Munro in the North-West Highlands of Scotland
Once I’m happy with how I’ve framed the backdrop, I’ll consider how best to position a person or persons within it. When composing an image, I like simple backdrops, with no distractions around the athlete and really clean edges to the frame (which I think is super important — distracting elements at the borders of your image can take your viewer’s attention away from the key element, i.e. the athlete). To help you picture where I add people into my shots, think of an imaginary grid. My aim usually is to position folk on the horizontal and vertical intersections, either entering or exiting the frame. But I’m not averse to placing athletes right into the middle of a scene, if I feel it looks good.
Key takeaway?
Practice and master the above until it becomes second nature so you can free yourself up to focus on your creativity, seeking out moments which can help you to stand out from the rest
Appreciate that, other than exposure, there’s no real right or wrong. Try different things and see what happens. Take lots of shots and share them widely. Gather feedback and keep learning (and, above all, enjoy the process).

A Peale’s dolphin leads Team East Wind as they sea kayak on the Strait of Magellan in Chile, Patagonia, during the Patagonian Expedition Race